Pitch shifting and time stretching are two of probably the most generally used sound design strategies.
Usually pitch shifting is used to change the pitch of an audio pattern whereas conserving the period of the pattern unchanged.
Time stretching alternatively is used to change the period of the pattern with out altering its pitch.
On this information, we’ll discover collectively some inventive strategies past BPM and key matching, equivalent to:
- Tips on how to time stretch and pitch shift samples in FL Studio and Ableton Stay
- Fascinating methods to create distinctive atmospheres by excessive time stretching
- The facility of harmonizing your melodies by hacking pitch stretching algorithms
- And much more
Let’s dive in! When you want some samples to get began with, be certain to take a look at our Foley Pattern Pack – stuffed with sounds which can be able to stretch and course of! ?
What Do We Imply by Pitch Shifting and Time Stretching
Earlier than diving into sensible suggestions, a little bit refresher. When you’ve ever had a physics 101 class, it will in all probability convey again some (doubtlessly painful) reminiscences.
Frequency is measured in hertz (Hz), which is only a fancy means of defining the variety of cycles per second of a given waveform. One hertz equals one cycle per second, so the next variety of hertz means extra cycles per second, which the human ear will translate into the next pitch.

Visually, the next frequency will subsequently translate right into a extra “squeezed” waveform, whereas a decrease frequency will look extra spaced out.
Intuitively, you may see that when you stretch out (i.e decelerate) a waveform, you’ll decrease its pitch. When you velocity up an audio pattern, you’ll elevate the pitch. For this reason pitch shifting and time stretching are two sides of the identical coin.
Via technological improvements, we will now time-stretch with out altering the pitch, or change the pitch with out altering the period of the audio. That is what is often referred to when speaking about pitch shifting and time stretching, and it opens up a world of prospects.
A fast disclaimer that pitch shifting is totally different from frequency shifting. Whereas pitch shifting will maintain the harmonics in step, a frequency shift will transfer the basic and each harmonic by a sure variety of Hertz, which means the harmonics are now not multiples of the basic, and therefore lose their musical properties.
Tip #1 : Pitch Shifting in FL Studio and Ableton Stay
First let’s take a look at easy methods to use pitch shifting in two of the preferred DAWs: FL Studio and Ableton Stay. We can be utilizing solely inventory plugins in these examples, so you may simply comply with alongside.
Pitch Shifting in FL Studio
There are a couple of methods to pitch shift audio in FL Studio, however one of many best methods is to go immediately into the Audio Wrapper of your pattern by double-clicking on it.
Within the top-right, you will note the Time stretching part.
Choose Auto mode. It will by default choose the perfect audio preservation algorithm primarily based in your pattern. You’ll be able to then alter the Pitch knob to the specified pitch. Every 100 cents increment corresponds to 1 semitone, so in case your pattern is in F#m and also you want to pitch it as much as Am, then flip the Pitch knob up by +300 cents.
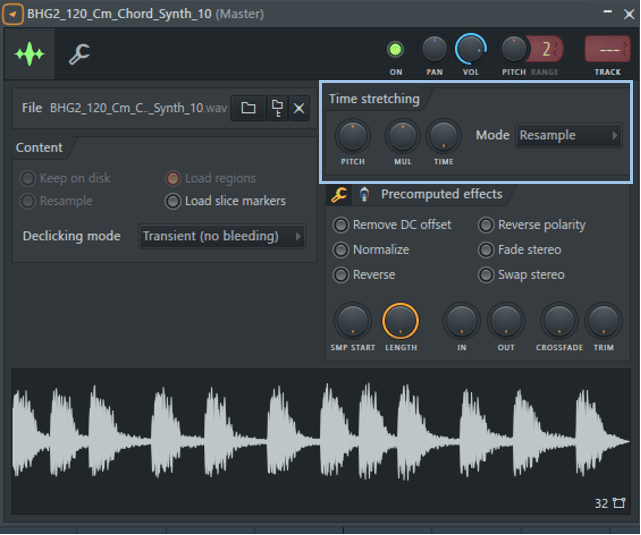
Be happy to experiment with totally different modes, as some would possibly work higher on samples with excessive transients (equivalent to drums). The e3 mono mode is very fitted to vocals and different monophonic enter alerts.
Pitch Shifting in Ableton Stay
In Ableton Stay, pitch shifting is achieved by its well-known Warp mode. Within the Pattern tab of your audio clip, choose Warp. Just like FL Studio, Ableton Stay gives totally different time-stretching modes. For the perfect audio preservation, choose Complicated Professional, then alter by the specified quantity of semi-tones.
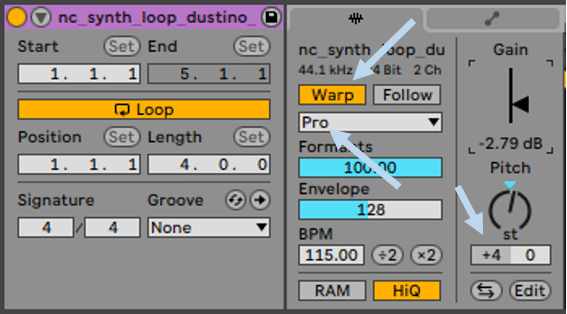
You too can alter the Cents knob when you want to pitch by an interval smaller than a semi-tone.
Totally different time-stretching modes will work higher with totally different audio sources. Choose Beats if the rhythm is predominant in your pattern, or Tones for monophonic samples.
Really helpful: How To Use Ableton Stay – The Producer’s Information
Tip #2: Time Stretching in FL Studio and Ableton Stay
As talked about above, pitch shifting and time stretching are two sides of the identical coin. A lot of the controls described under will subsequently be just like what we’ve already lined about pitch shifting.
Time Stretching in FL Studio
Open up the Audio Wrapper by double-clicking in your audio pattern. Choose Auto mode, and alter the Time knob to make your pattern match the specified tempo.
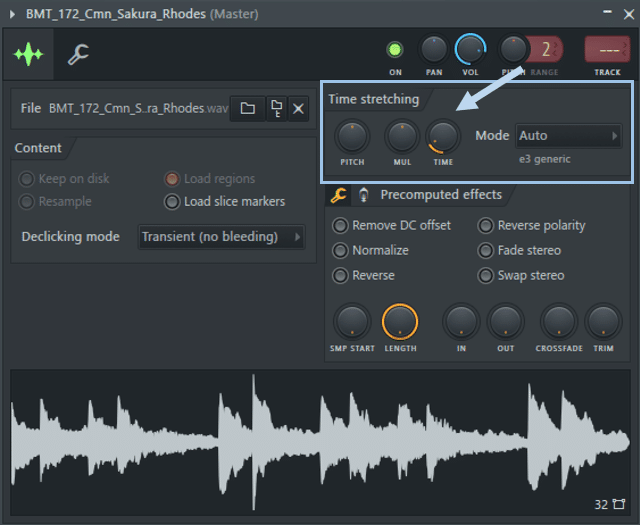
In observe, there can be a set BPM you’ll want to match your pattern to. A straightforward means to do that is to pick Bar within the Snap to grid choices.
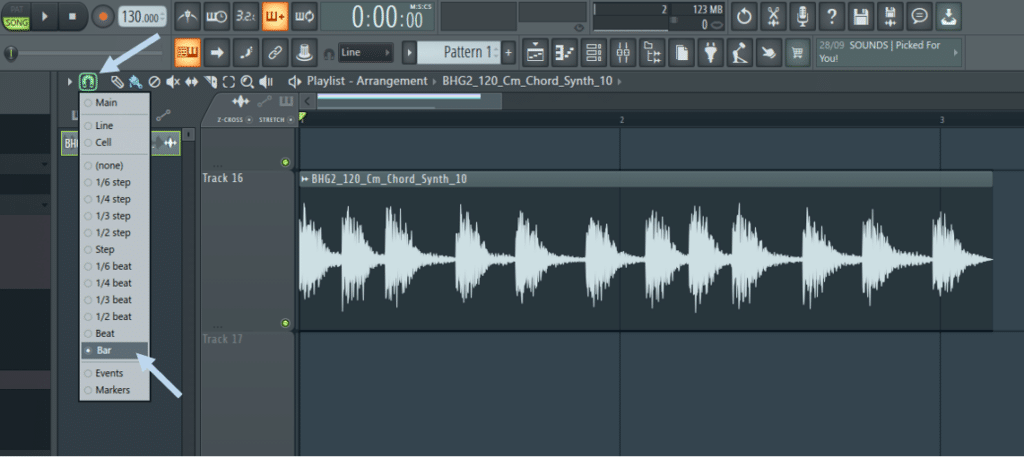
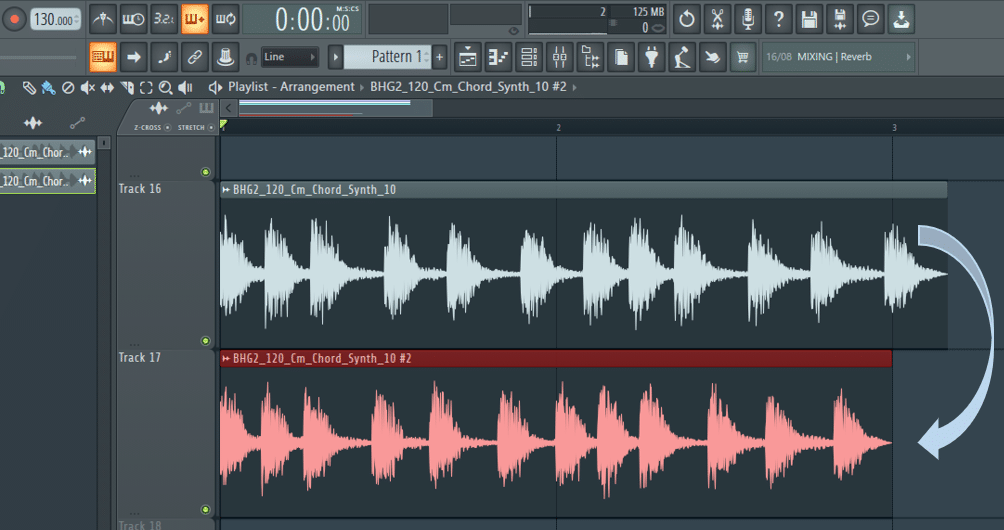
Within the above instance, our pattern is at 120BPM, however our challenge is ready at 130PM. To make the pattern match the grid, merely double-click in your audio pattern, choose Auto mode and alter the Time knob till it snaps to the grid.
When you don’t know the tempo of your pattern, you need to use FL Studio’s built-in Tempo detection to seek out it for you. Click on on the waveform icon within the top-left nook of your audio pattern and choose Detect tempo.
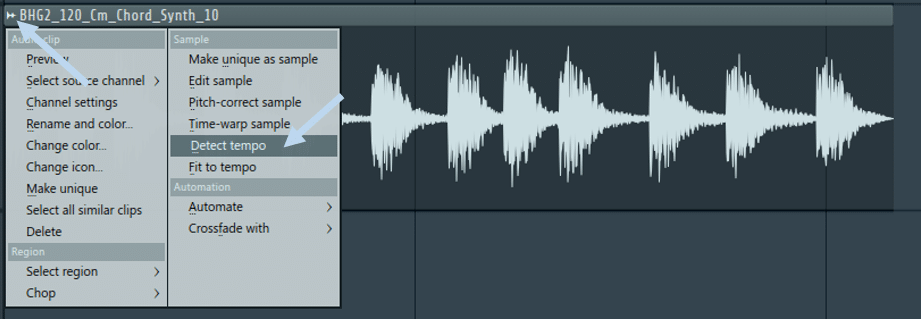
Enter probably the most possible tempo vary your pattern is ready in (100 to 200 BPM is often an excellent guess). As soon as the tempo has been detected, return to your pattern, click on on the waveform as soon as once more, however this time choose Match to tempo. Click on Kind in (BPM), kind within the tempo of your pattern (not the tempo of your challenge!), and your pattern ought to now be in time.
Time Stretching in Ableton Stay
In comparison with FL Studio, Ableton makes it rather a lot faster to time stretch samples in time along with your challenge’s BPM. Merely activate Warp within the Pattern tab of your audio clip, then choose the algorithm most suited to your pattern as defined beforehand.
The pattern will now play in time along with your challenge, even when you determine to alter the challenge’s BPM.
Nonetheless, a key characteristic of Ableton Stay’s Warp perform is the power to set Warp markers, as we’ll discover within the subsequent part.
Tip #3: Warp Markers in Ableton Stay
A key characteristic of Ableton Stay’s Warp perform is the power to set Warp markers. Let’s take a look at these intimately.
By zooming into the Clip View, you will note gray triangles known as transients markers. As their identify suggests, these markers point out the transients of your pattern.
By double-clicking on one in all these markers, they grow to be a warp marker, permitting you to time stretch or condense particular areas of your pattern.
Let’s give it a pay attention:
This may both be used for corrective functions (equivalent to for a vocal take) or to create completely new patterns.
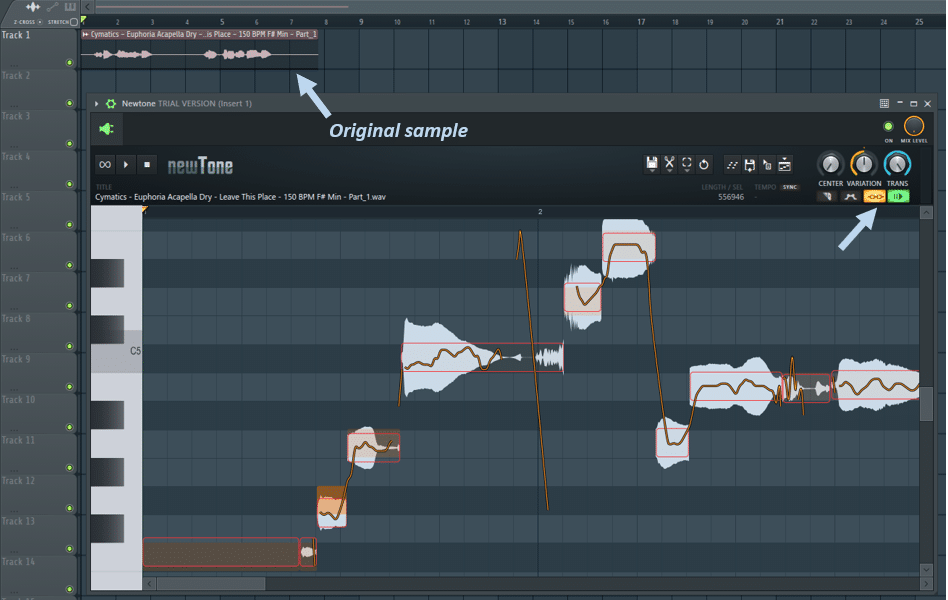
Tip #4: Harmonizing with NewTone (FL Studio)
Harmonies are a necessary constructing block of up to date music. Typically hidden within the background or barely noticeable at first pay attention, harmonies present richness to your melodies and can assist improve your preparations with out the necessity for brand new parts.
Though NewTone is generally used for pitch correction, it will also be utilized to shift the whole pitch of a vocal pattern, thereby creating model new melodies. Let’s take a look at easy methods to simply harmonize vocals.
First let’s have a pay attention on the unique vocal pattern:
Firstly, merely drag your pattern into NewTone. It would mechanically minimize your pattern up into totally different syllables and their respective notes:
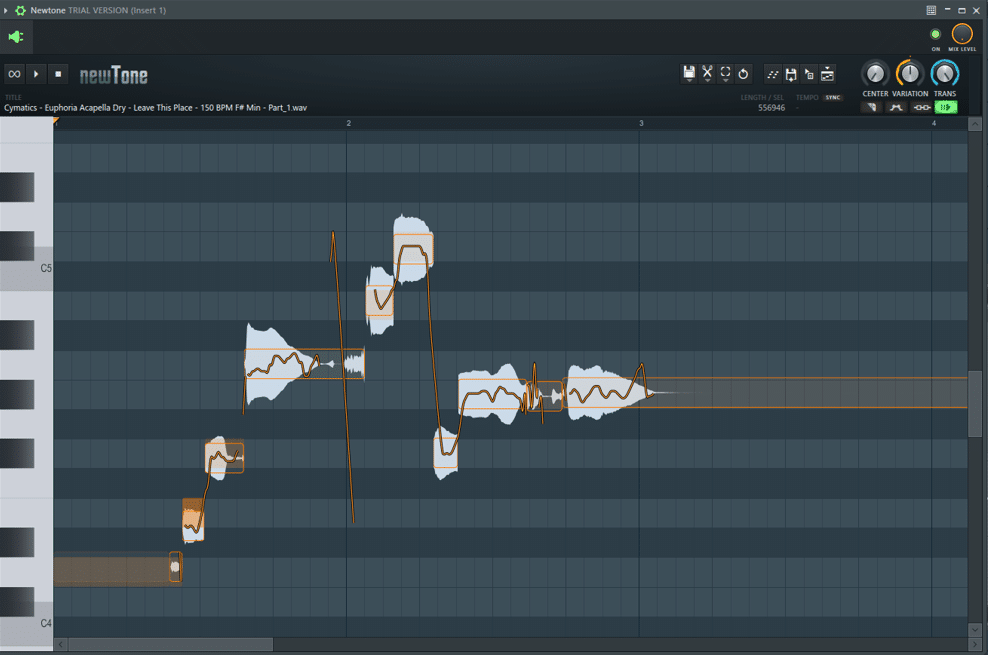
Earlier than we begin creating harmonies, ensure you have Slave playback to host enabled. It will will let you monitor in real-time how your harmonies sound on high of the unique sound taking part in within the playlist
There are various methods to jot down harmonies. You’ll be able to go by ear, or you need to use a little bit little bit of music concept. With out diving too deep into scales and intervals, let’s take a look at how we will construct harmonies with some fundamental concept.
One quite common option to harmonize is to make use of excellent fifths. To do that, choose all of the notes by urgent Ctrl+A, and pitch shifting them up 7 semi-tones.
Let’s hear the outcome:
Fairly cool proper? And you may get much more inventive by pitching particular person notes and creating completely new melodies. Examine this different instance out:
NewTone is a particularly highly effective device and permits a lot greater than pitch shifting, equivalent to rectifying tempo, formant management, and vibrato enhancement.
If you’re inquisitive about easy methods to manipulate vocals additional, try our newest tutorial on vocal chops.
Tip #5: Creating the Stutter Impact in Ableton Stay
The most effective methods to create attention-grabbing outcomes is to misuse settings in methods they weren’t meant for. One such instance is achieved by messing with the algorithms of Ableton Stay’s Warp perform.
As mentioned in Tip #1 and #2, Ableton Stay gives totally different Warp modes suited to totally different kinds of samples. Let’s see how we will use this creatively.
Choose a melodic pattern, equivalent to a background pad or a easy chord development. Allow Warp, choose Beats mode, set Protect to 1/16 or 1/32, set Loop mode to off, and scale back the time envelope to wherever between 0 and 50.
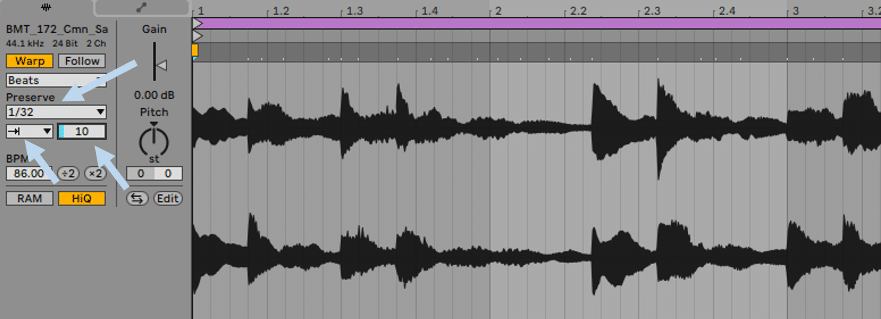
Take a look at the outcomes you may get:
Tip #6: Haunting Textures Via Excessive Time Stretching
Constructing on Tip #5’s recommendation of misusing settings for inventive functions, pushing time stretching to its limits can yield fascinating outcomes. You’ve in all probability already come throughout a few of these movies of in style tracks slowed all the way down to the acute:
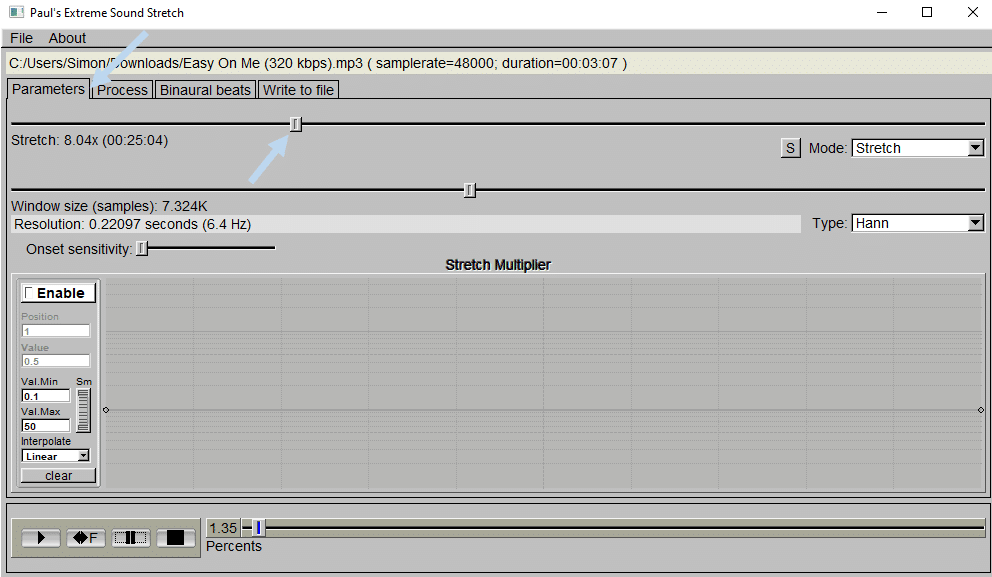
Excessive time stretching is a option to create completely haunting and twisted soundscapes, all from comparatively regular supply materials. Though there are methods to realize the identical outcome inside your DAW, my go-to software program to do that is Paul’s Extreme Sound Stretch.
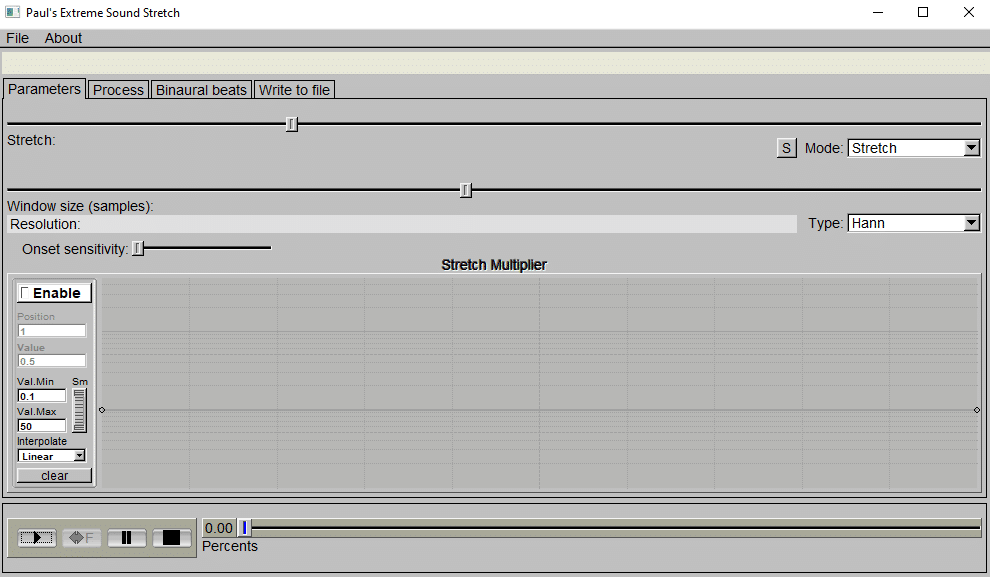
Sure, it seems prefer it’s straight out of 1996, however bear with me as I present you what it’s able to.
As you would possibly acknowledge, I’m utilizing a fairly latest well-known pop tune as my start line. Don’t fear about copyright points, the audio we’ll find yourself with can be unrecognizable.
To time-stretch, navigate to Parameters and slide the Stretch button.
Sadly, the software program’s built-in rendering choices aren’t probably the most user-friendly and don’t will let you render out particular parts of the audio. Two choices are attainable right here:
- Route the audio to your DAW or to a recording software program equivalent to Audacity, and document dynamically from there. On this case, you need to use the freeze perform to isolate sections you need to maintain.
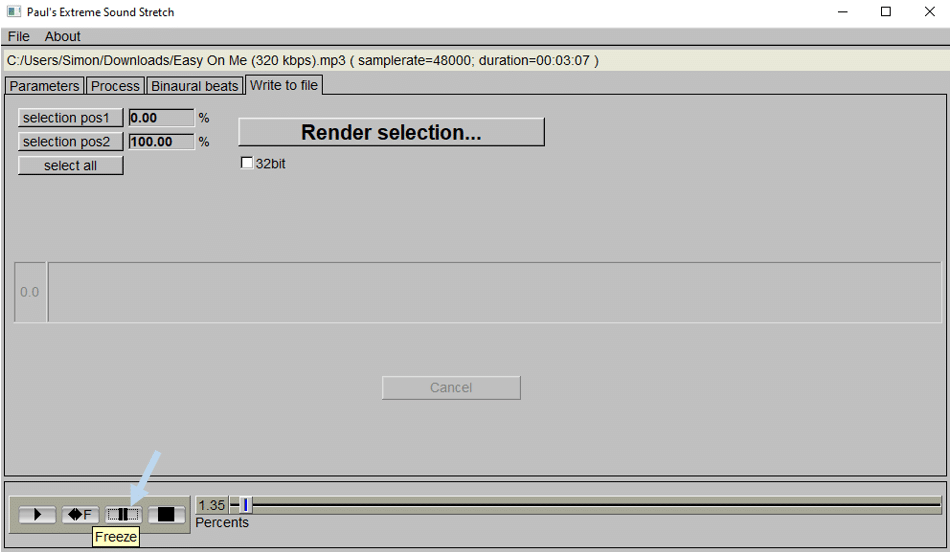
- Alternatively, I wish to maintain my choices open, so I render the whole audio file at totally different speeds, after which work inside my DAW to pick attention-grabbing sections. Exporting at 8x and 20x often yields an excellent vary of outcomes to work with.
Understand that since you are stretching out an audio file, utilizing audio clips any longer than 2min will create fairly giant recordsdata.
Let’s hear among the clips I chosen from these 2 rendering speeds:
And that is with none processing! With some fundamental filtering, reverb, and delay, you may create actually mesmerizing atmospheres. These additionally work significantly nicely for risers and transitions between sections, or if you simply need to incorporate the environment of a tune with out sampling it immediately.
Tip #7: Incorporate Different Genres
One recurring problem most producers will face in some unspecified time in the future of their inventive journey is easy methods to provide you with unique concepts.
That is very true when utilizing pattern packs that have been made for the style you might be writing in: you find yourself utilizing the identical sounds as your friends within the scene. Have you ever ever used a pattern in one in all your tracks, solely to understand it had already been utilized in a number of different tracks?
I do know I’ve, and it’s not an excellent feeling.
One option to counter that is to discover obscure genres you might be much less acquainted with and make these sounds match into the tempo you might be working with.
Let’s discover this. Right here is the drop we can be working with. The tempo is 174 and the secret is in Fm:
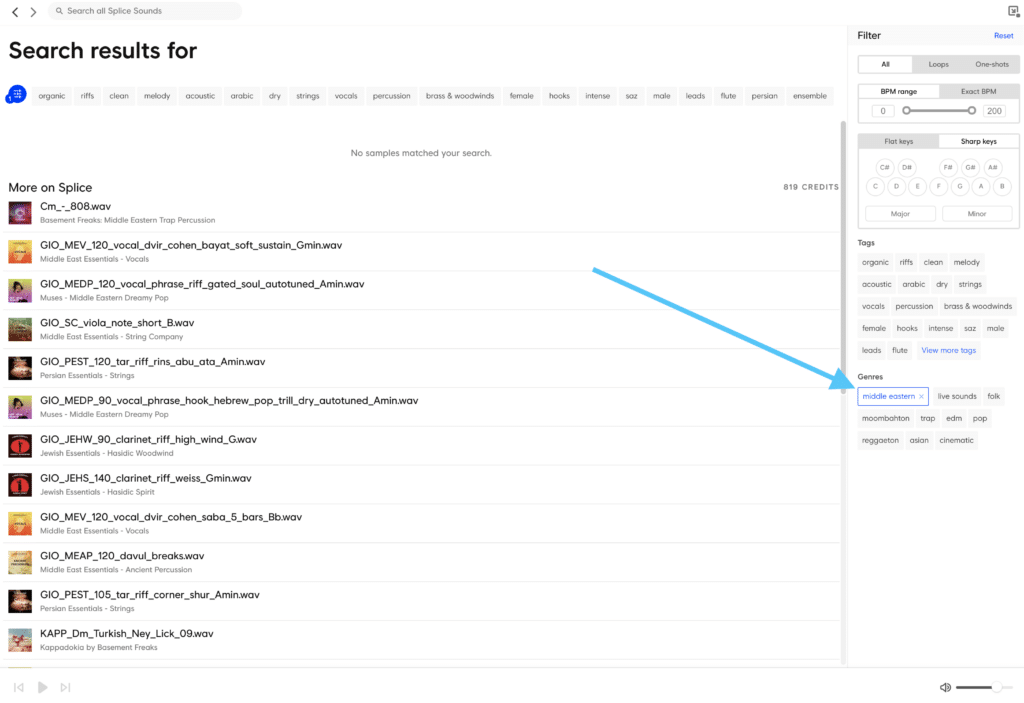
I’ve browsed Splice in some genres I’m not used to checking, and listed here are some cool samples I discovered:
Within the Center Jap Music class:
Within the Journey-Hop class:
Let’s see how they sound over our unique drop:
Fairly cool proper? I used the primary half of the Center Jap loop, after which transitioned into the Journey Hop loop to convey the monitor into a totally new world.
Regardless of each samples not being in the identical key or the identical tempo as my monitor, time stretching and pitch shifting allowed me to include different genres into my music.
Tip #8: Reworking Sounds Into New Devices
Pitch shifting will also be used to transpose devices into registers they can not naturally play in.
For instance, I don’t personal a bass guitar, however one possibility can be to document my electrical guitar and pitch it all the way down to emulate the sound of a bass guitar.
Let’s discover this.
I’ve recorded a little bit melody that I really feel might work nicely as a bass-line on my electrical guitar, with none processing:
Let’s pitch the guitar down one octave, and add some processing to it:
Not too removed from an actual bass guitar, proper? Clearly, this isn’t an ideal substitute, however as a guitar participant, I discover it generally extra pure to jot down bass strains on a guitar and pitch them down after the actual fact, fairly than having to jot down them on a MIDI controller.
Regardless of not proudly owning a bass guitar, this can be a nice option to inject the pure tone and grain of an actual instrument into your association.
Tip #9: Rework Your Vocals With Little Alterboy
A information about pitch shifting wouldn’t be full with no point out of Soundtoys’ famous Little Alterboy plugin.

Little Alterboy is Soundtoy’s monophonic voice manipulation plugin, and though the interface is comparatively easy, the quantity of management and enhancement you may convey to your vocals is astounding.
With out going into an in depth run-through of all of the controls, let’s have a pay attention at among the outcomes you may obtain:
Activating robotic mode will pitch the vocal to a single word. When Pitch is ready to 0.0, that word can be a C:
One of many sensible options of Little Alterboy is the power to combine within the processed sign with the unique sign by the Combine management. Let’s have a pay attention on the preset Wealthy 5ths blended with the unique sign:
From delicate backing harmonies to completely manipulated robotic voices, the chances are limitless.
Really helpful: Music Manufacturing Software program – The Definitive Information
Last phrases
Hopefully, you’ll now have a greater understanding of the numerous inventive methods through which you need to use pitch shifting and time stretching to boost, manipulate and rework your sounds.
If you wish to discover sound manipulation additional, be certain to take a look at our 7 Methods to Resample Audio!