Need to discover ways to make lure music, however really feel left at the hours of darkness? Don’t know the steps to getting your beats to hit onerous?
It sounds such as you want a correct step-by-step framework.
You’ve come to the suitable place. This information will step you thru all the manufacturing means of a lure tune, from begin to end. You’ll be taught:
- Learn how to get these tight, snappy drums
- The most effective methods to get your 808 to chop by means of the combo
- Artistic layering strategies for melodic layers
- Why creating magic moments helps your monitor to not be boring
- + extra!
So it doesn’t matter what DAW you’re utilizing (Ableton Reside, FL Studio, Logic Professional X), let’s begin with the fundamentals! ?
Desk of contents
A Few Disclaimers on Lure Music
Earlier than we get straight into find out how to make lure music, let me make clear just a few issues about this information.
What type of lure music?
To completely different individuals, the style ‘lure music’ means various things.
On this construct, we’ll concentrate on find out how to make the extra energetic and aggressive facet of lure music (e.g. Lure Nation). We’ll be utilizing banging 808s, snappy drums, and roaring basses.
In actual fact, right here’s the ultimate results of what we’ll be making:

Should you’re trying find out how to make traditional lure beats (like Migos, Future & Metro Boomin), then don’t click on away but. All the pieces on this article nonetheless applies, however you would possibly wish to skip over the half the place we add basses to the drop.
Even then, you would possibly be taught a factor or two that you could apply creatively in your personal manufacturing.
How in-depth is that this?
I’ll be trustworthy – this information is extraordinarily detailed.
Not solely will you discover ways to write fundamental drum patterns and 808 traces, however we dive deep into the little particulars, comparable to:
- altering up your drum patterns within the construct
- including FX hits to create background pressure
- alternating and modulating completely different bass sounds
This information does skip over just a few components of the method by necessity (it’s not a full association). However you’ll be taught sufficient to have the ability to apply these strategies to your personal music.
Anyway, on to the ‘find out how to make lure music’ information!
Notice: eager to be taught basic EDM manufacturing? Take a look at our huge information – How To Make Digital Music.
Step 1: Tight Drums
Drums are essentially the most elementary factor in making lure music, together with the 808. So it’s necessary to get them proper.
Selecting the best tempo and samples
One key with lure drums is to not overcomplicate them. Use just a few, high-quality samples and easy rhythms.
However first, you’ll wish to arrange your undertaking correctly. So let’s set the BPM to 160.
160BPM is a good tempo for making faster-paced, energetic lure. However most lure falls between 140BPM and 160BPM.
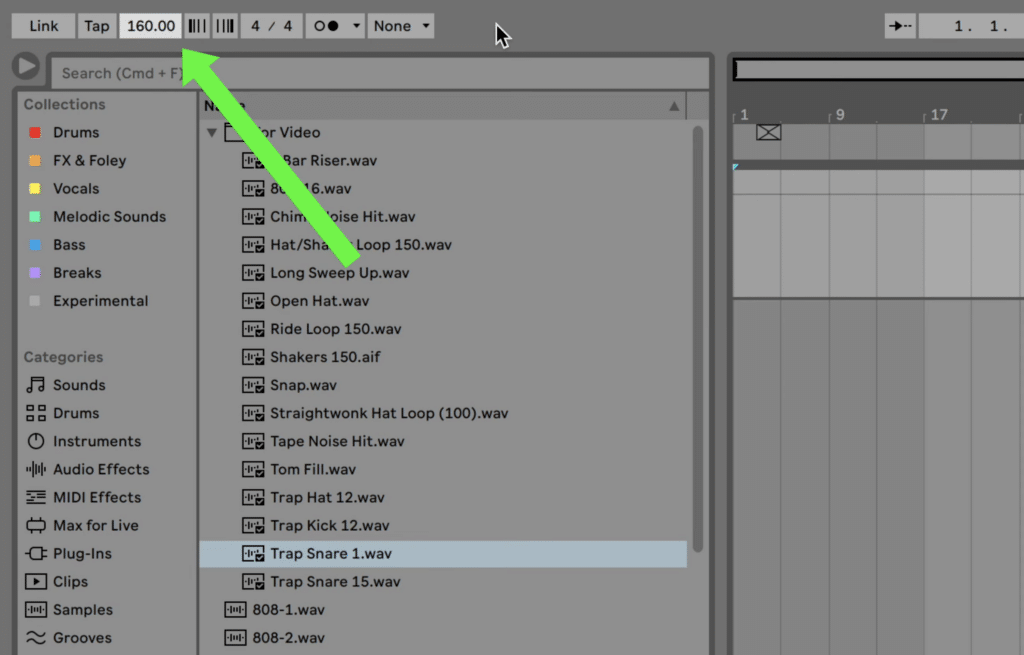
When you’ve finished this, you’ll wish to add in some kind of drum sampler. In Ableton Reside, I’m going to make use of the Drum Rack, which lets you add in several drum samples.
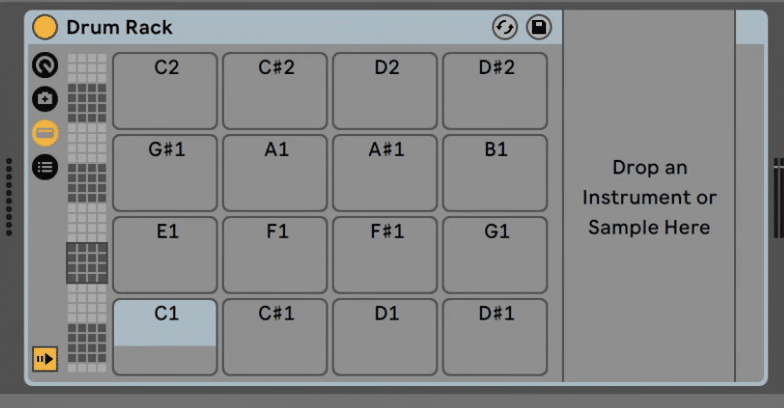
After your sampler is able to go, you’ll wish to discover a good kick, snare, and hi-hat to load up.
Listed here are just a few standards I take advantage of to decide on the very best samples:
- Kick: punchy but has a stable weight to it
- Snare: quick and punchy, with a excessive, snappy pitch (an 808 drum machine snare is conventional)
- Hello-hat: quick and snappy, one thing you may play very quick (808 drum machine hat)
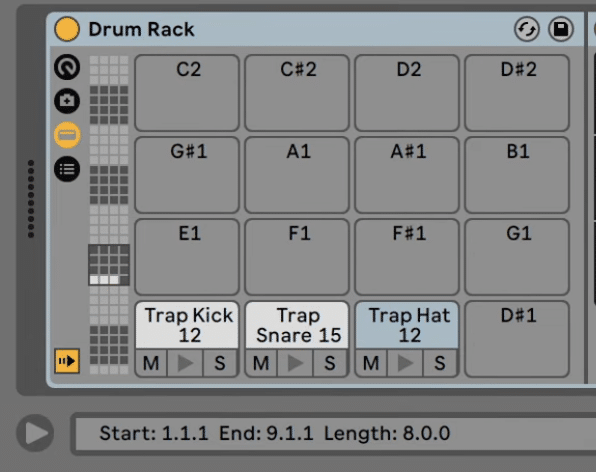
For this monitor, I’ve chosen three samples from the Lure Starter Package:
Merely drag them in out of your DAW’s browser into the drum rack. I used the notes C1, C#1, and D1.
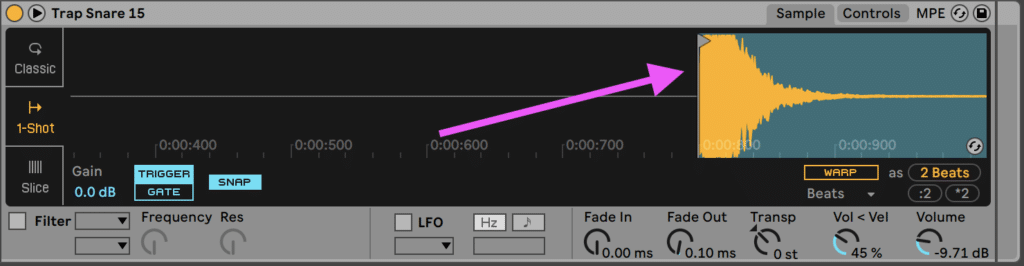
Notice: you’ll wish to modify the beginning time on the Snare pattern, because it’s technically a loop. Regulate it in Easier like so.
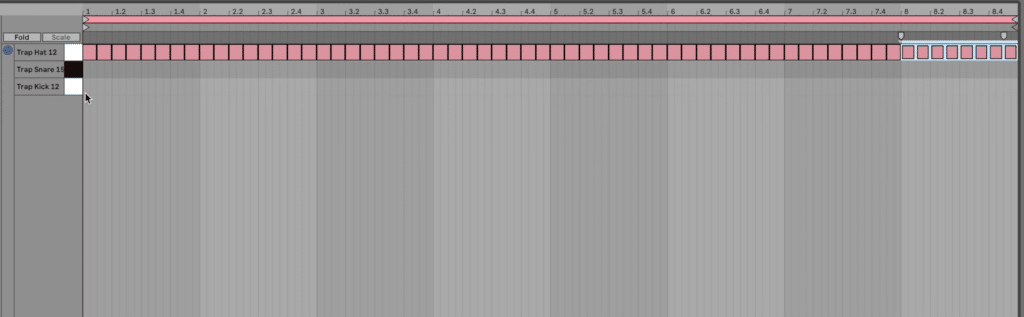
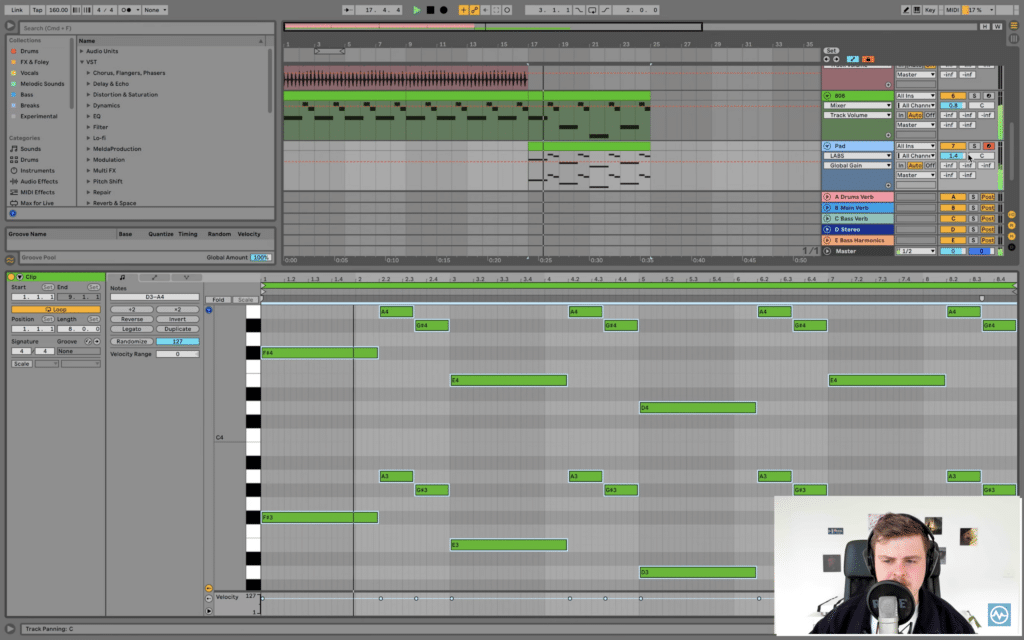
Now you can begin to program a easy drum loop to get a beat down. Let’s create an 8 bar MIDI clip and begin to fill it out.
A Primary Lure Drum Sample
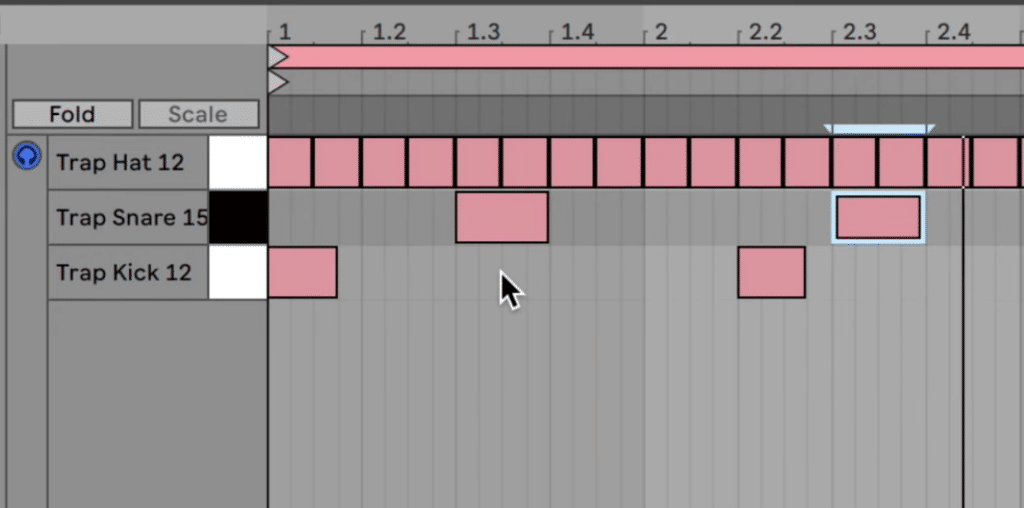
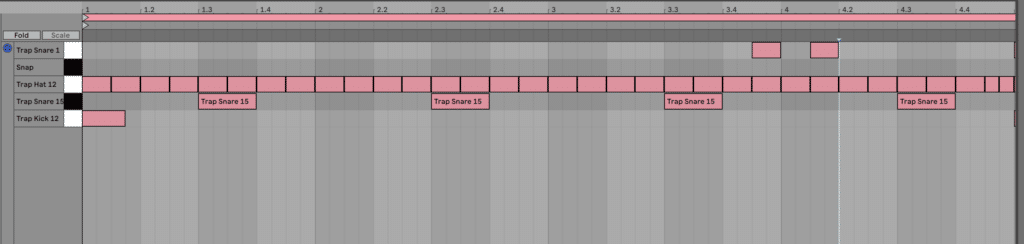
Lure music makes use of a ‘halftime’ drum sample, normally with a kick on beat 1 and a snare on beat 3 in its easiest type.
We’ll begin it off with some hi-hats going off each 1/8 be aware, creating constant power in our drums.
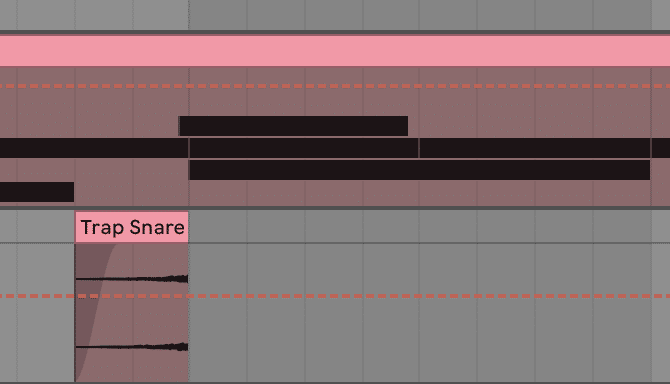
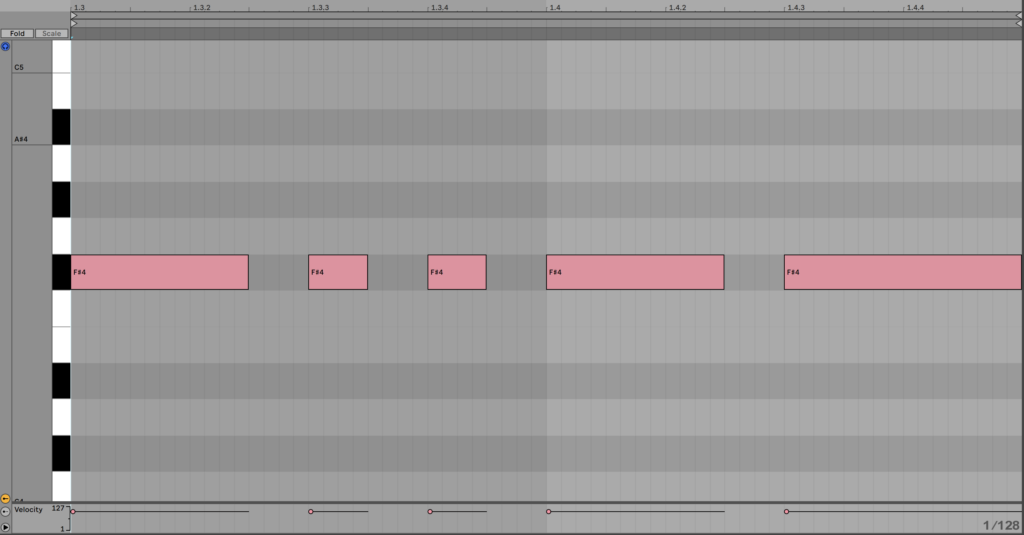
As soon as once more, let’s maintain it easy. I’ll put a snare on the 1.3 and a pair of.3, and duplicate them over for the second lot of 4 bars:
Then I’ll put a kick on the 1, and provides it an off-beat groove earlier than the second snare on beat 2.2. It is a frequent approach in lure music, borrowed from traditional hip-hop:
That is what we get from these 3 easy drum sounds:
It’s possible you’ll already see how this drum sample kinds the spine of our monitor – very like this monitor right here when the drums are available in:
Spicing Your Drums Up
Actually, it will be high quality to go away it just about like this.
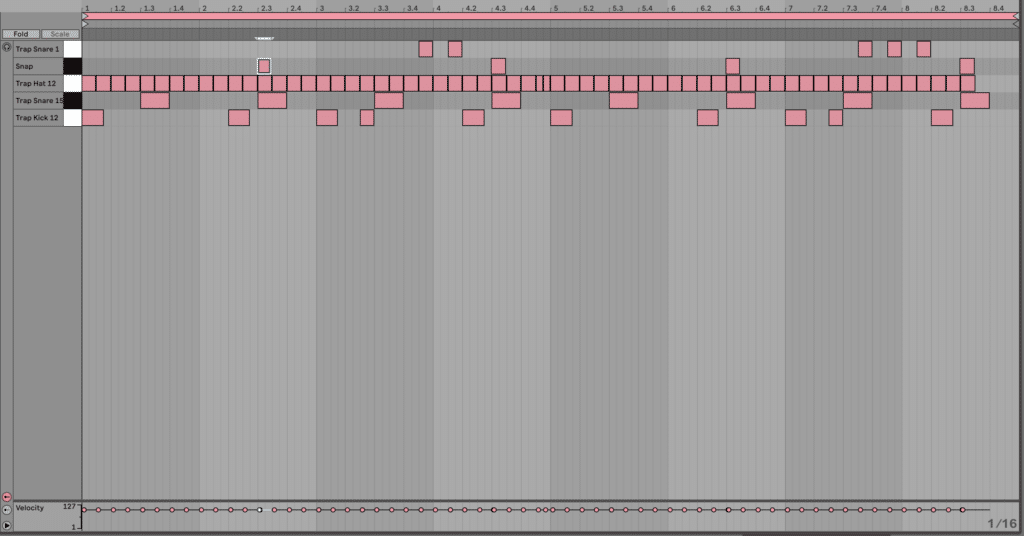
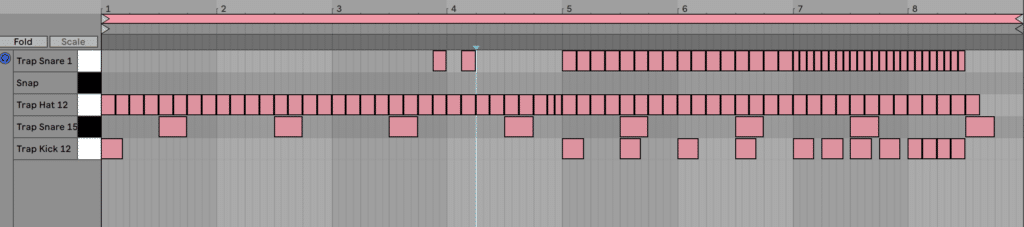
However at this level, you may add little bits of variation to boost the drum loop. Right here are some things I love to do:
- Add some sixteenth be aware fills on the hi-hat in direction of the tip of a bar
- Add some additional kicks right here and there (e.g. double kick on beat 1)
- Usher in one other snare pattern to create some off beat groove
- Take away a number of the hits to create pressure at completely different factors
- Including a clap or snap pattern to layer with sure snare hits
- Create a reverse snare sweep from the tail into the snare
- Add chant samples of the off-beat
On this monitor, I did all these (besides the chants) to point out you the ability of little modifications including up. Right here’s the place I received to:
The reverse snare:
Now this drum loop has some warmth! ?
Advisable: The Final Information To Drum Programming
Layering In Textured Drum Loops
Let’s take it even additional by layering in some loops. This may give our drum association a energetic and textured sound, quite than a stale set of one-shots.
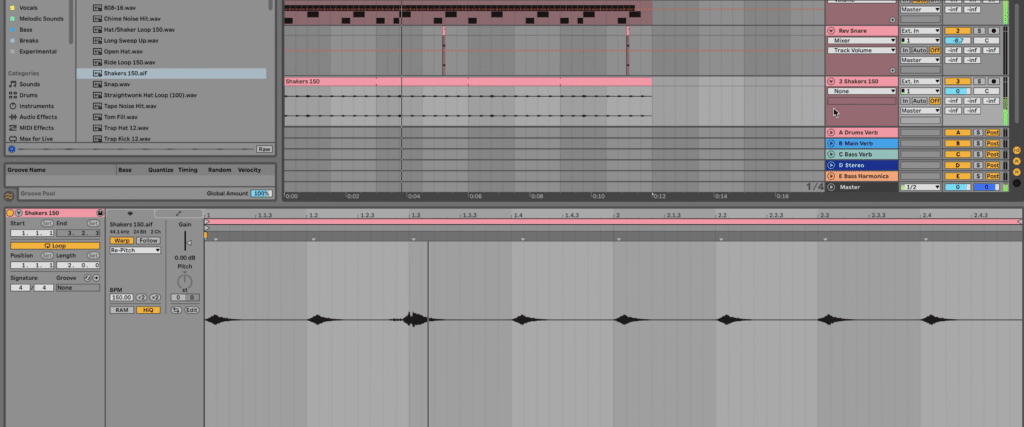
I’m going to usher in the Shakers 150 pattern onto its personal audio monitor.
Be certain that it stretches to the BPM of the undertaking – I take advantage of the Repitch warp mode in Ableton Reside for this.
Merely loop it throughout the entire sample and modify the quantity to style.
It’s also possible to do some extra artistic loop mangling so as to add your personal aptitude to your drums and assist them stand out. On this instance, I pulled within the Straightwonk Hat Loop (100) pattern and warped it in time.
Ableton Reside has quite a lot of sick warping modes that you should utilize to mangle sound in several methods. This time, I used the Texture warp mode with the next settings:
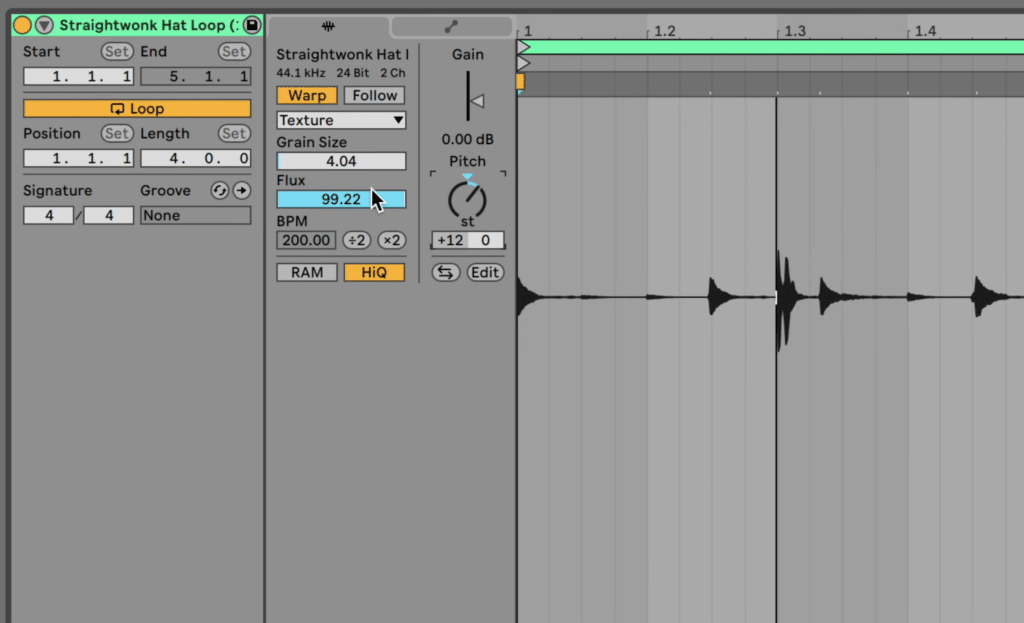
Discover that the loop can also be transposed up an octave (+12st), giving it a grainy really feel.
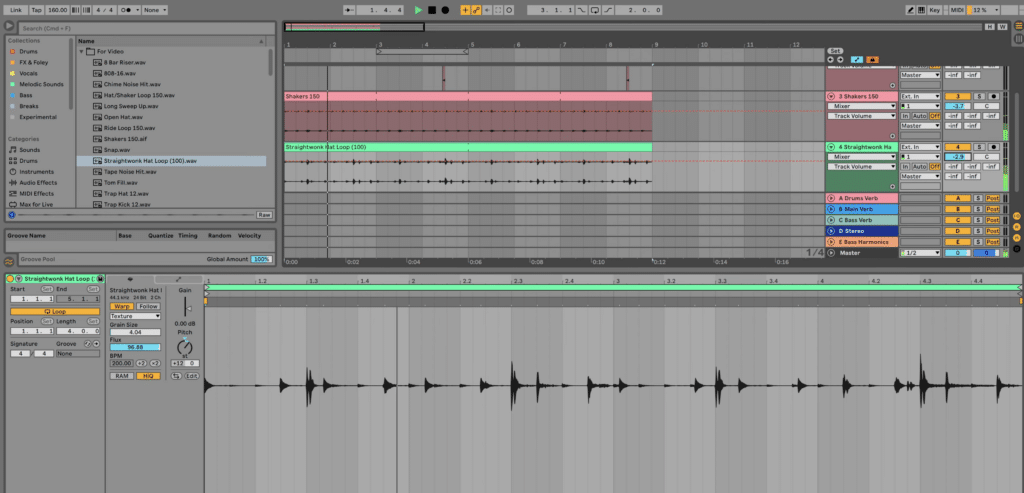
Lastly, I’m going to usher in the Hat/Shaker Loop 150 and use the Repitch warp mode once more. This one requires a little bit of high-pass filtering to get the low-end noise out – 800Hz is an effective cutoff frequency.
As soon as these three loops are blended in, duplicate the 8 bar loop twice and also you get this consequence:

It is a full-sounding drum loop to begin off with. Now we are able to add some 808s in to make that low-end shake.
Step 2: Banging 808
When you begin studying about find out how to make lure music, you’ll come throughout the idea of 808s.
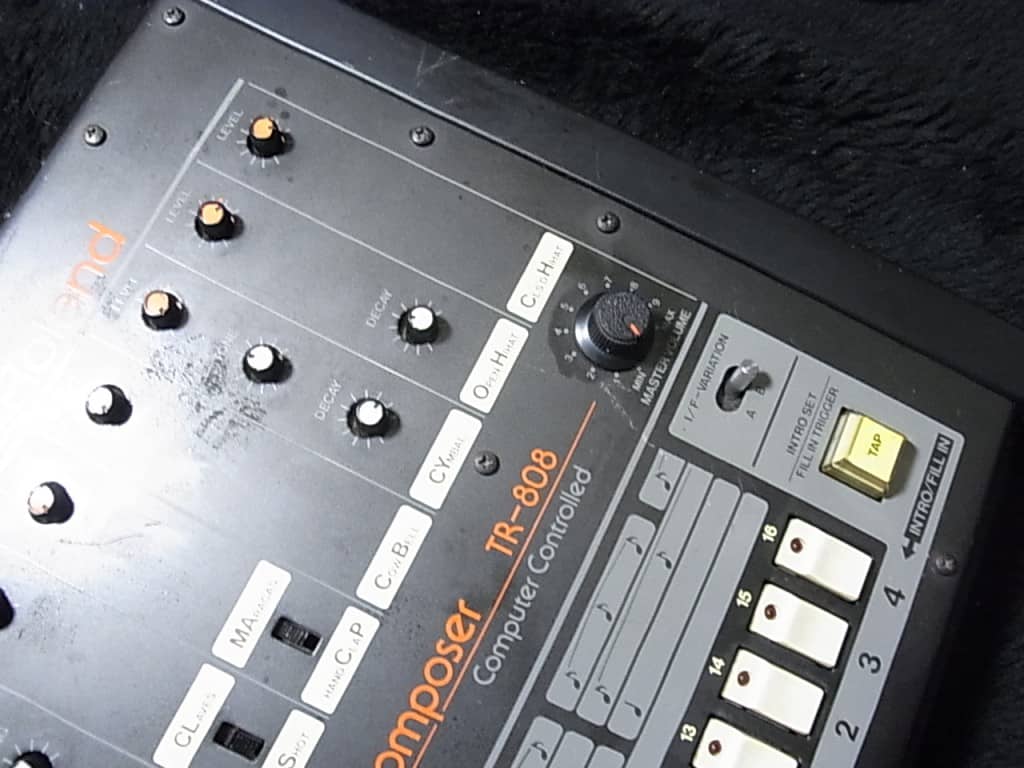
808s are lengthy bass sounds, historically taken from the kick drum of a Roland TR-808 drum machine.
On the subject of trendy 808s for lure, you may both make your personal in a synth or use a good-quality pattern. There are actually hundreds of nice choices on the market.
On this information, I’ll be utilizing a pattern. However for those who’re eager to make your personal from scratch, try our Breakthrough Sound Design course.
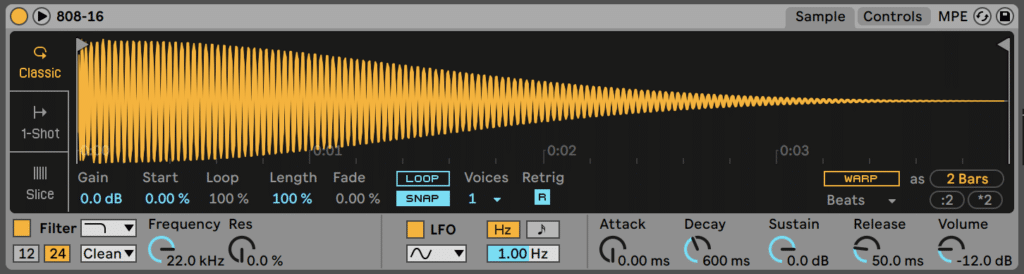
From the Lure Starter Package, I take advantage of the 808-16 pattern and produce it right into a sampler channel (Ableton’s Easier is ideal for this).
Tuning your 808 pattern
Be certain that it’s in key together with your notes by utilizing some kind of tuner gadget (or for those who’re blessed with excellent pitch, your ear). Doing so will mean you can program notes in the suitable key.
I’m going to play a C on my MIDI keyboard and tweak the pitch controls till we get it hitting an precise C.

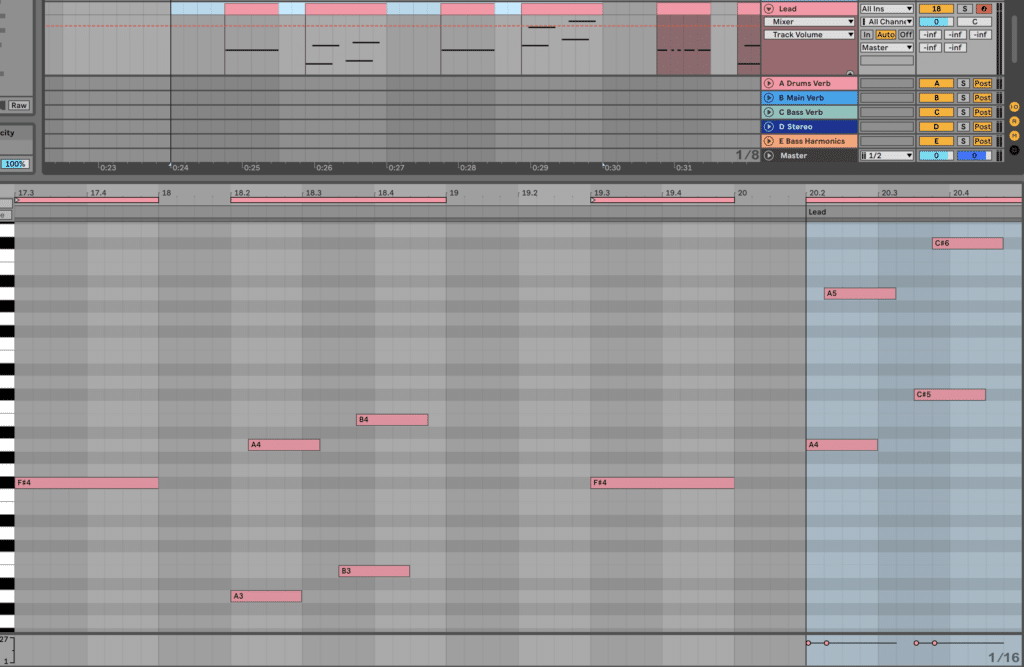
Now we are able to program in an 808 sample within the appropriate key. For this monitor, we’re going to select F# Minor. It has the ideal note range for 808s cutting through on big systems (together with F and G Minor).
Making a stable 808 line
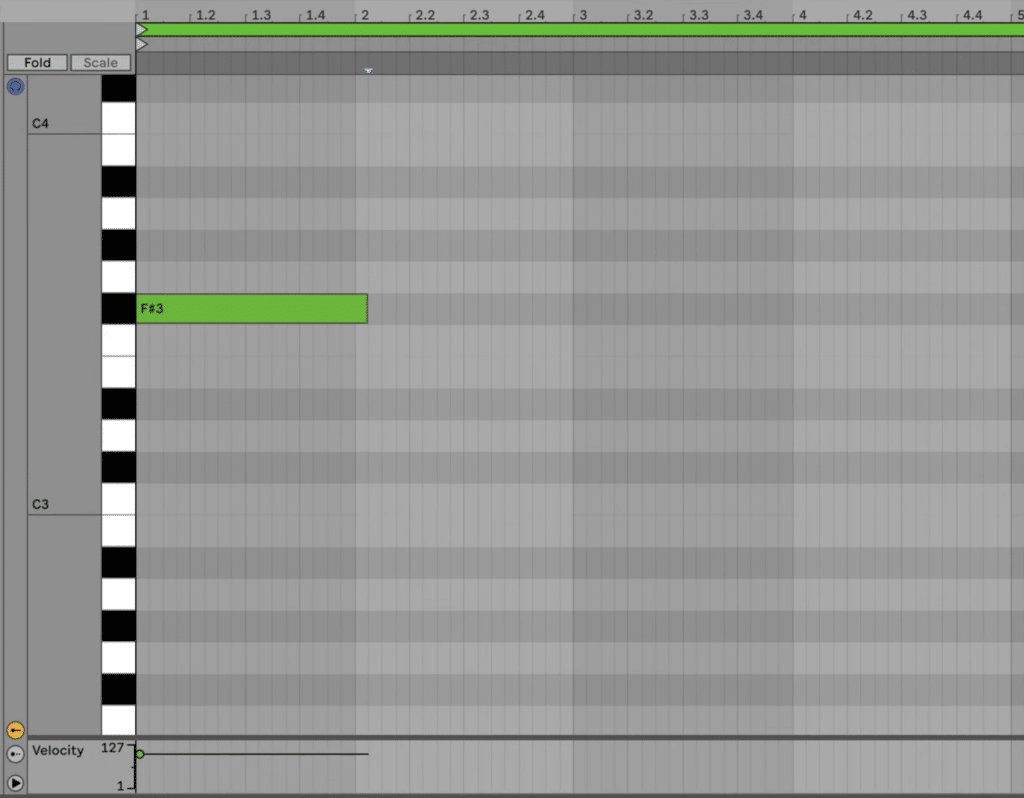
Let’s add a brand new MIDI clip and begin by aligning our 808 to the fundamental kick sample from the final part. Don’t fear in regards to the notes but, let’s simply use an F#:
Be certain that your be aware pitch is in the suitable octave. If it’s too low, it’ll sound muddy, and if it’s too excessive, it gained’t really feel weighty sufficient.
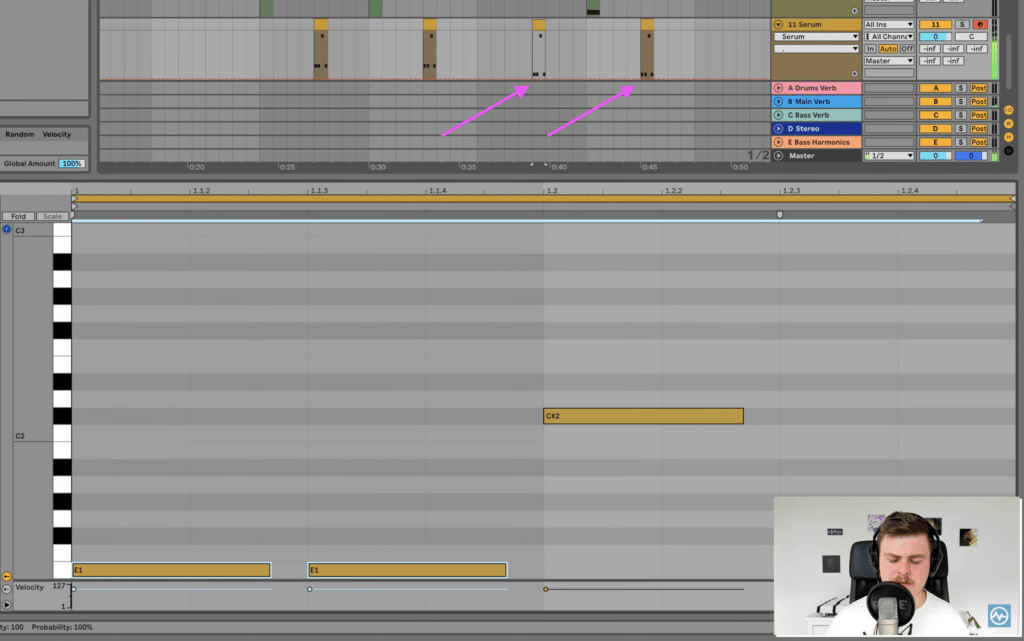
Now let’s add an additional be aware after the second kick, making a bit of additional bass movement. Not each 808 hit has to align with a kick, but it surely helps if most of them do.
Now let’s begin to add a little bit of melody to the notes. I’m going to deliver the second 808 as much as the A (aligning with the kick), and the additional hit we simply added to a G#. This creates a cool scale-descending impact.
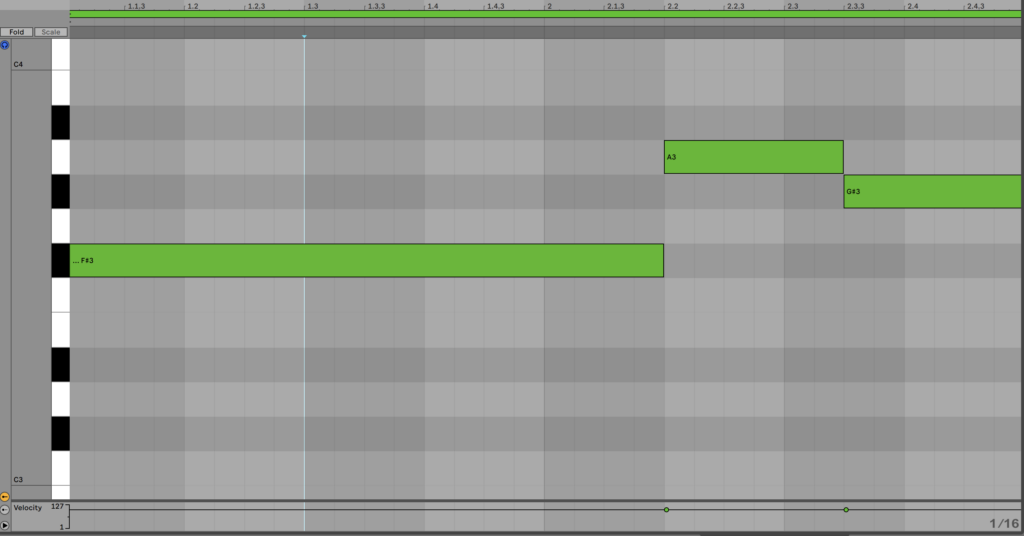
Copy this throughout for the entire 8 bars, and also you’ll get this consequence.
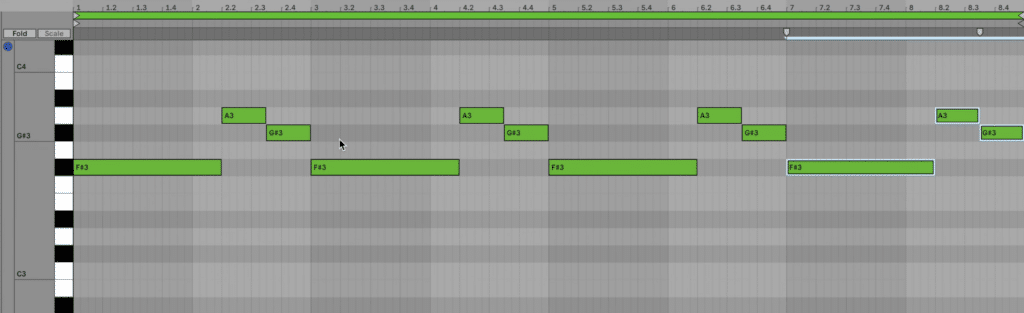
Making 808 loop variations
These extra constant 808 patterns are nice for the drop, the place the main target is much less on the bass notes and extra on the sound design.
However for the intro and outro, I wish to create a extra musical variation. So let’s copy the clip over to the second 8 bars and create a second model.
This time, we’ll make the notes that hit on the primary beat of every 2 bars descend in key for the primary 3 phrases. after which come again up on the final phrase. We’ll depart the opposite notes as they’re.
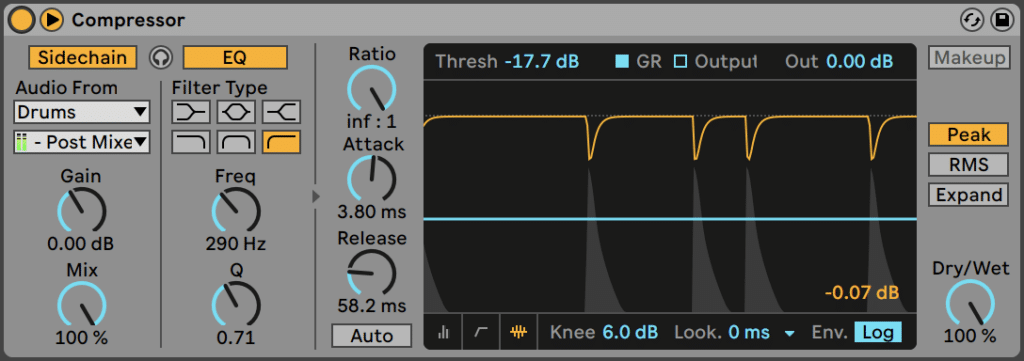
Subsequent, let’s modify the quantity to style and sidechain the 808 to the kick. This ensures that there aren’t any low-end clashes.
Drop in your favourite sidechain gadget and tweak it to style. I didn’t want intense sidechain compression on this monitor, so I used Ableton Reside’s Compressor in sidechain mode with the next settings:
Including 808 Grit
Lastly, I wish to give the 808 a bit extra grit to assist it lower by means of on smaller audio system. 808s sometimes have lots of sub frequencies and fewer higher harmonics. So including some distortion may help clear up this downside.
Right here’s an instance of a monitor that has a low 808 that also punches by means of on smaller audio system:
Discover how suppose it sounds?
I’m going to make use of Ableton Reside’s Drum Buss gadget for this, however be happy to make use of any distortion plugin. Listed here are the settings I used to get a pleasant stability of cleanliness and heat:
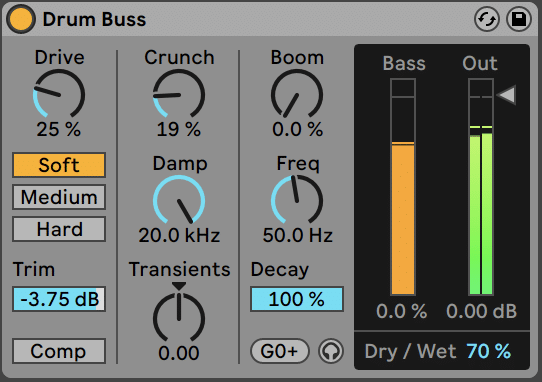
Evaluate the clear (first half) to the soiled (second half).
Now our 808 and drums are sounding tight, and we are able to transfer onto the remainder of the monitor!
Notice: be sure you’ve received 16 bars for the drop, and eight bars after that for the subsequent a part of the method.
Step 3: Hype Melodies & Synths
The melodies and synthesized sounds (together with midrange basses) are tremendous necessary to fill within the combine, particularly for those who’re making instrumental lure music.
Even you probably have vocals, it’s necessary at this step that you just create a vibe for the monitor.
That is largely borrowed from the type of traditional lure beats, like Migos – Fashionable Day:
On this ‘find out how to make lure music’ information, we’ll be utilizing these kinds of sounds. To begin, we’re going to show our focus to the intro sounds, which might be just a little extra ethereal and melodic.
I’m going to be utilizing just a few of the Spitfire LABS (free) libraries. Should you don’t have it, obtain it from that hyperlink.
Ethereal Pad
We’re going to begin with a pleasant pad, so drag a brand new occasion of LABS onto a MIDI monitor, and cargo up the Piano Pads > Impure patch. You’ll wish to give it a little bit of quantity because it’s significantly quiet.
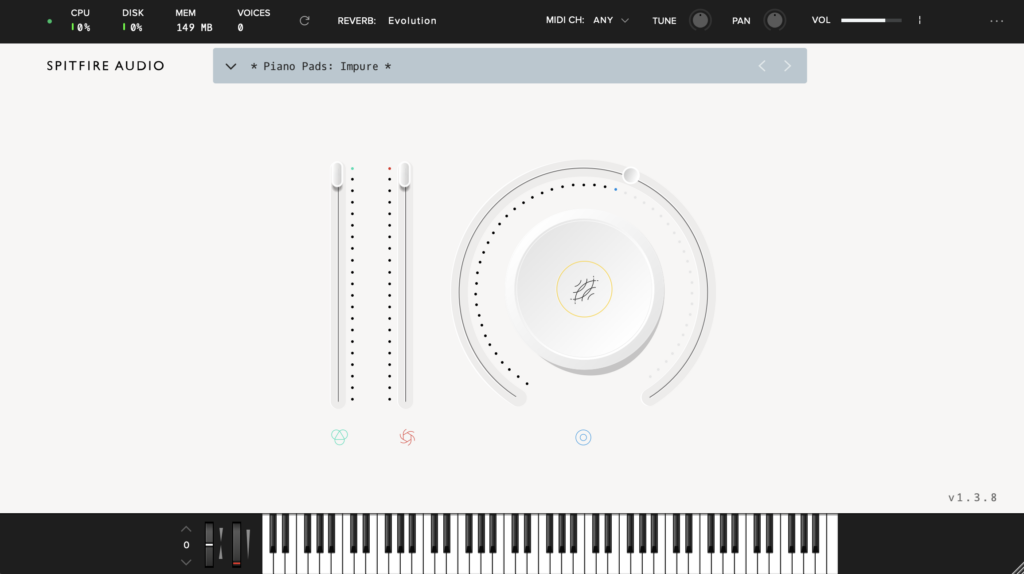
Subsequent, you’ll wish to tweak just a few of the settings to assist it swimsuit our monitor. These are private preferences, however having quicker assault and launch occasions will give it a direct taking part in impact:
- Assault: 71.5ms
- Launch: 1.4s
- Reverb: 57%
When you’ve received the sound sorted, copy the 808 MIDI onto the pad monitor. Copy it up an octave so you might have two notes taking part in at a time. This fills out the spectrum fairly properly.
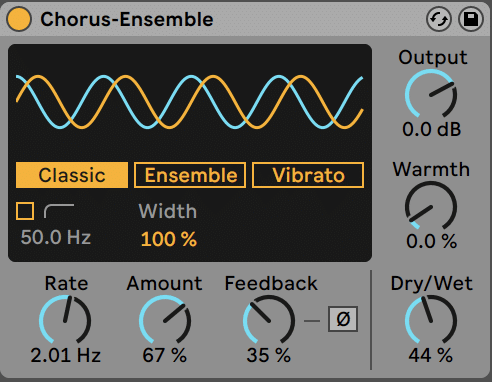
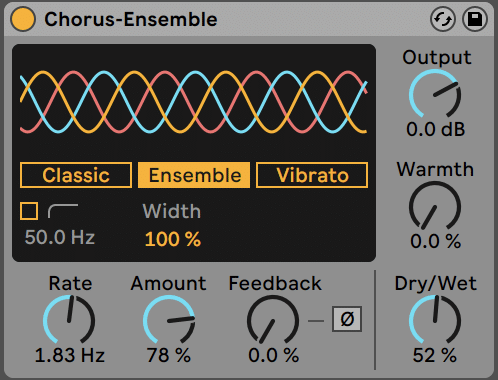
Nonetheless, I wish to give it a little bit of a wavey-type impact. So seize your favourite refrain plugin and provides it the specified wobble. I’m utilizing Ableton Reside’s Refrain-Ensemble impact.
Ambient Keys Layer
Let’s layer this up with one other sound from LABS to thicken up the melody much more. Merely drag one other occasion on and cargo up the Uncommon Groove Piano > Maintain. Be sure to copy over the identical MIDI as nicely.
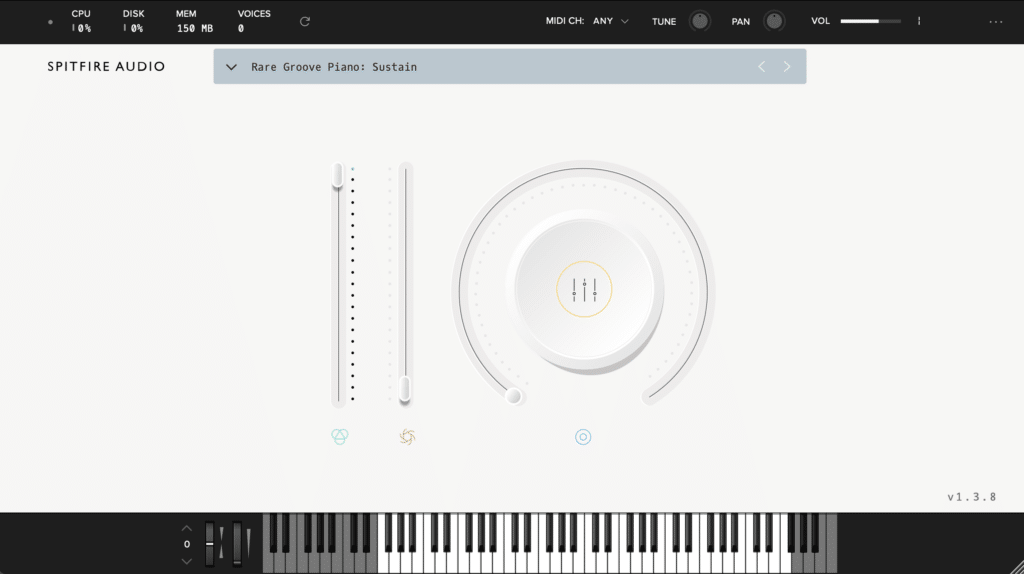
Be at liberty to lather it in reverb (you are able to do this by clicking the spherical button and dialing it up in LABS).
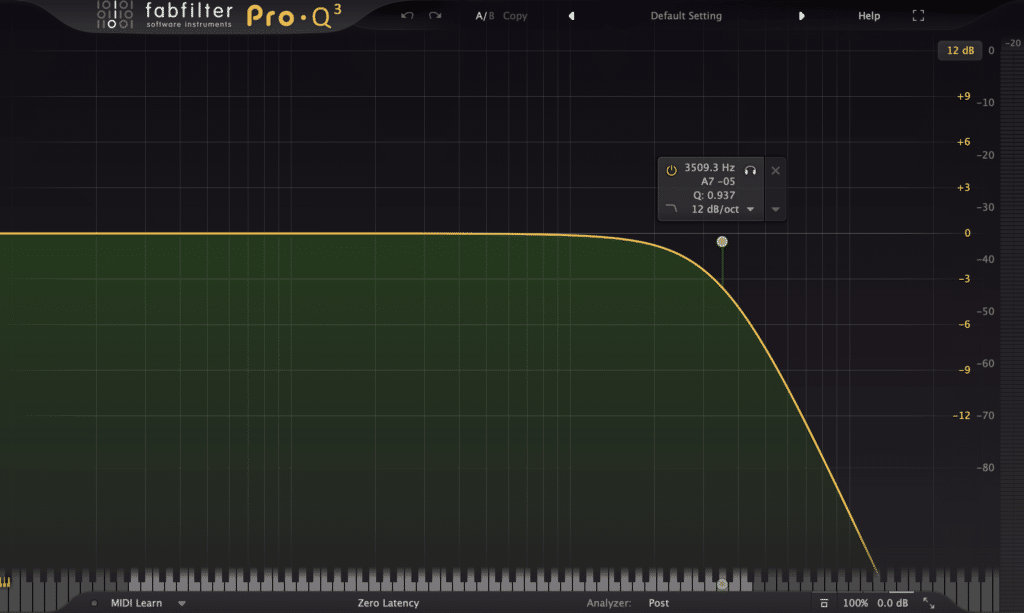
We additionally need this layer to be fairly subdued within the combine, so let’s low-pass it. I’m utilizing FabFilter Professional-Q 3 right here, however any EQ will do (Ableton EQ Eight, FL Parametric EQ 2 or Logic EQ is ok).
To ensure it layers up properly with the pad, we’ll additionally add some extra refrain to the keys. I’m utilizing barely completely different settings right here (i.e. the ensemble mode as an alternative of refrain), as these refined variations make the sound really feel fuller.
If all the things was sounding the identical, we’d be doubling the sound, not layering.
Be at liberty to repeat the beneath settings. In any other case, experiment with your personal (relying on the gadget you’re utilizing).
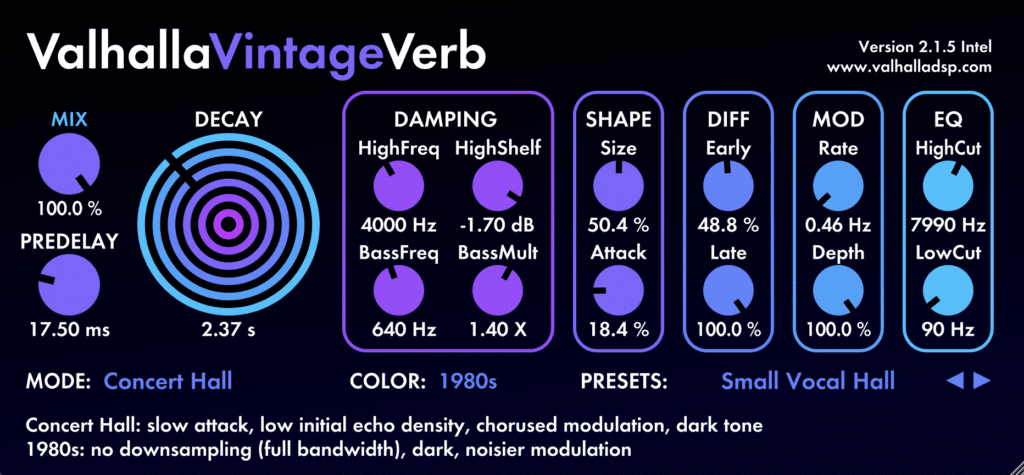
When you’ve got some kind of reverb ship arrange, give each of those layers a good quantity of reverb to drown them out. Some kind of corridor reverb works fairly properly for this – I’m significantly keen on Valhalla Classic Verb.
To get a pleasant stability, you’ll want to mix the 2 layers’ quantity in order that they’re sounding blended. Now we’ve received a stable melodic hook that we are able to use within the intro and outro.
Let’s flip to the drop and add some extra energetic components.
Lure Hype Lead for Drop
We’re going to create a essential hook factor for the drop.
That is the climax of your monitor. So it’s necessary you create one thing distinct, high-quality, and loud. For this type, I’m going to make use of a giant detuned noticed lead, which is frequent in lure songs by artists like RL Grime, Boombox Cartel and extra.
(It’s additionally frequent in intently associated genres like Future Bass).
Nonetheless, I’m going to make use of it in a a lot decrease octave than regular.
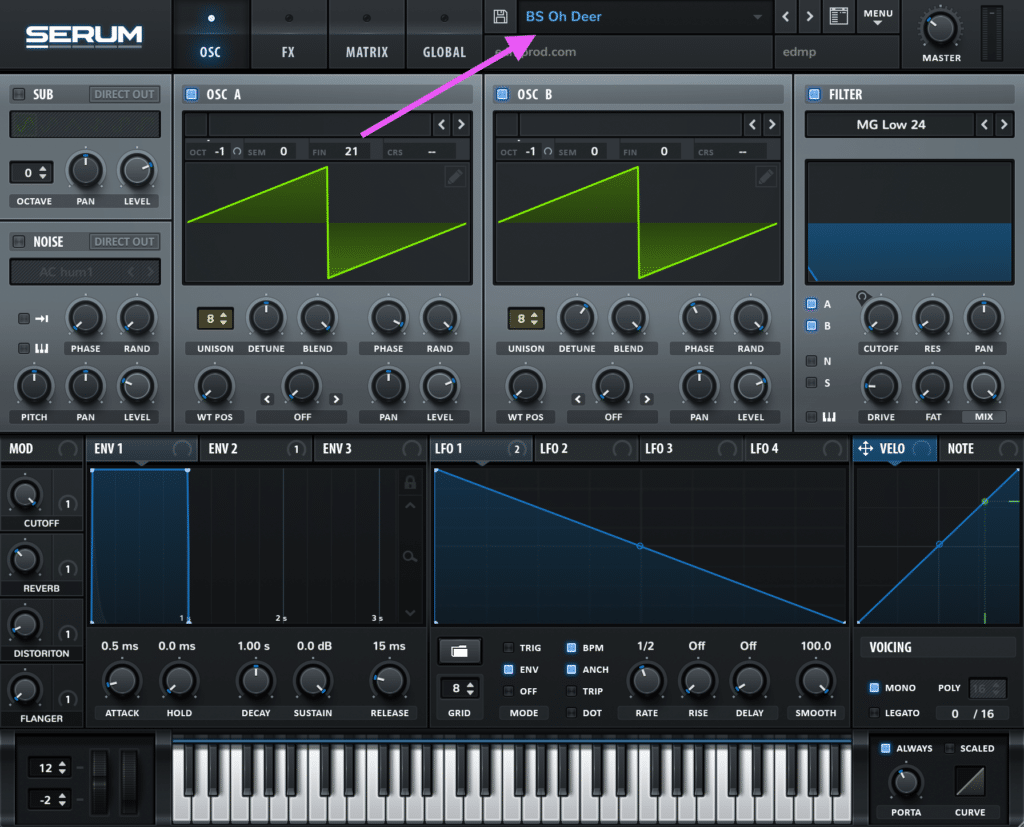
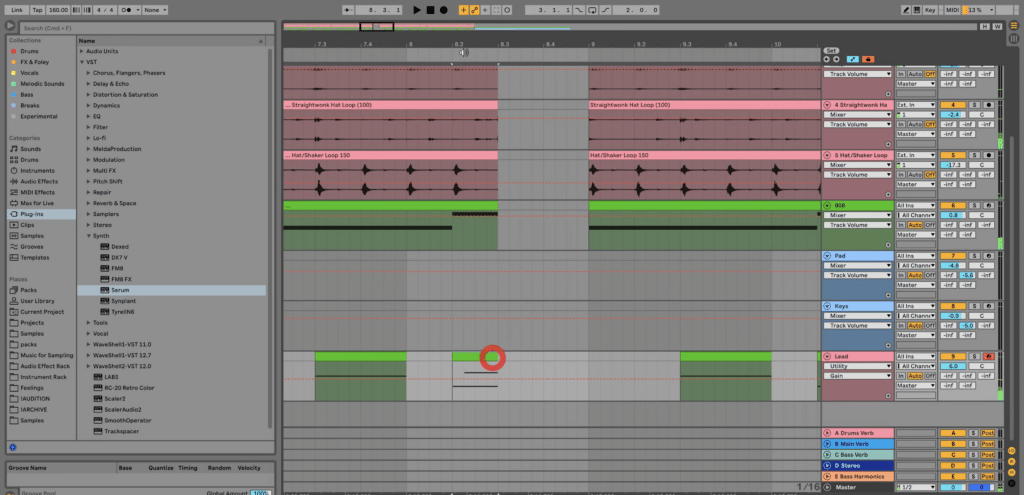
Let’s begin by copying over the 808 MIDI to a brand new MIDI monitor. On this one, you’ll wish to load up an occasion of Xfer Serum (you may seize it on rent-to-own here).
Load up the BS Oh Deer preset from the Lure Starter Package and modify the quantity to style.
To make the drop attention-grabbing, we don’t wish to copy the identical notes verbatim. Let’s chop and alter the MIDI clip by performing the next steps:
- Push the primary be aware again 2 beats
- Depart a niche of 1 beat after the primary bar
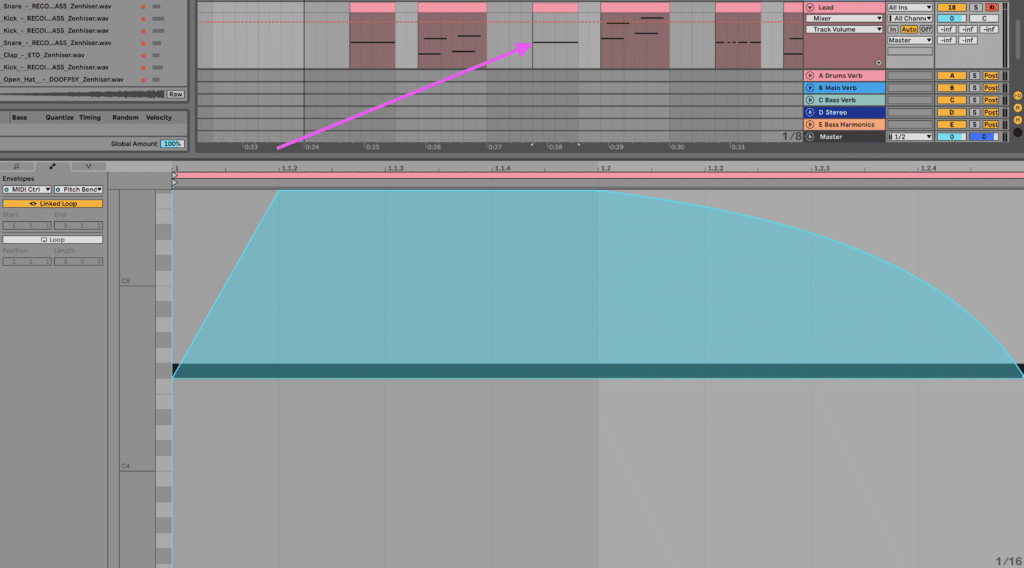
- Give each second F# be aware (that begins on the primary beat) a pitch wheel automation, sliding it up the octave. You’ll need to alter the Serum pitch wheel settings to go to (+12st)

After which add modulation to the clip:
- Transfer the G# as much as a B to create some attention-grabbing melodic movement. On each 2nd repeat, transfer the B as much as a C#, and transfer all of the notes up an octave.
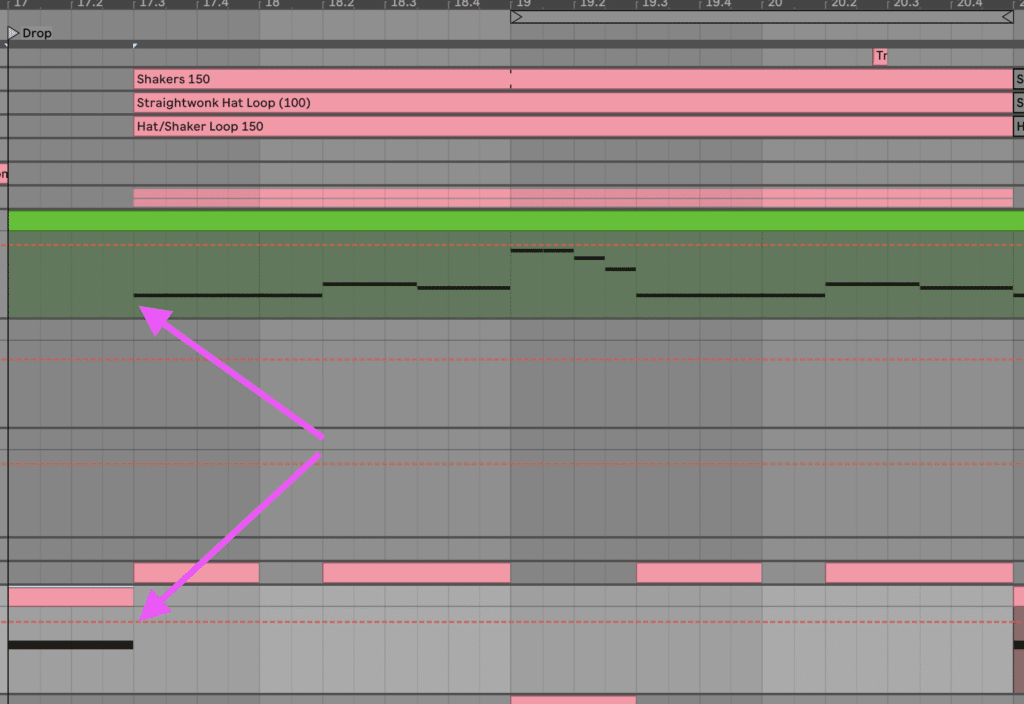
- Copy the final two notes of each second bar up an octave. Transfer them ahead by an offset of 1/sixteenth to provide them an octave sweep impact (as pictured beneath). Transfer that a part of the MIDI down an octave. Shorten the notes by 1/eighth on this part.
- On the third first be aware hit (F#), create a stuttered model (pictured beneath).
Lastly, take just a few of the notes and sections out to create pressure, significantly in direction of the tip of a 4 or 8 bar phrase.
Right here’s what it appears like (the 808 is muted so you may concentrate on the lead sample).
This may create the principle basis of our drop, however to fill it out extra, let’s add in some bass sounds.
Lure Mid Bass Sounds
Midbass sounds are excellent for creating power and grabbing consideration within the drop. Particularly you probably have no vocal.
Notably in onerous lure, alternating between completely different sounds additionally creates a way of variation. That is very true when the drums and 808 stay comparatively constant.
Let’s begin by creating 3 new MIDI tracks – these might be our 3 completely different bass sounds that we use.
Growl Bass
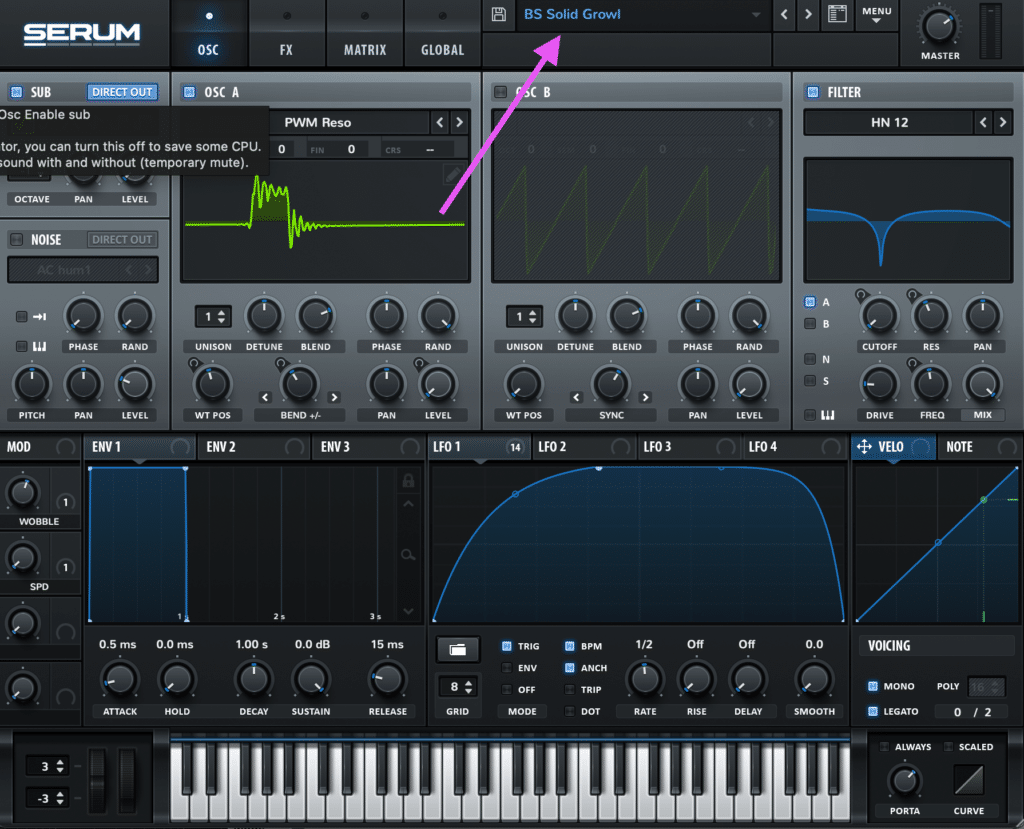
On the primary monitor, load up one other occasion of Serum. Choose the BS Strong Growl preset from the Lure Starter Package presets folder.
We’re going to fill that two-beat hole created in the beginning of the drop with an F#1 be aware.
Copy it over to the second 4 bars, and within the second half of the second 8 bars as nicely. Transpose the final one right down to match the notes of the opposite components within the second half of the drop.
Reese Stabs
To fill the 2nd and 4th gaps each 2 bars, we’re going to usher in a second sound onto one of many different new MIDI tracks. Load up Serum and head to the inventory presets Bass (Arduous) folder to load up BA Deth reese [GI].
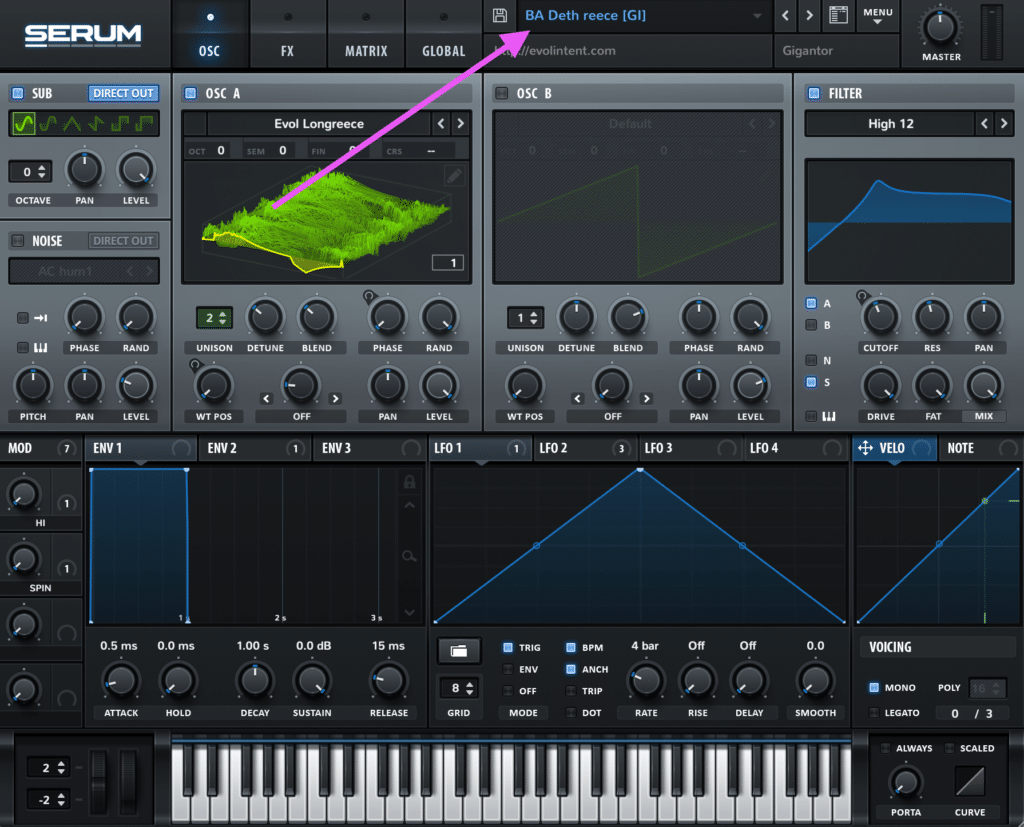
We’re going to make use of a 1/sixteenth be aware sample with a shortened be aware size. This may make the second just a little extra attention-grabbing and can assist the drop stream extra.
Merely program in 2 F#1 notes, 1 C#2 be aware, and one other F#1, like so:
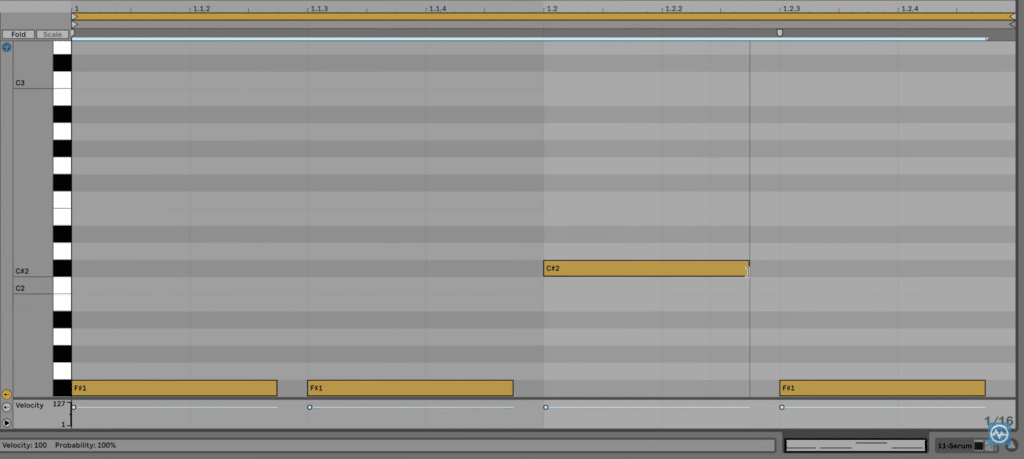
The silence between every be aware determines the sense of urgency. So be deliberate together with your be aware size.
Copy the sound throughout to each third bar in each 4 bar phrase. Transpose the final two phrases in relation to the notes of the atmospheric components.
Stab Bass
Lastly, we’ll add in a extra refined sound – the BS Stabby Hype Bass from the Lure Starter Package.
This sound might be used so as to add just a little rhythmic groove to the drop.
Add an F#0 be aware 1/sixteenth earlier than the 2 sliding notes that go as much as the C#:
Transpose the second two right down to match the notes within the drop. Right here’s what the drop might be sounding like:
Now now we have an in depth and stable drop that doesn’t get boring all through.
However there are just a few extra particulars we are able to add to strengthen our monitor much more, so let’s flip to FX!
Advisable: Serum Presets: The Greatest Free/Paid Packs in Every Style
Step 4: Sprinkle the FX
On the subject of utilizing FX in lure music, it’s necessary to match the power of what’s going on in the remainder of the monitor. These layers create extra depth within the monitor and make it extra attention-grabbing to hearken to.
On this instance, we’re going to maintain issues easy by utilizing two FX samples: an impression and a background vocal hit.
Affect FX
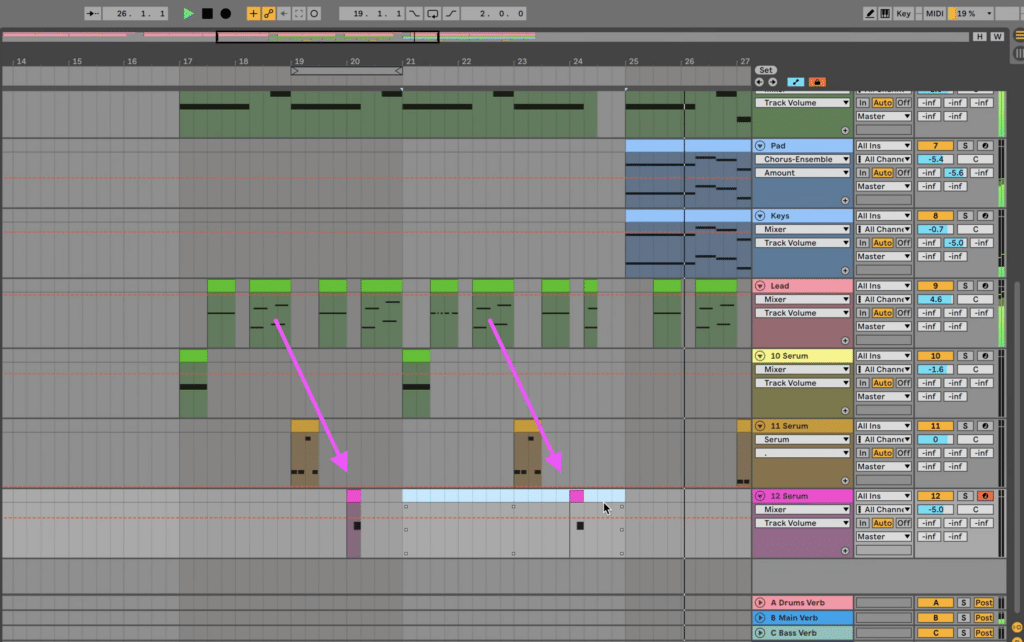
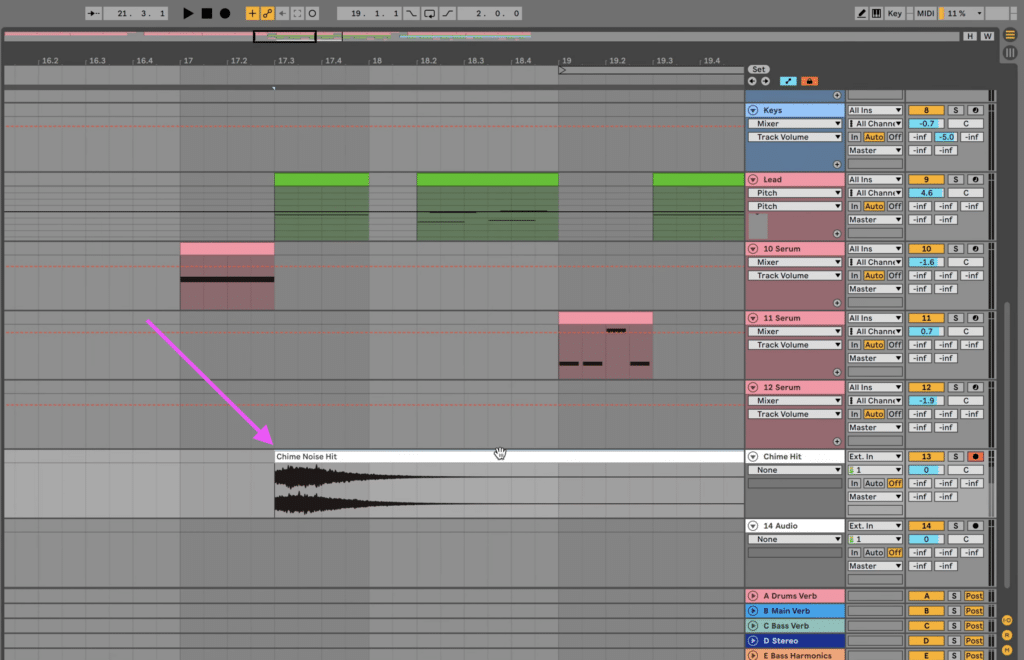
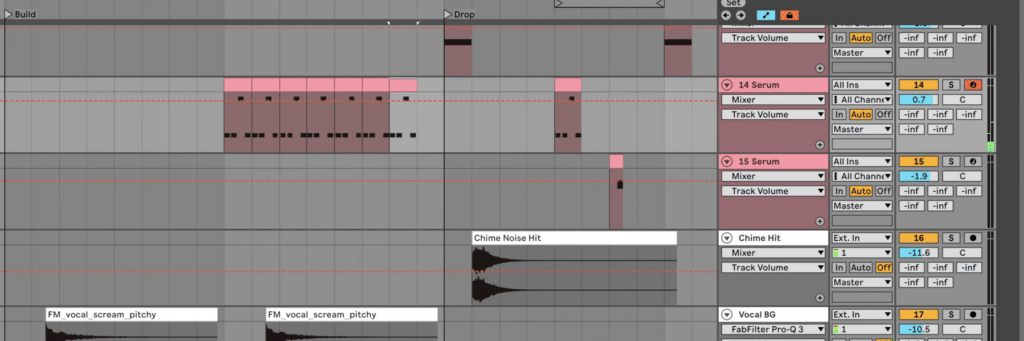
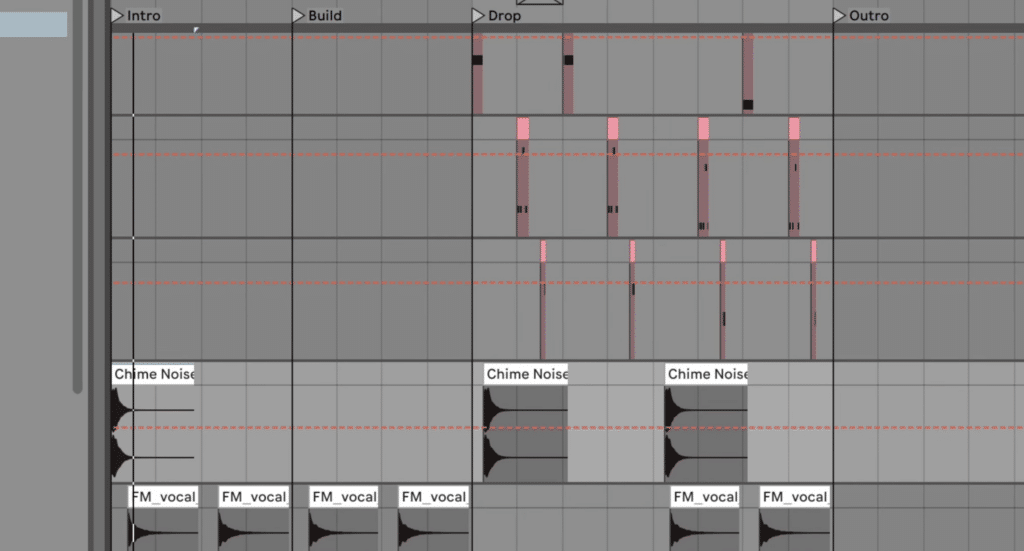
The chime hit will add impression to the start of recent sections. So create a brand new audio monitor and drag within the Chime Noise Hit pattern from the starter package.
Be certain that to pull it proper in the beginning of the monitor, and in addition 2 beats after the beginning of the drop.
Usually it’s high quality so as to add an impression on the primary beat of the drop. However we would like the growl to have extra emphasis, so transfer it 2 beats ahead – in alignment with the primary snare.
Regulate the quantity to push it into the background.
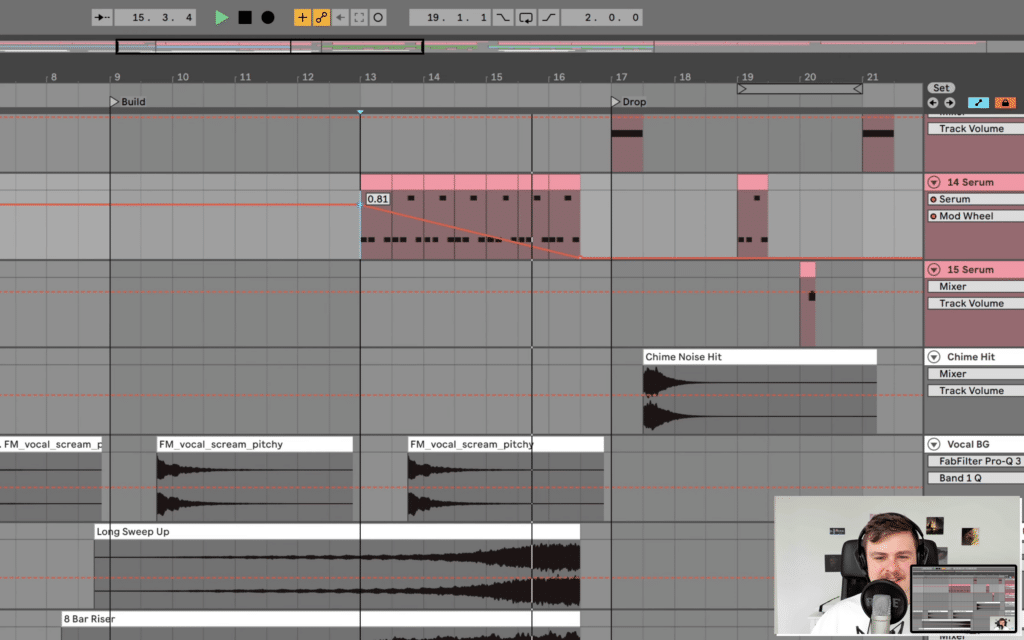
Background Vocal FX
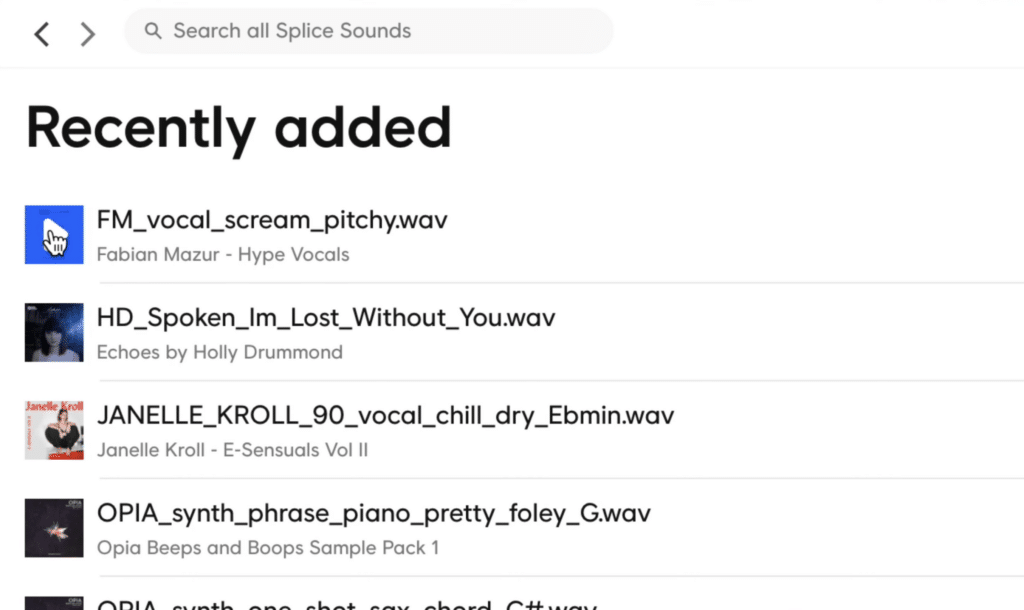
Now we are able to add the background vocal hit. So for those who don’t have a Splice Sounds subscription, be happy to enroll (you get a free month once you enroll in our courses).
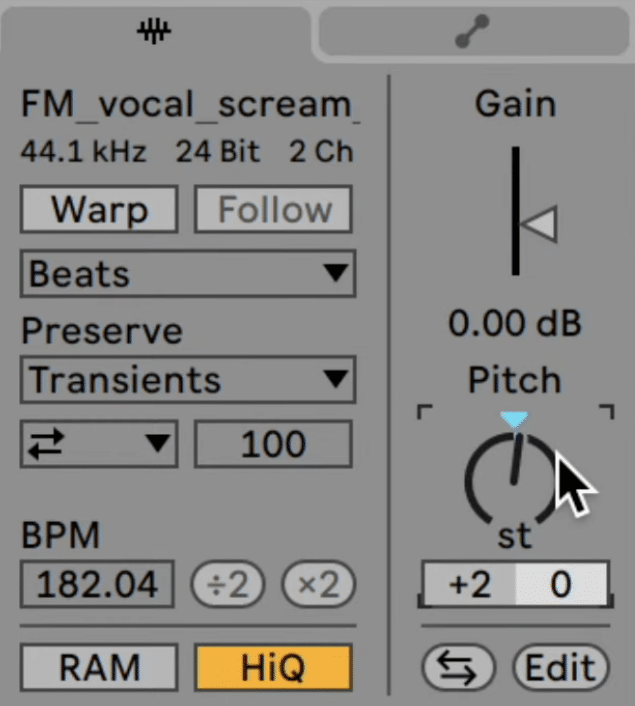
I used the FM_vocal_scream_pitchy.wav pattern from the Fabian Mazur – Hype Vocals pack:
I’ve added the pattern on each 4th beat of the primary bar of a 4 bar phrase. If this sounds complicated, simply have a look at the position within the association:

We’ll additionally have to transpose it up +2st so it sounds harmonically associated to the remainder of the monitor.
Let’s copy this to the intro and the drop so it stays constant, besides the primary 8 bars of the drop.
We wish the primary half of the drop to be targeted on the lead. So eradicating different sounds will assist create this distinction.
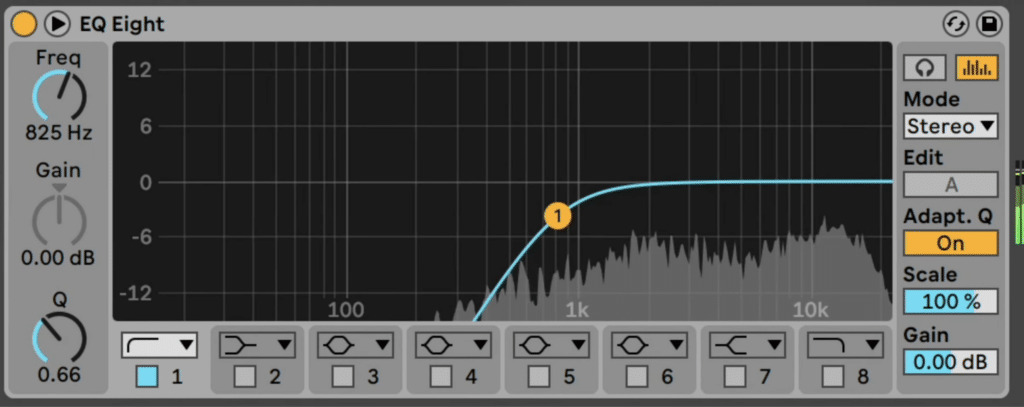
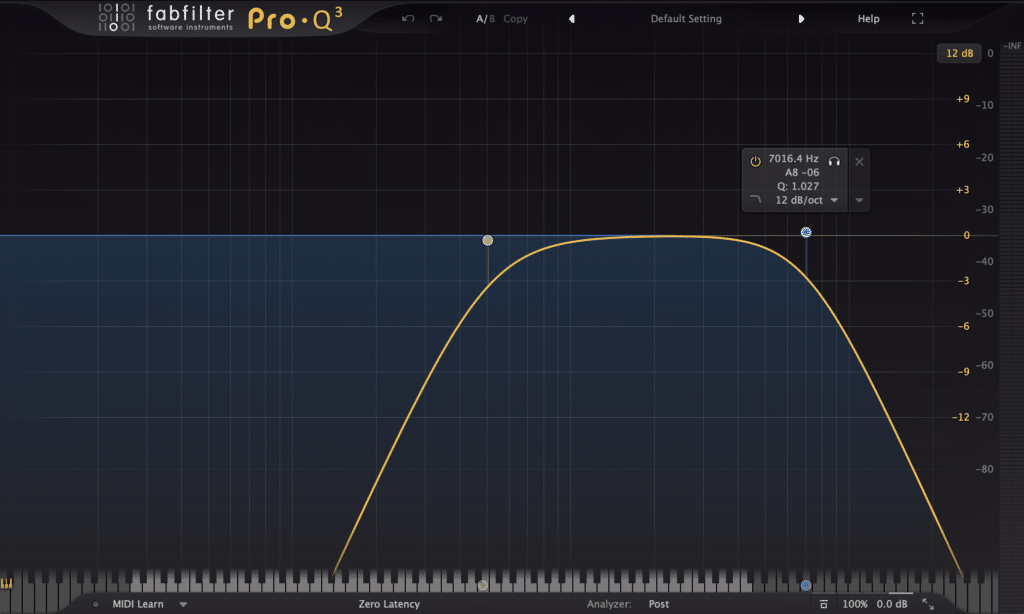
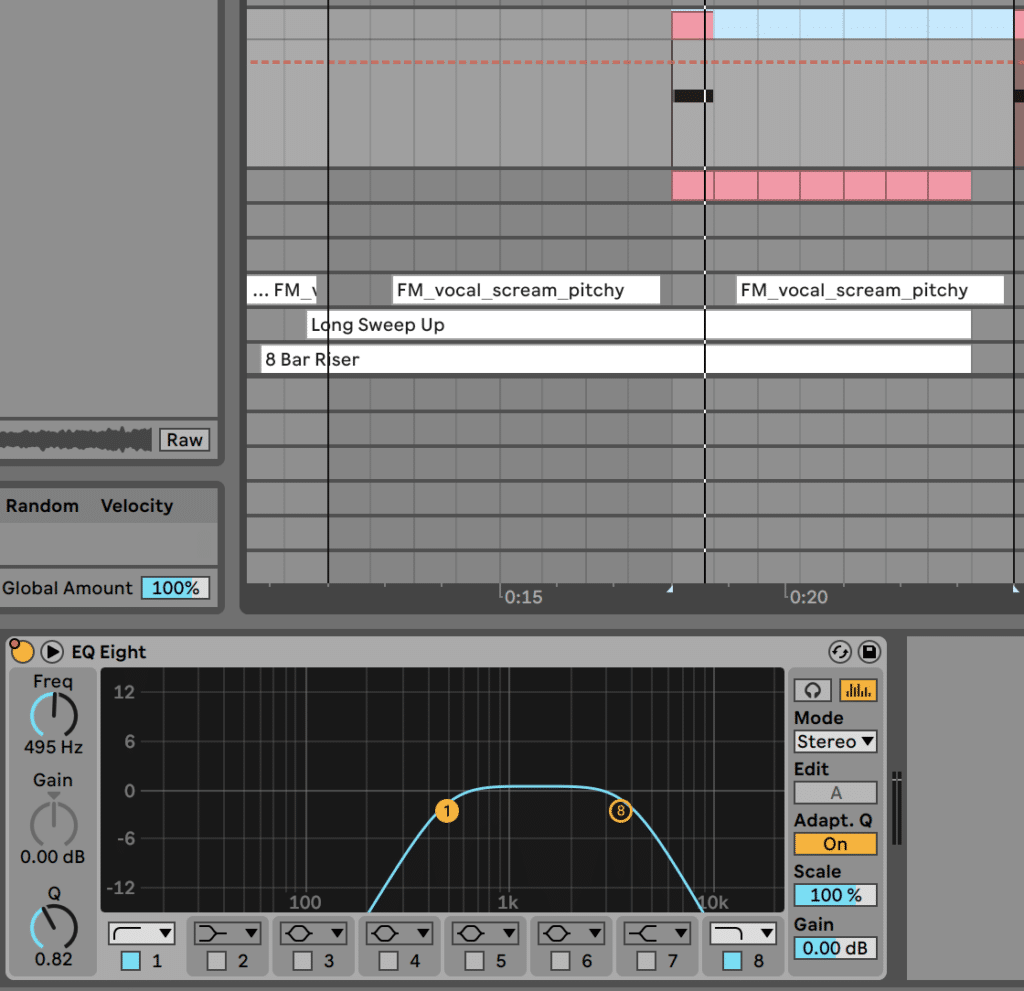
To push this sound into the background even additional, let’s add an EQ and lower out the low finish, in addition to a number of the excessive finish. I’ll use a cutoff of each 500Hz and 7kHz, respectively.
Now our monitor has just a little extra taste, and we are able to add much more FX by creating power within the subsequent part.
Step 5: Create Vitality
Now that we’ve received a stable set of components, we are able to begin to consider the construction and power of the monitor.
As a result of a monitor is extra than simply an 8 or 16 bar loop.
Fleshing Out A Strong Lure Association
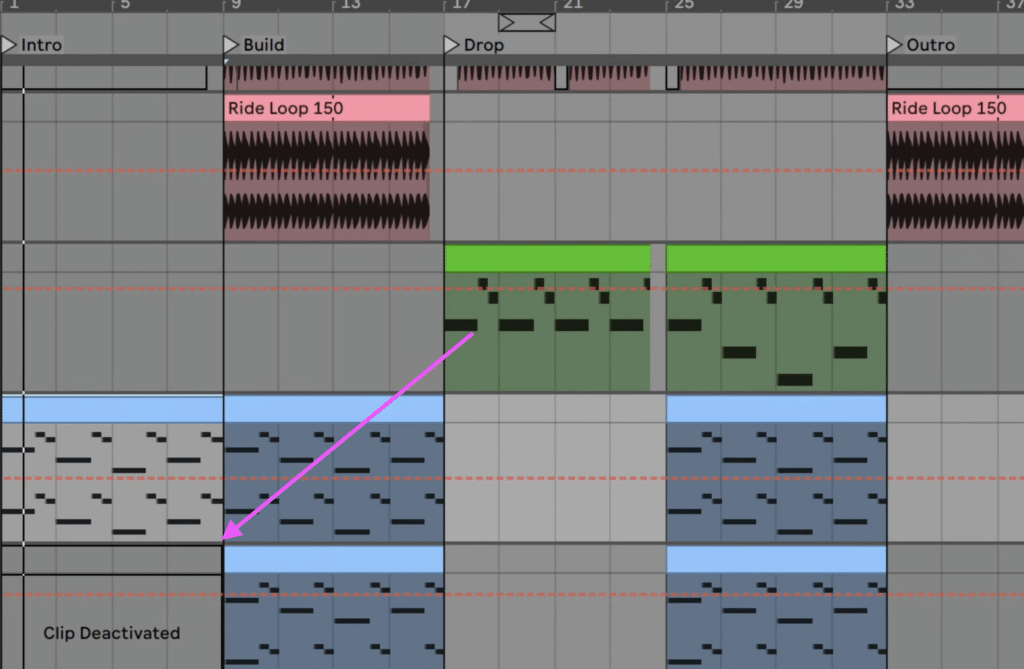
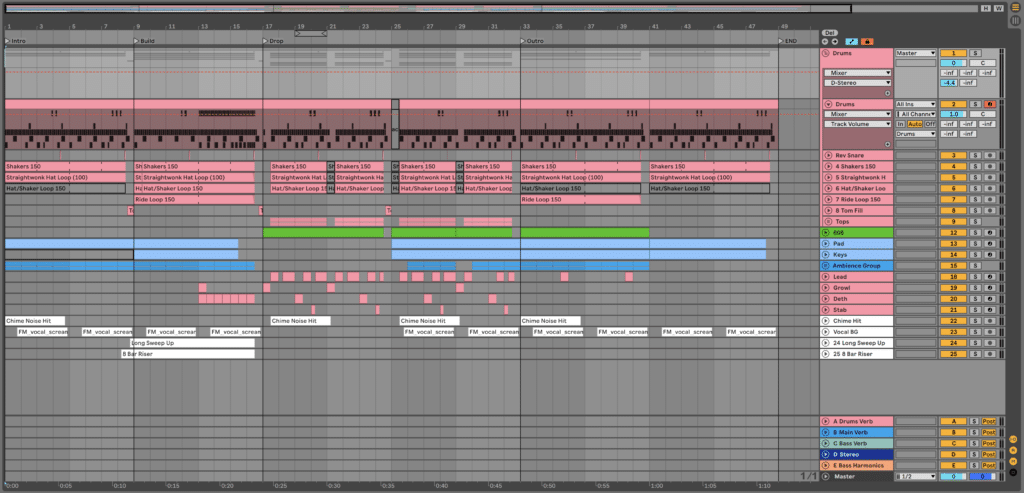
In lure music, you’ll usually have one thing that follows a construction like this:
Intro (8-16 Bars) – Breakdown/Construct (8-16 Bars) – Drop (16-32 Bars) – Drop Variation (Non-compulsory) (16 Bars) – Breakdown/Construct (8-16 Bars) – Drop (16-32 Bars) – Outro (8-16 Bars)
An instance of a tune that follows this construction can be RL Grime & Whethan – Outta Right here:
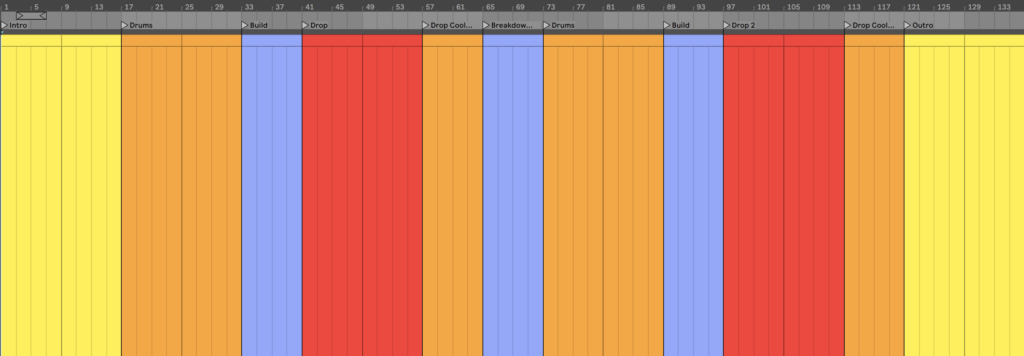
However for this instance, we’re going to solely create a half-length monitor. Right here’s our construction:
Intro (8 Bars) – Construct (8 Bars) – Drop (16 Bars) – Outro (16 Bars)
You possibly can add a distinct second drop after one other breakdown and construct for those who like.
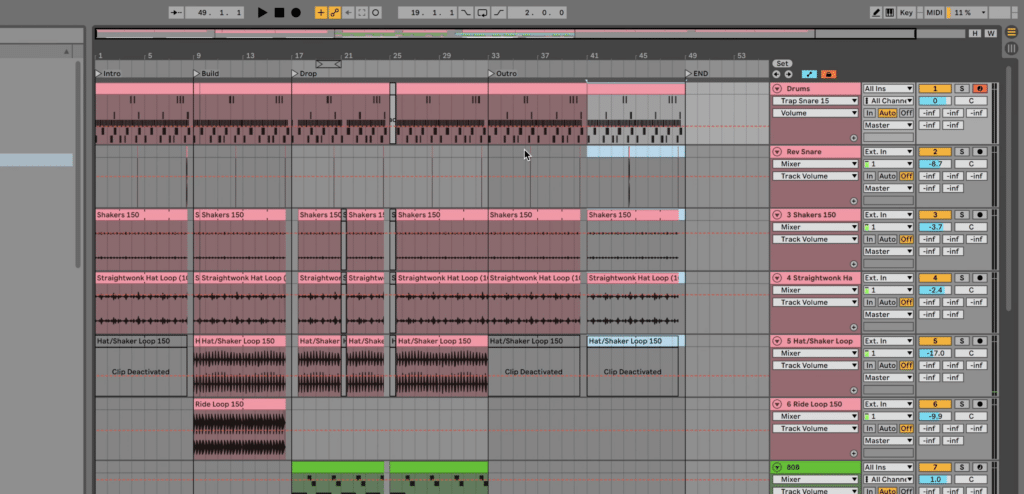
Let’s add some markers to our association to replicate this:
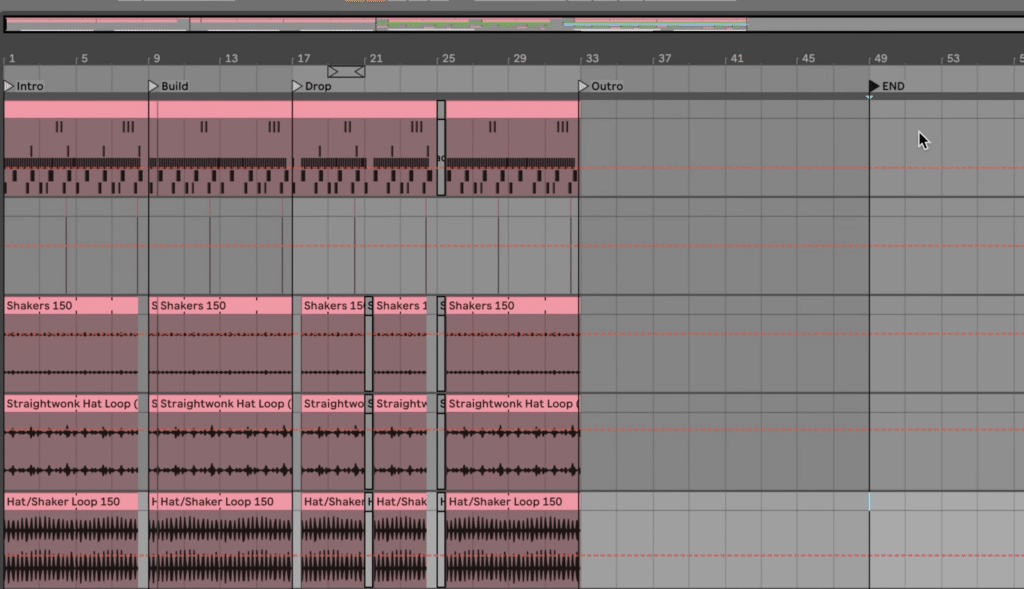
Doing this offers us each a top level view of the monitor, in addition to defines the aim of every part.
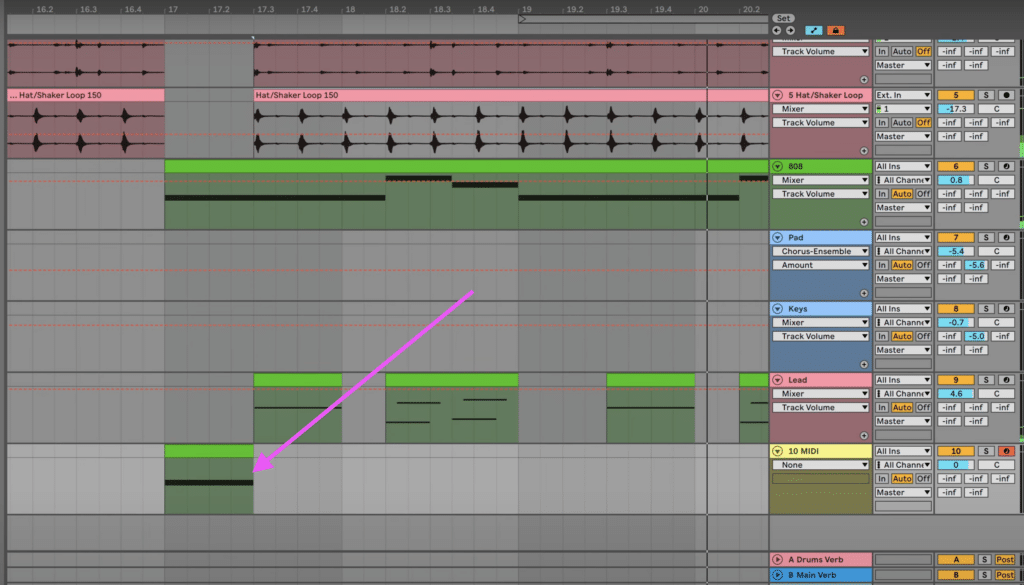
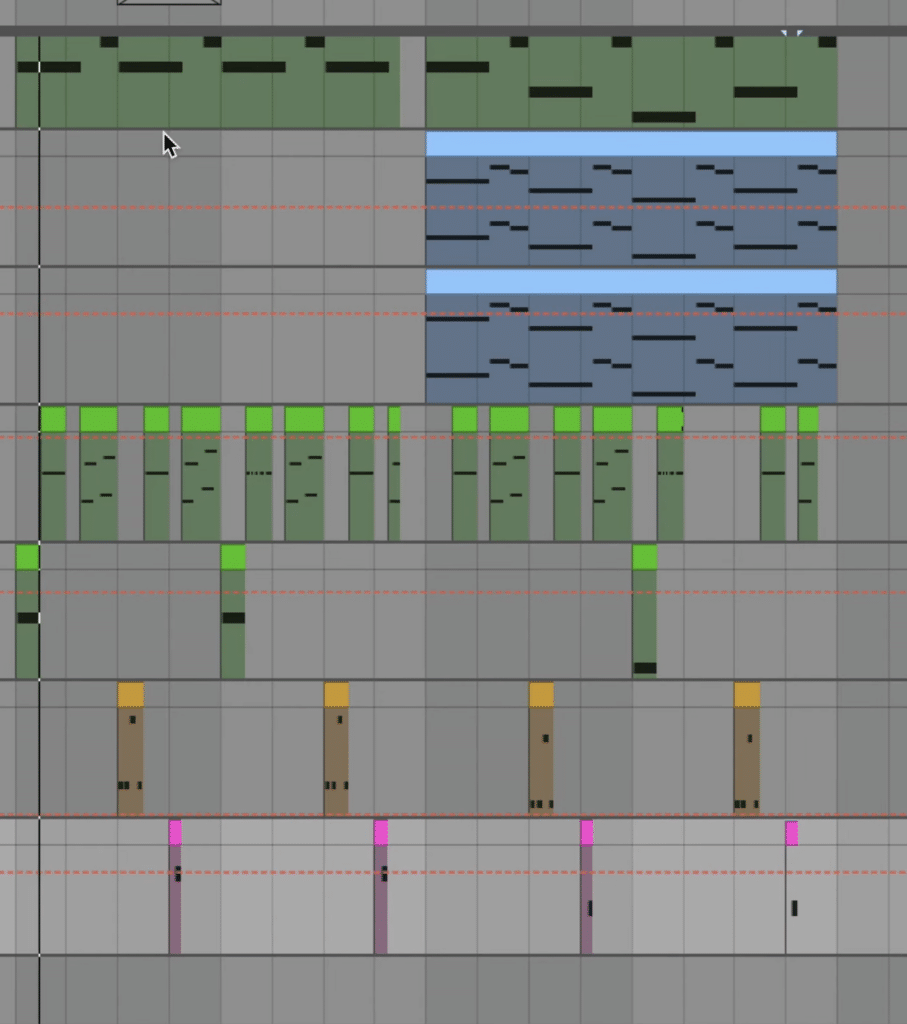
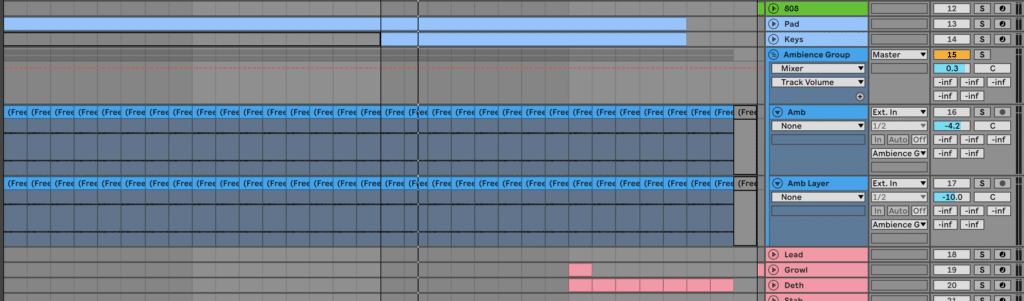
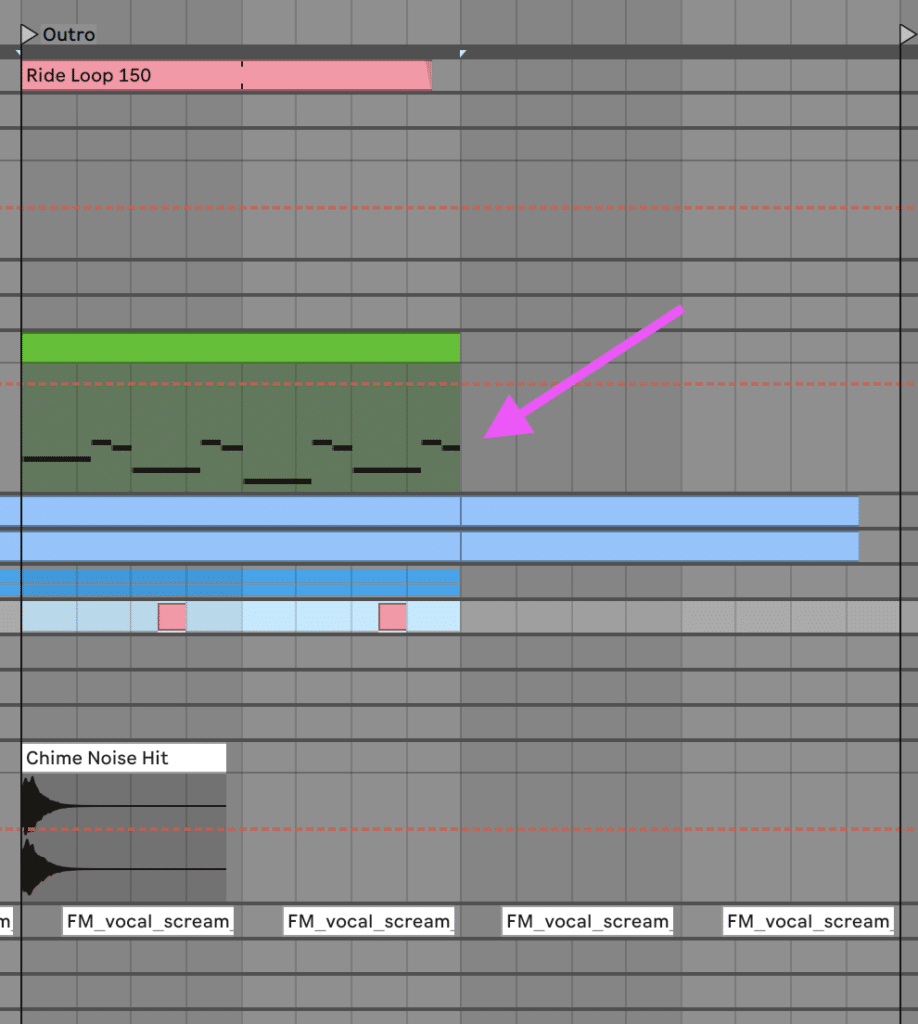
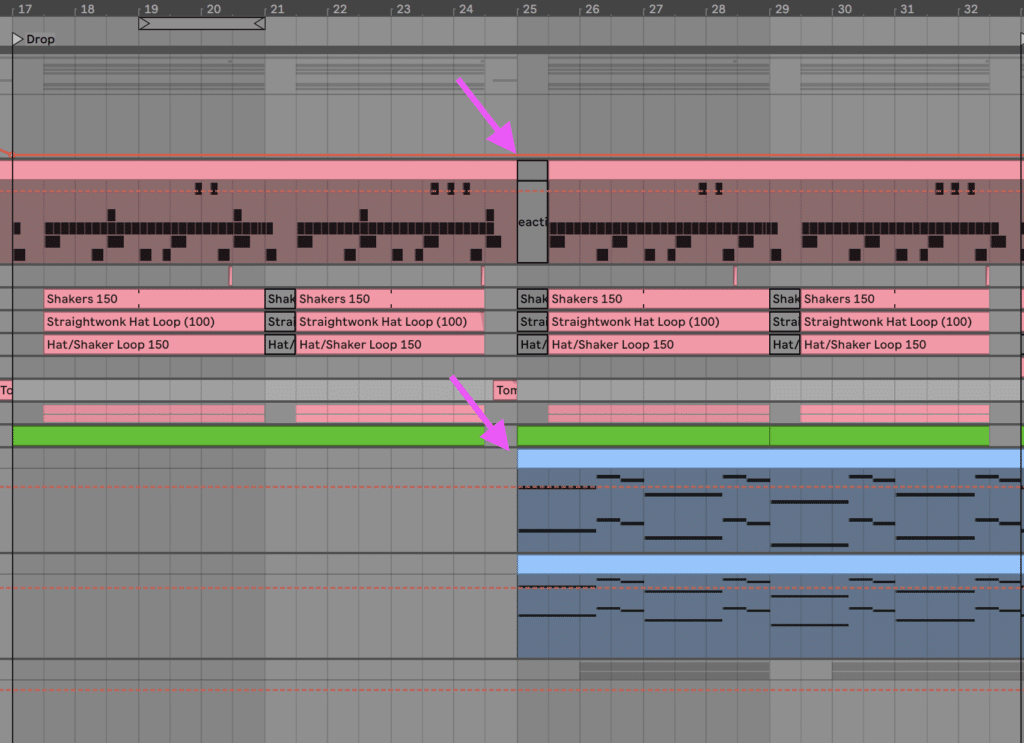
Let’s copy the drop drums over to the intro so we are able to make them barely completely different. To hold the power into the construct part, we’ll pull in one other loop to fluctuate up the drums and add some top-end power.
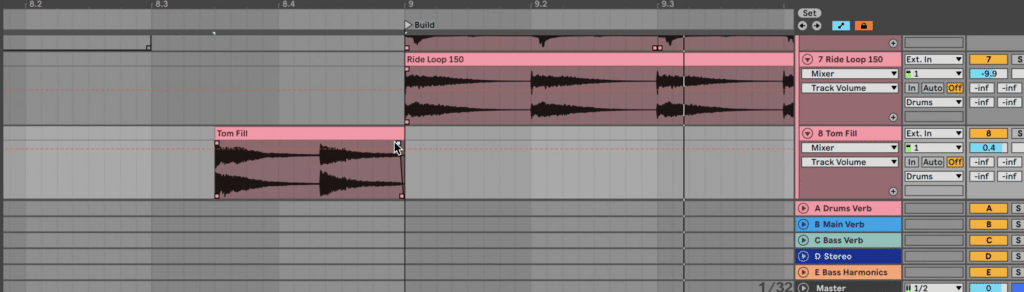
Drag the Experience Loop 150 onto a brand new audio monitor proper from the beginning of the construct. We’ll additionally emphasize this by eradicating the Hat/Shaker Loop from the primary 8 bars.

This sound will want a little bit of a quantity stability and a few EQ to tame the overly vibrant high finish. This helps the loop to take a seat within the combine correctly.
Whereas we’re at it, copy the primary 8 bars of intro drums to the outro, and duplicate it. This prepares us for engaged on the outro too, as the 2 sections will share similarities. Copy the trip loop to the primary 8 bars of the outro as nicely.
The Construct: FX
It’s necessary in lure music to create a robust sense of anticipation earlier than the drop, because it’s the climax of the monitor.
To vary up the construct, we’re going to create pressure in our drum patterns in just a few alternative ways.
From bar 9 onwards, we’re going to have a kick hit on the 1 after which lower out.
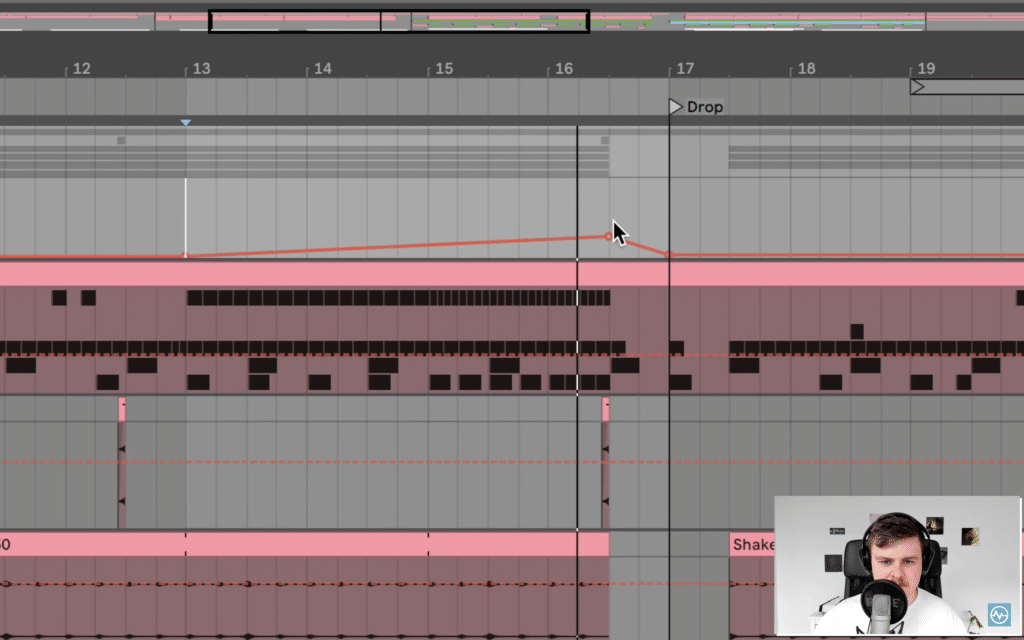
In the direction of the tip at bar 13, we’ll add a kick each 2 beats, then each beat, then each 1/2 beat.
To create some anticipation for the drop, we’ll additionally take all the things out two beats earlier than.
From bar 13 as nicely, we’ll add the offbeat snare each beat and growing in rhythm. The consequence will look and sound one thing like this:
Whereas we’re at it, we can provide the drop much more impression by taking the bass out of the drums with a high-pass filter. That is frequent throughout many genres of digital music to create a robust sense of pressure.
I’m going to make use of Ableton Reside’s Auto Filter, however you may be happy to make use of any EQ or filtering plugin:

Merely choose a high-pass filter and automate the cutoff from bar 13 to midway by means of bar 16:
You possibly can play with the precise cutoff values, however making a slope upwards from 0Hz to 140Hz labored for me. Be certain that to automate the on/off of your filter, so it doesn’t have an effect on the drums for the opposite sections of the monitor.
Now that now we have a sweeping sound in our association, let’s add two risers samples to bolster this power within the construct part. Let’s seize the Lengthy Sweep Up pattern and 8 Bar Riser pattern onto two new audio tracks.
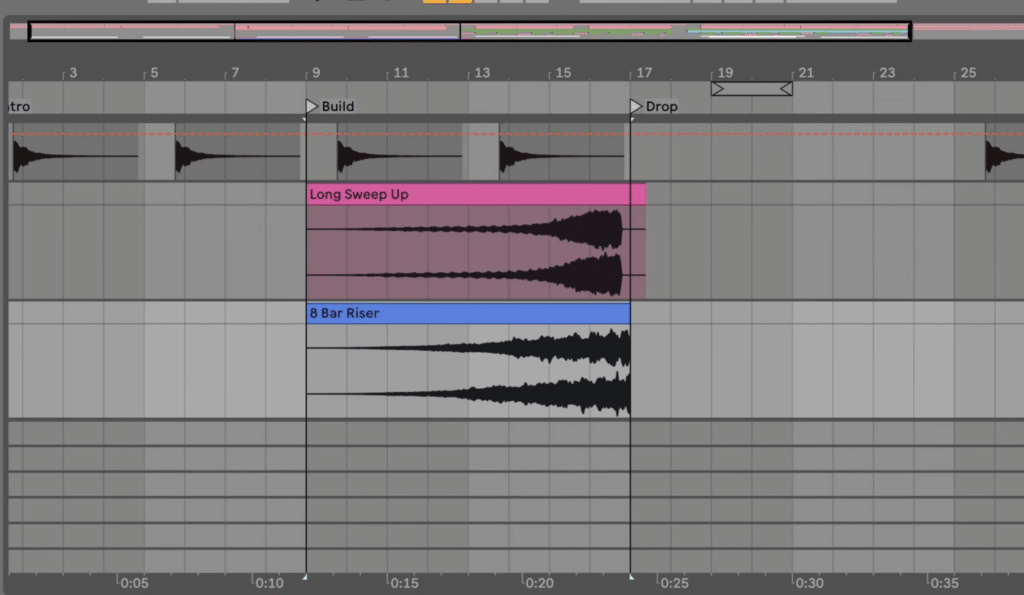
Unwarp each and align them in order that they finish proper on 16.3 when the two-beat hole earlier than the drop is.
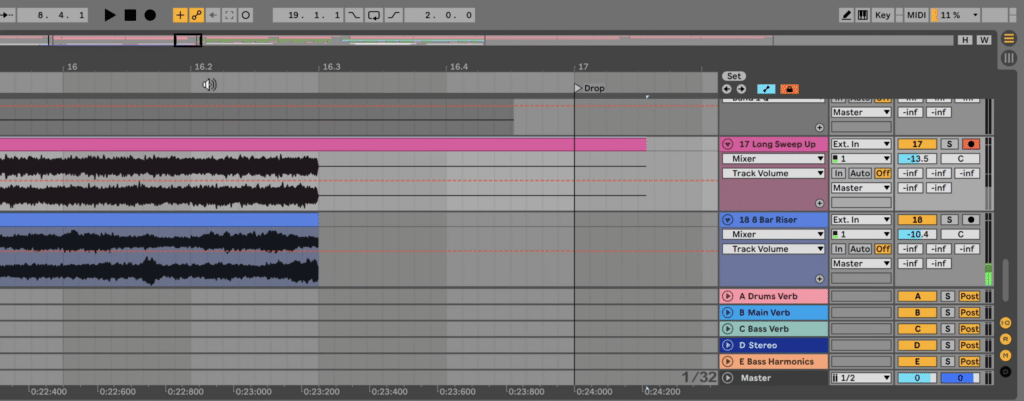
To complete, mix them to style (down 12 to 18dB works nicely right here, in any other case, they are going to be too overpowering).
The Construct: Teasing The Bass
We’ll additionally wish to introduce a number of the mid-bass sounds to bridge the hole between the construct and the drop.
Many lure songs undergo from the construct and drop having nearly nothing in frequent. The construct right here acts as a transition so your listeners aren’t confused.
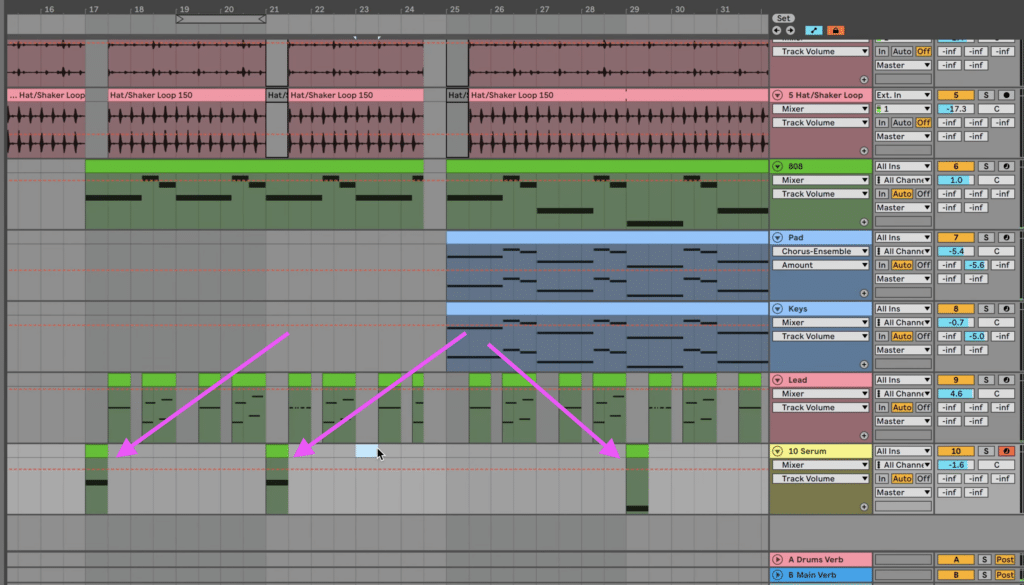
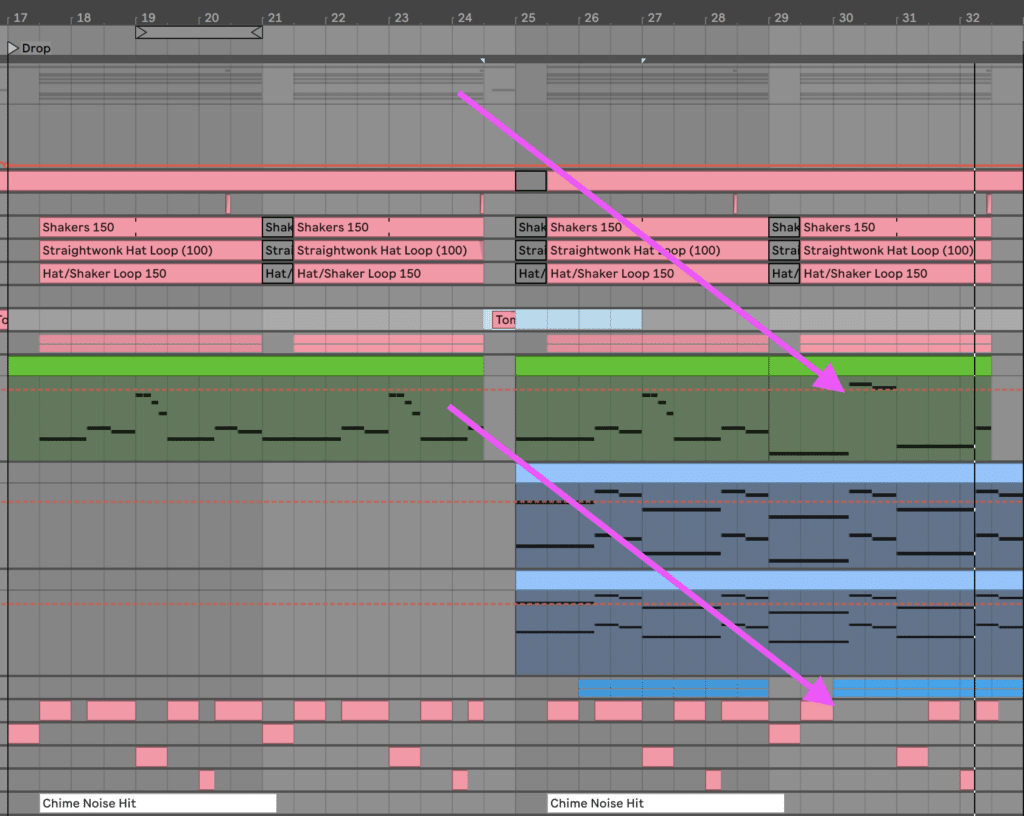
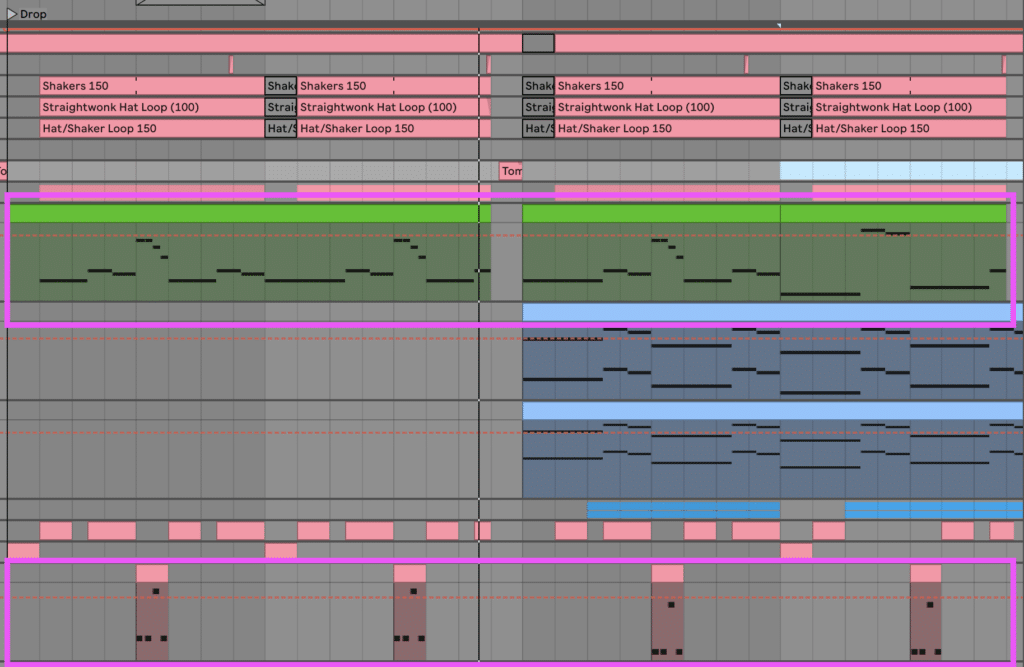
So copy over the Deth Reese sample and have it repeating from bar 13 onwards:
This works in idea, however the sound is simply too overpowering for this part.
Fortunately, the mod wheel is mapped to the filter cutoff for this preset, so let’s modulate the mod wheel to deliver it in over 4 bars.
Additionally, automate the quantity so it will increase over time to the max. I used Ableton Reside’s Utility for this.
Persevering with the theme, we’ll copy the primary growl within the drop over to bar 13.
Create a highpass filter at 500Hz to chop any low finish out, in addition to a low-pass filter at round 3-7kHz.
Lastly, deliver the keys and pad out at bar 15.3 in order that they don’t fill the hole created by the remainder of the weather chopping out. We wish to fill this with a tom fill in a while.
The Drop
Being essentially the most energetic level within the tune, we would like the drop to have most power.
We’ve finished this already by creating the bass phrases within the final part, however we wish to fill it out much more.
A typical means to do that is to make use of crashes, noise, and different ‘washy’ sounds within the background to fill out the excessive finish.
Let’s deliver into two samples to fill out this spectrum from the pack – Open Hat and Tape Noise Hit. Drag them onto two new audio channels:
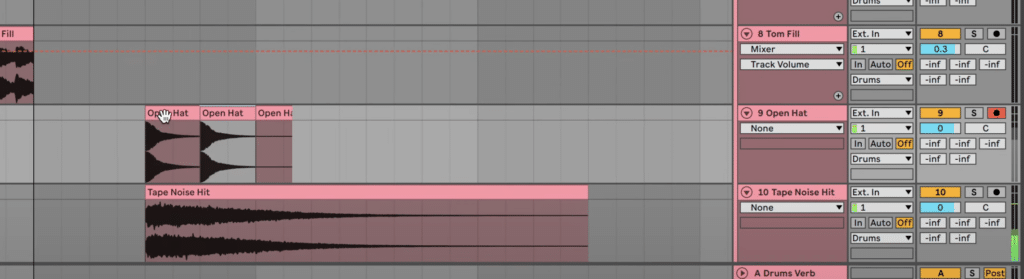
Merely have the Open Hat repeating each beat, and the Noise Hit repeating each half bar.
We’re utilizing two samples because the Open Hat provides us a rhythmic background, whereas the Tape Noise Hit creates a basic noise impact.
Be sure to take them out in alignment with every other gaps within the drums.
You’ll additionally wish to high-pass the Tape Noise Hit at about 1.4kHz to chop out any muddy low finish that’s current within the pattern.
Lastly, push these out into the background by turning down the quantity. As soon as we add limiting and compression on the last stage, this noise will assist the monitor to return alive.
The Intro
Copy the pad and keys over from the second half of the drop to the intro. This may introduce the principle melodic thought in a refined means.
Begin by eradicating the keys from the primary 8 bars to make it much more ambient for the very first part:
Take away the upper octave notes from the pad as nicely, to make it extra subdued.
We additionally wish to copy over a Chime Noise Hit to the primary beat of the intro, creating an preliminary sense of pleasure in our monitor.
Resampled Pad Atmosphere
Lastly, it’s good so as to add one thing distinct to the drop because it provides the part extra worth to the listener. This doesn’t should be a loopy factor – even one thing refined could make a distinction.
So on this part, I resampled the unique pad and reversed it over two layers, repeating each half bar:
One of many layers is down -12st, and the opposite -5st. This creates a pleasant harmonic sound (particularly when utilizing the feel warping mode).
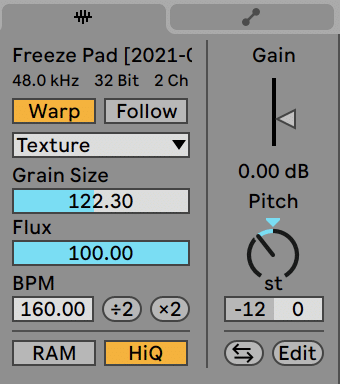
I additionally processed it with a bunch of FX. The precise processing doesn’t matter – it’s about reworking an current factor into one thing else.
All you need to do is flip down the layers to style and add a high-pass filter sweeping down. In spite of everything that, right here’s how the intro is sounding.
Copy these over to the second half of the drop, and the outro, which we’re about to get into.
The Outro
The intention of this part is to considerably mimic the intro, but in addition to deliver down the power for the shut of the tune.
To begin, we’ll copy the pad and keys over from the second half of the drop, twice. For the second half of the outro, we’ll transpose the MIDI of the keys down an octave to deliver down the power.
Additionally copy over the Chime Noise Hit on the primary beat of the outro. Be certain that the BG vocal stabs proceed all through this part too.
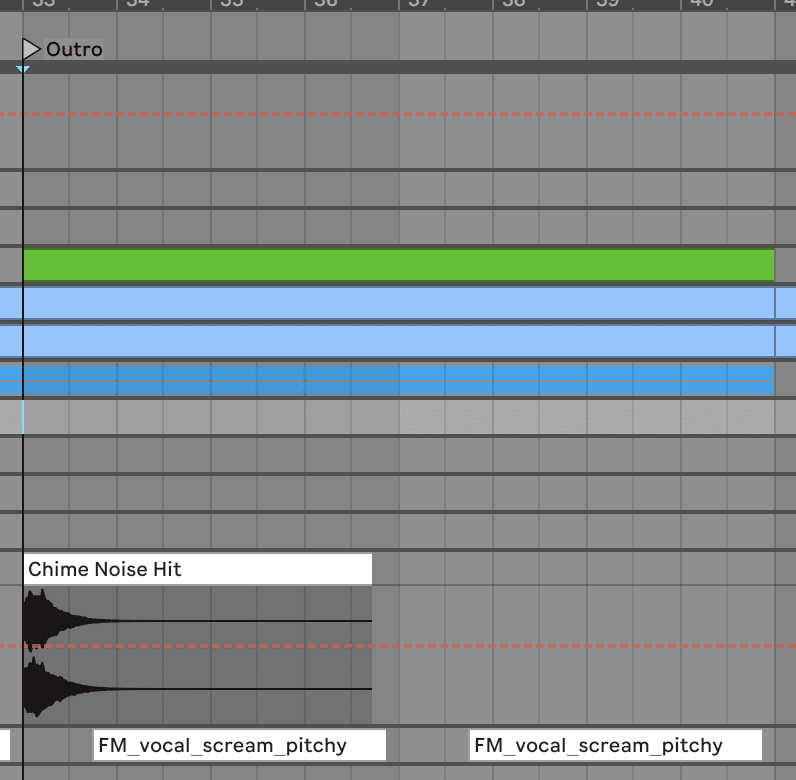
Copy the 808 patterns over to the primary 8 bars of the outro to provide it some continuity out of the drop.
After which additionally copy over the ‘pitchy’ lead clip so it retains some resemblance of the drop. However add a low move filter to push it into the background.
Now the outro must be sounding like this!
Now we are able to see our lure tune has a correct construction with a distinct power degree for every part. Congratulations you probably have made it this far, as a result of we’re practically there.
All now we have left to do is add just a few extra ‘magic moments’ and provides it a last combine and grasp.
Step 6: Magic Moments
To maintain lure music attention-grabbing, it’s necessary to create ‘magic moments’.
It’s best so as to add them when you’ve received a full association, as you hear the place you would possibly begin to lose curiosity.
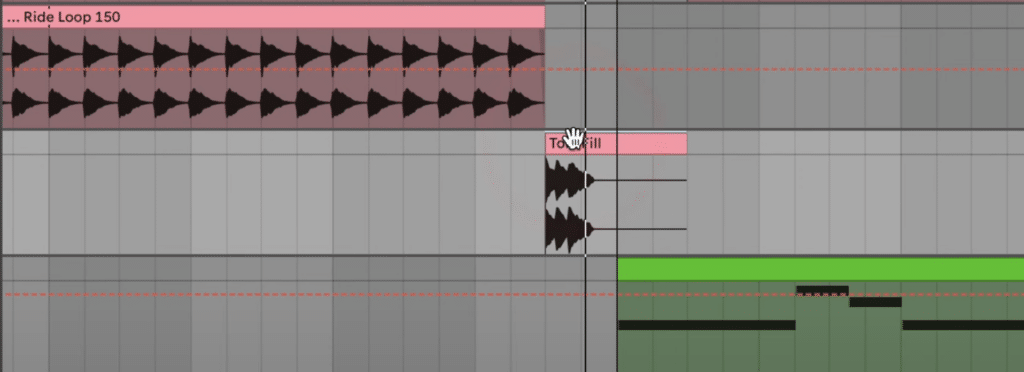
We’ve already by the way created some (such because the pitch sweep on the principle lead). However let’s add just a few extra, beginning with a tom fill.
Tom Fills
Toms are a traditional drum sound to incorporate proper earlier than the drop, as they sound big and energetic.
Merely drag the Tom Fill pattern onto a brand new audio monitor, and place it one beat earlier than the drop.
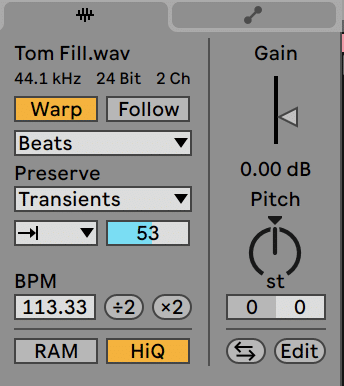
Be certain that it’s warped in time on the Beats warping mode and shortened so it ends on the drop:
These first 3 hits lead fairly properly into the drop, however let’s shorten them with the next transients settings:
The consequence ought to sound like this!
This creates a easy transition into the drop, shifting the power fairly naturally. Now we are able to copy the tom fill so it comes right into a 2 bar hole earlier than the construct.
This time, use the primary a part of the tom fill pattern as an alternative of the final half. Then, offset the timing barely (as pictured beneath).
You don’t should be as tight with the transients, however this fill is extra ‘relaxed’ than the one proper earlier than the drop.
Talking of gaps, we are able to create one in the midst of the drop, permitting the keys hit to shine by means of. Take away 2 bars earlier than and after the start of the 2nd half of the drop.
This straightforward approach provides listeners a payoff for sticking round.
808 Octaving & Variations
One other good approach is to transpose the 808s up an octave for sure hits. Let’s do that in direction of the tip of the drop part, the place there has already been a niche left.
Let’s do one thing comparable mimicking the rhythm of the Deth Reese notes.
Go into the 808 MIDI sample and program 2 F# notes up the octave from the remainder of the bassline, adopted by an E and a C#. Copy these over to different situations the place the Deth Reese sound is current.
Make The Growl Shine
Lastly, emphasize the primary growl by eradicating the 808 on the primary 2 beats of the bar. This may permit that growl to take entrance and heart proper when the drop hits.
Now our monitor has that additional degree of element added, making it really feel extra skilled and completed. Let’s finish with the mixdown.
Step 7: Last Polishes
When studying find out how to make lure music, most producers neglect each mixing and mastering. Nevertheless it’s necessary that your beats come throughout in the very best gentle.
At this level, the final duties to carry out are:
- Balacning ranges
- Including EQ
- Controlling the stereo picture
- Limitng and mastering
As a result of mixing may go on ceaselessly, I’m not going to dive into the detailed degree for every channel. However it would be best to spend a little bit of time adjusting the fader volumes of every monitor.
If you wish to learn the way I strategy mixdowns, try this text on ‘pondering like a compressor’.
Stereo Imaging
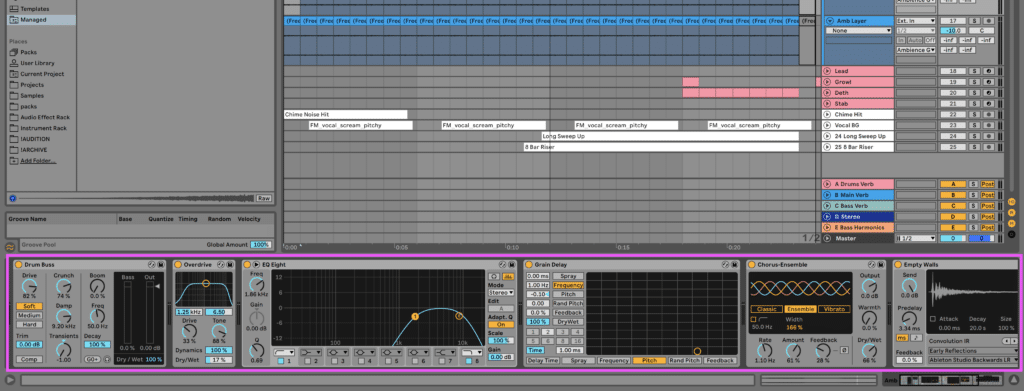
To assist the drums sound fatter, I’ve used stereo imaging by way of a ship. I take advantage of the iZotope Ozone Imager 2 plugin with another FX to sprinkle in some facet data.
That is solely blended in just a little bit, in any other case it’ll smash your drum combine.

Lure Lead Fattening
To provide the lead extra presence, I’ve additionally given it a lift within the midrange at about 1.4kHz:
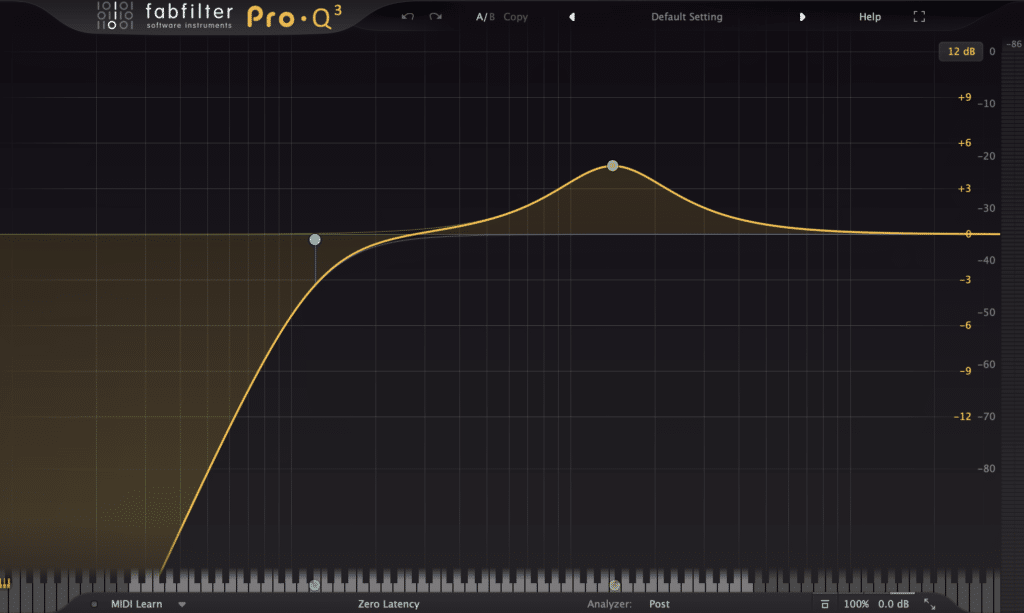
Plus added some chorusing and saturation to provide it extra of an ‘edge’:
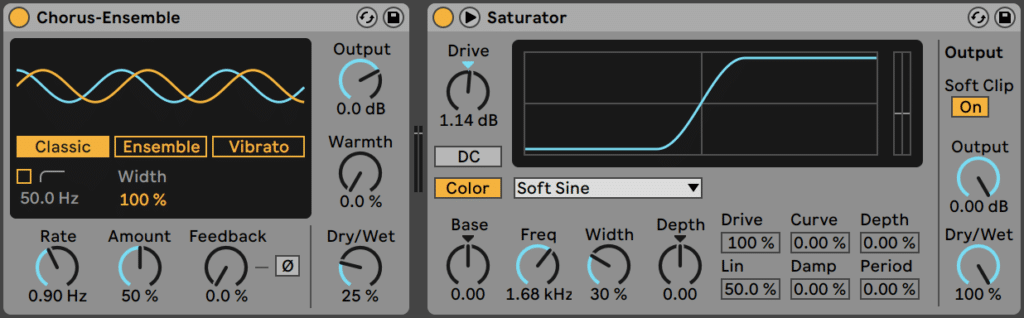
Right here’s a earlier than and after of the processing – it sounds far more current and big:
It’s possible you’ll have to deliver the fader quantity right down to compensate.
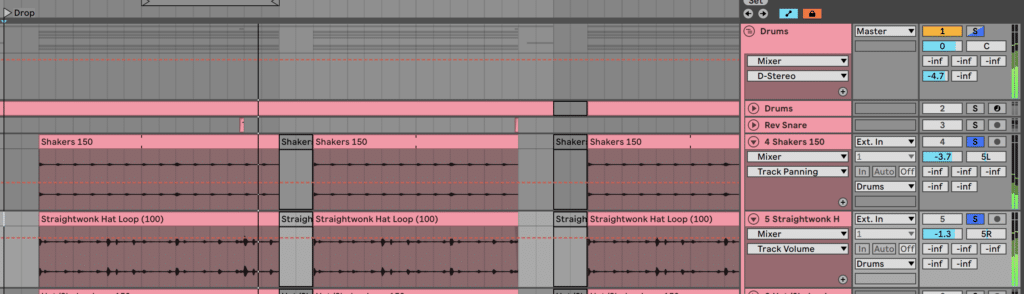
Refined Panning
I’ve additionally panned the Shaker Loop 150 and Straightwonk Hat Loop 5L and 5R to provide it a little bit of stereo separation:
Mastering & Limiting
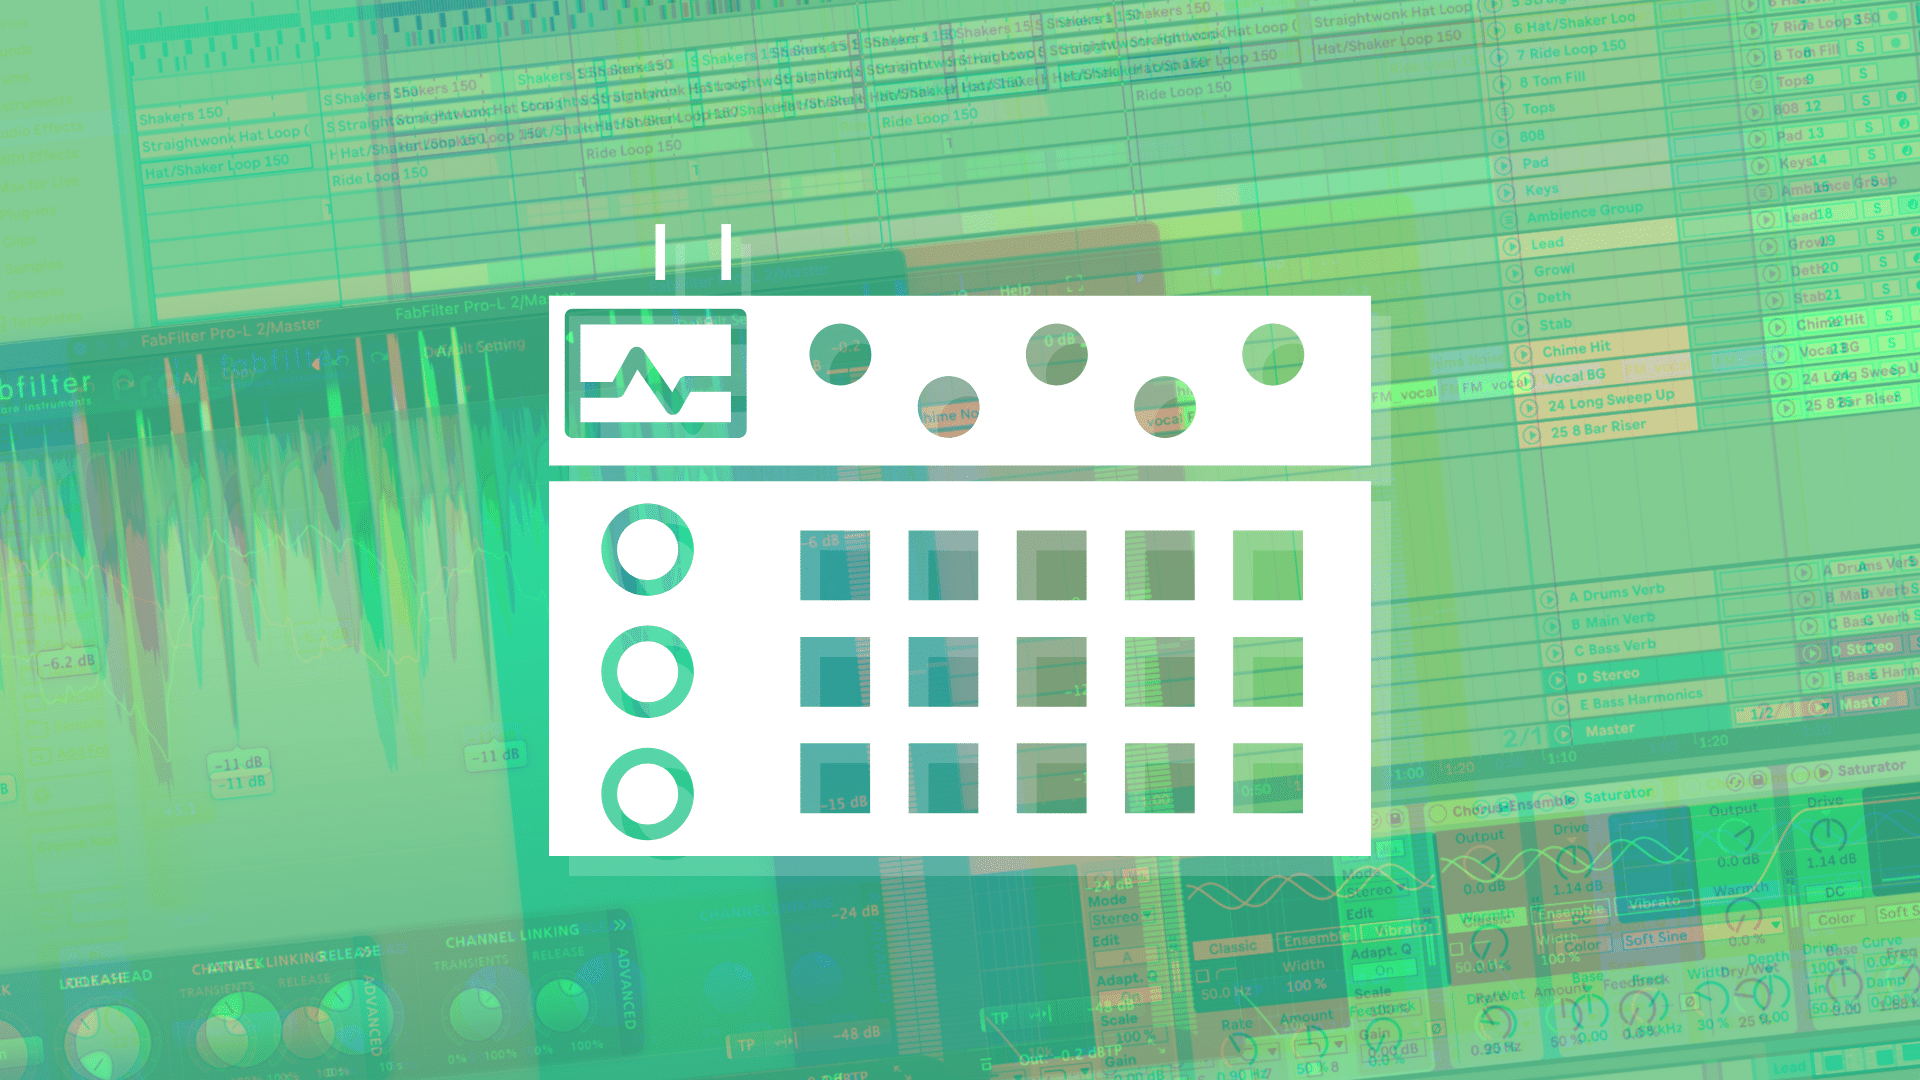
Lastly, verify how your combine sounds with some loudness by utilizing a limiter. I’m utilizing the FabFilter Professional-L 2 plugin on the Fashionable setting and boosting the achieve to style.
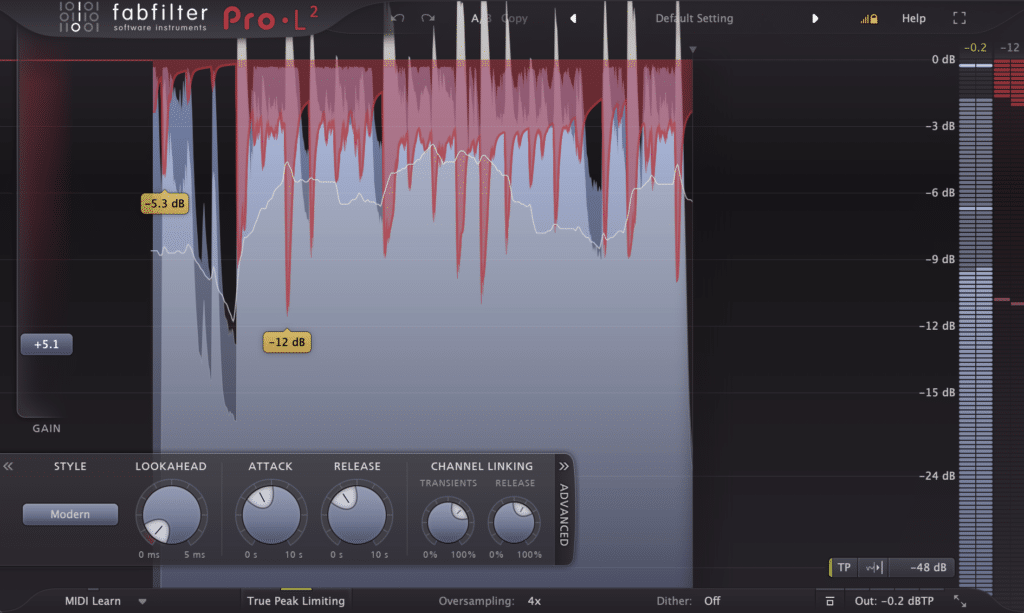
In case your combine sounds bizarre at this stage, chances are you’ll want to return and spend extra time balancing the degrees.
However right here’s the ultimate consequence!
Now it’s your flip – seize the samples from the Lure Starter Package beneath and get producing your personal music:
What’s Subsequent?
That’s it! I hope you realized quite a bit about find out how to make lure music with this information.
Even when it’s only a new approach or two – be sure you apply what you realized in the present day in your DAW.
When you’ve got any options for a way this information will be improved, flick me an electronic mail at [email protected].