
Subtractive synthesis may sound like an obscure idea to you.
But, it is without doubt one of the important constructing blocks of sound design. And though it may appear overwhelming at first, it doesn’t should be that approach.
For this reason we’ve made this information for you. Collectively we’ll run by:
- What subtractive synthesis is
- The way it differs from different types of synthesis like wavetable synthesis
- Some primary rules to get you began
Let’s dive in! ?
What Is Subtractive Synthesis?
Subtractive synthesis is a type of synthesis the place elements of a sign wealthy in harmonics are attenuated with a filter. By filtering out sure frequencies from a primary waveform, you’ll be able to sculpt the sound to your liking.

It’s also possible to play with the ADSR envelope (extra on that later) to form how the sound fades out and in.
You possibly can consider subtractive synthesis as sculpting: you begin off with a slab of rock, and also you finish with a sculpture by eradicating the elements you don’t need.
That is how basic synths function, such because the Prophet-5, Juno-106 & Jupiter-8.
A fast refresher on harmonics. A harmonic is solely a waveform whose frequency is a a number of of the unique (or basic) frequency. For instance, the word A at 440 Hz has harmonics at 880 Hz (first harmonic), 1,320 Hz (second harmonic), and many others.
Harmonics are what offers a sound its richness and its timbre.
Pay attention to those two examples:
Let’s see how this interprets visually:
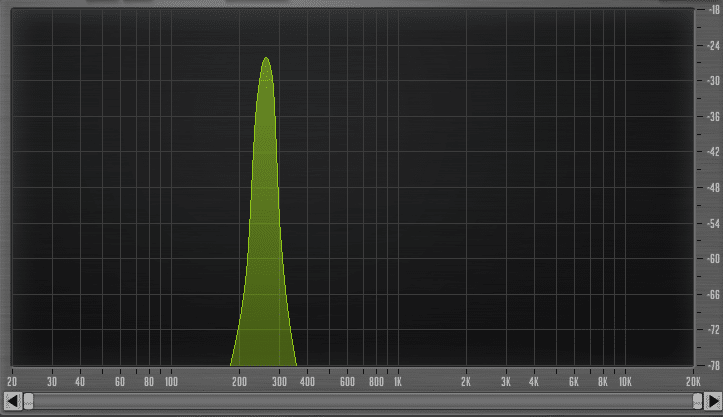
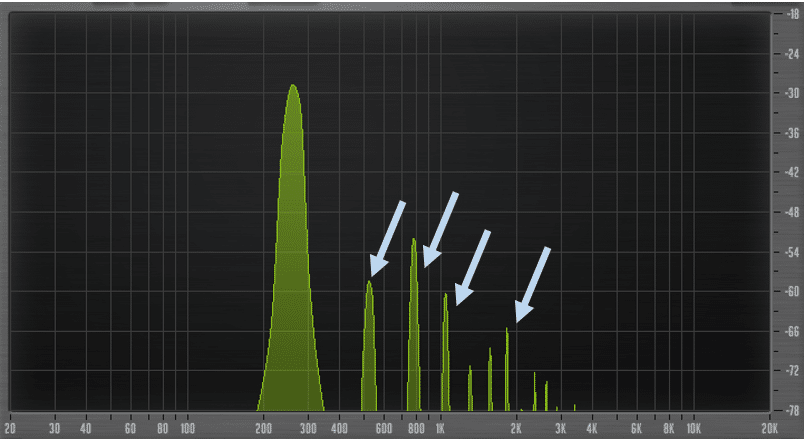
With subtractive synthesis, you’re taking a sign wealthy in harmonics and filter out sure frequencies.
Analog synthesizers from the 60s and 70s had been closely primarily based on this method. The Minimoog, some of the well-known analog synthesizers of the previous 50 years, relies on subtractive synthesis.
Nonetheless, figuring out that these basic analog synths can simply attain the US$10,000 price ticket, most of us shall be utilizing tender synths.
Earlier than going any additional, let’s focus on what units subtractive synthesis aside from different types of synthesis.
In the event you really feel such as you want a refresher on sound design basically, make certain to take a look at our course Breakthrough Sound Design.
How Does It Differ From Wavetable Synthesis or FM Synthesis?
Wavetable synthesis has change into a cornerstone of recent music manufacturing.
Typically referred to as “sample-based synthesis” (as a result of sourcing wavetables from audio samples), wavetable synthesis makes use of morphing oscillator waves to create sounds.
Whereas subtractive synthesis relies round a single primary waveform, wavetables can retailer numerous completely different frames, permitting you to scroll by from one wave to the following. This creates the sensation of motion in your sound.
Alternatively, frequency modulation synthesis (or FM synthesis) takes the unique waveform and modulates its frequency over time to create a brand new frequency.
The sounds you get from FM synthesis are sometimes described as harsh and metallic. To get an thought of what FM synthesis feels like, consider these growly mid-basses that you simply hear within the brostep period of the early 2010s.
The Fundamentals of Subtractive Synthesis
As with all complicated subjects, it’s useful to deliver it again to the fundamentals first. Let’s look at the completely different parameters that come into play in subtractive synthesis.
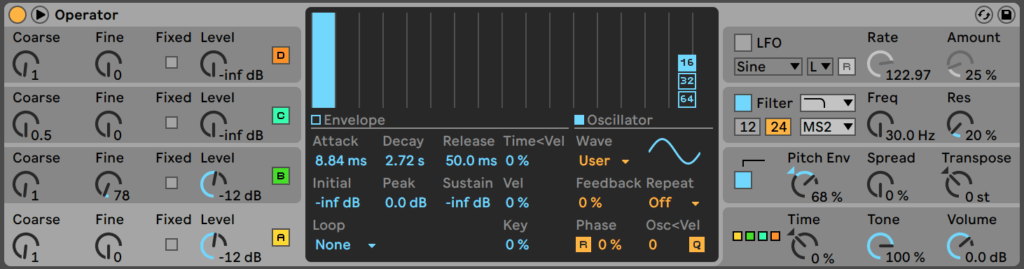
Selecting The Oscillator
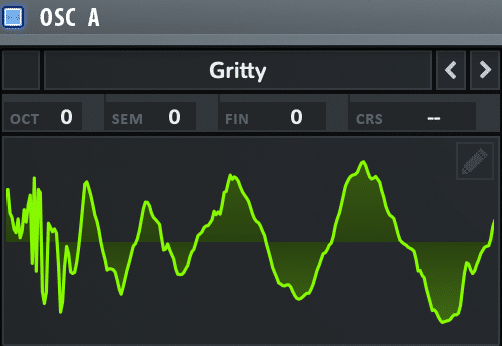
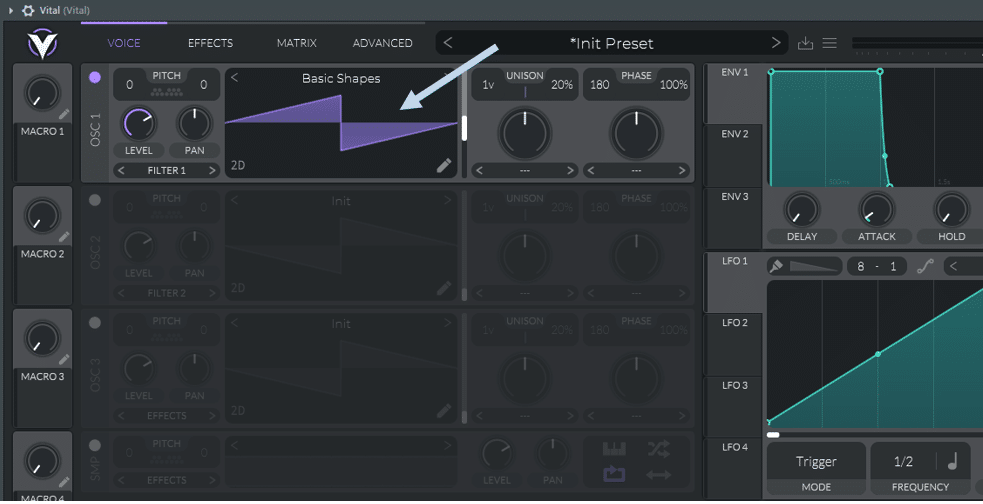
Subtractive synthesis begins off with an oscillator. The oscillator is the supply of the sound. There are a handful of primary waveforms that we will decide from as a place to begin (make certain to show down your quantity a bit first):
Sin wave
A sine wave is a pure tone containing only one frequency.
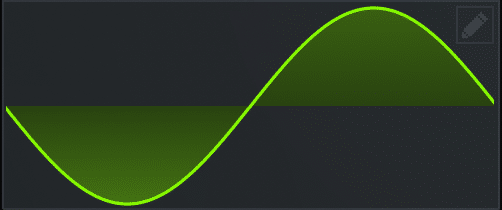
It’s generally used for sub-bass and really tender key and pad sort sounds.
Right here’s a pure sine tone:
Sq. wave
On the alternative finish of the spectrum, we now have a sq. wave.

A sq. wave has a hole sound with quite a lot of harmonics to provide it a full sound. Squares are used for basses as a result of their distinct sound.
Sawtooth wave
A sawtooth (or noticed) wave is probably the most dense wave you may get.
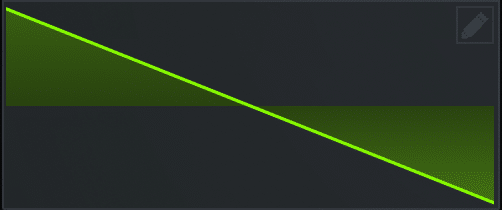
It options all odd and even harmonics and quite a lot of prime finish. For that reason it’s used for giant chord sounds and leads very often.
Triangle wave
A triangle wave is a curious use case. It’s similar to a sine wave however has a bit extra grit to it.
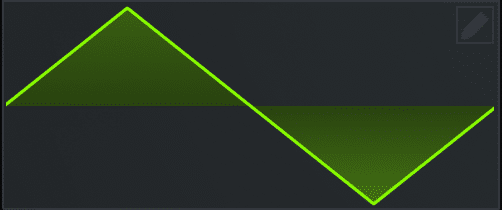
It’s generally used for softer leads and bass sounds.
As you possibly can think about, selecting the oscillator is without doubt one of the most essential steps. Earlier than diving into filtering and LFO automation, ask your self some questions.
Would you like a tender, clean sound? Are you on the lookout for one thing extra aggressive with quite a lot of harmonics?
Answering these questions will enable you to select the appropriate waveform. After all, it’s also possible to select a waveform at random, experiment, and see the place you find yourself!
It’s also possible to add a number of oscillators to create a richer sound.
As we proceed our exploration, I shall be utilizing the VST synth Vital (which is free and extremely really useful to check out). The identical parameters will be present in most synths similar to Serum or Large.
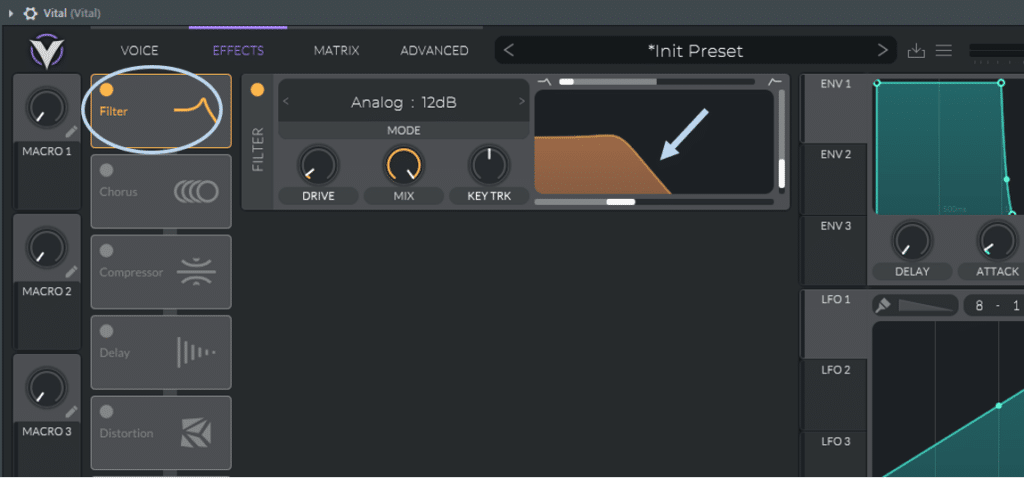
Deciding on Frequencies By way of Filtering
One of many first steps we will take to sculpt our sound is filtering. Most of the phrases used right here have been explored in our information on audio filters, so be sure to are aware of them.
Let’s begin with a sawtooth wave, and apply a low-pass filter:
Let’s hear how our sound has modified:
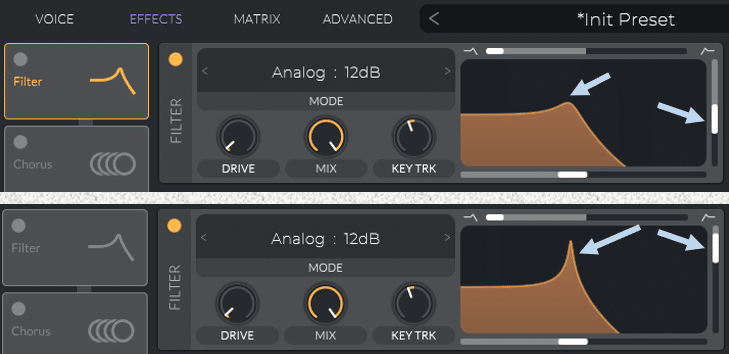
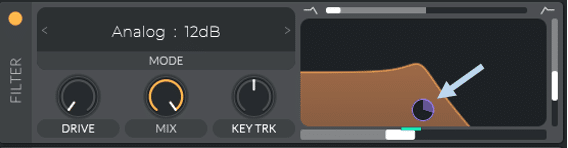
Equally, you might additionally apply a band-pass filter to pick out simply the “center” frequencies:
As you modify your filter, it’s also possible to play with the resonance to intensify the frequencies across the cutoff:
On this instance, we’re adjusting the filter dynamically by time with automation.
Past your customary filters, Important additionally has some relatively unique filters.
Considered one of my private favorites is the formant filter:
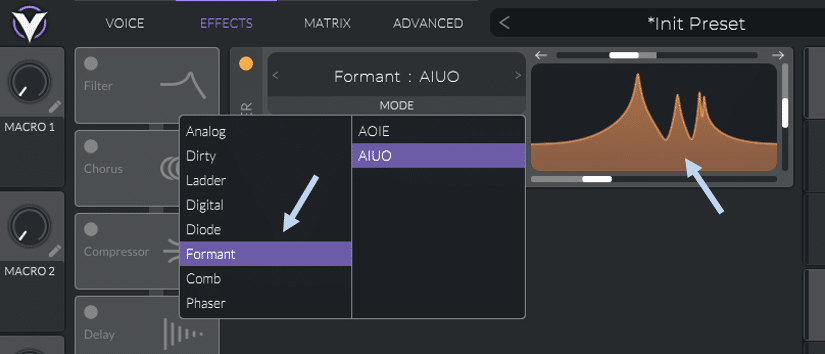
Let’s have a hear:
Coupled with some automation, you may get actually artistic with some easy filters. Nonetheless, frequencies aren’t the one parameter you possibly can modify.
Within the subsequent part, we’ll discover how controlling the quantity of your sign will help form your sound.
Enjoying With The ADSR Envelope
ADSR settings are a key part of all types of synthesis. With subtractive synthesis, tweaking the ADSR envelope means that you can form the amplitude (or quantity) of your sound throughout time.
A fast refresher on ADSR – it stands for Assault-Decay-Maintain-Launch, and dictates how the quantity of a sound evolves by time:
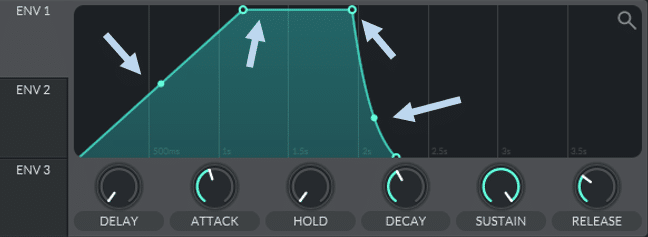
Listed here are how these 4 elements have an effect on a sound’s quantity:
- Assault: how rapidly the sound reaches its full quantity after being activated/performed
- Decay: how rapidly the sound drops to its maintain degree after its peak
- Maintain: the fixed quantity at which the word performs after going by its decay section
- Launch: how rapidly the sound fades as soon as the word stops being performed
Within the above instance, the maintain is about to 100%, that means the “fixed” quantity is identical because the one reached at its peak.
By tweaking these settings, we will form our sounds with precision.
Let’s have a look at some examples.
Let’s begin by setting a gradual assault and an extended launch:
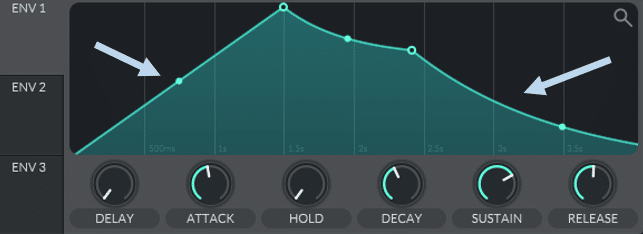
Any such gradual fade in / out is particularly nicely fitted to pads and atmospheres.
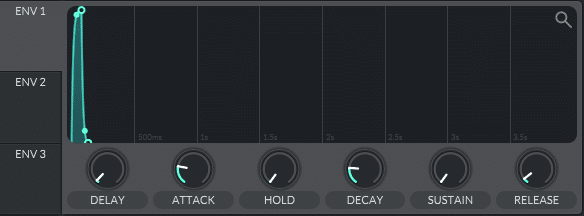
Alternatively, setting very low assault and launch charges will end in a “plucky” sound – higher fitted to melodies:
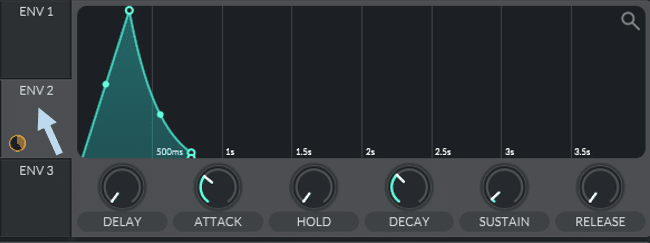
As defined above, ADSR settings usually seek advice from a sound’s quantity. By default, envelope 1 (ENV 1) in Important is assigned to the sound’s quantity.
Nonetheless, an envelope can truly be assigned to a large number of parameters.
For this reason we now have different envelopes (ENV 2 and ENV 3) with which to play with. Let’s discover.
First, let’s draw a brand new envelope for ENV 2:
Let’s assign this new envelope to the cutoff of our low-pass filter. To do that, merely drag-and-drop envelope 2 over to the cutoff knob of the filter:
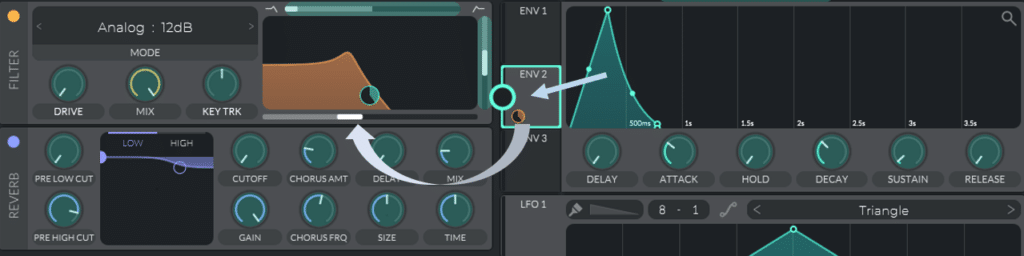
You’ll discover that when you begin dragging your envelope, all of the potential settings the place you possibly can assign will probably be highlighted in inexperienced.
Let’s take heed to the outcome:
So what simply occurred? Mainly, we at the moment are telling the cutoff of the filter to open up and shut in line with the envelope we drew.
You possibly can think about the infinite prospects this brings.
Let’s have a look at one other instance.
Begin with a primary sound with 2 oscillators, 1 sin, and 1 sawtooth. Let’s draw a rising and falling envelope, and assign it to the Degree of the sawtooth oscillator:
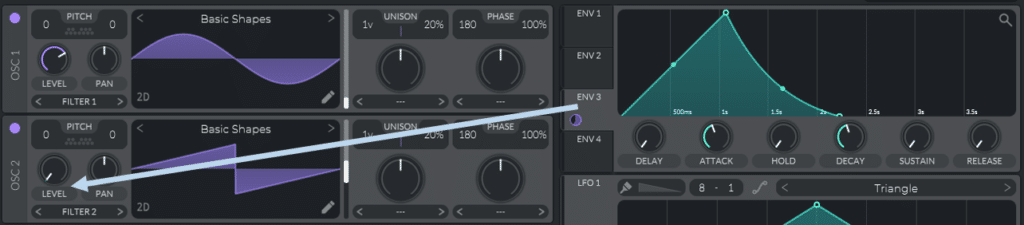
This implies the quantity of the sawtooth wave will rise and fall in line with our envelope. Let’s give it a hear:
When you grasp the facility of assigning envelopes, the world turns into your oyster!
Creating Motion With LFOs
LFOs are one other approach of dynamically affecting a sound’s traits. LFO stands for a Low-Frequency Oscillator and takes its title from its frequency which sits beneath 20 Hz.
The human ear can’t understand frequencies this low, so how are these oscillators used?
Much like an envelope, an LFO is assigned to a different parameter to regulate it dynamically.
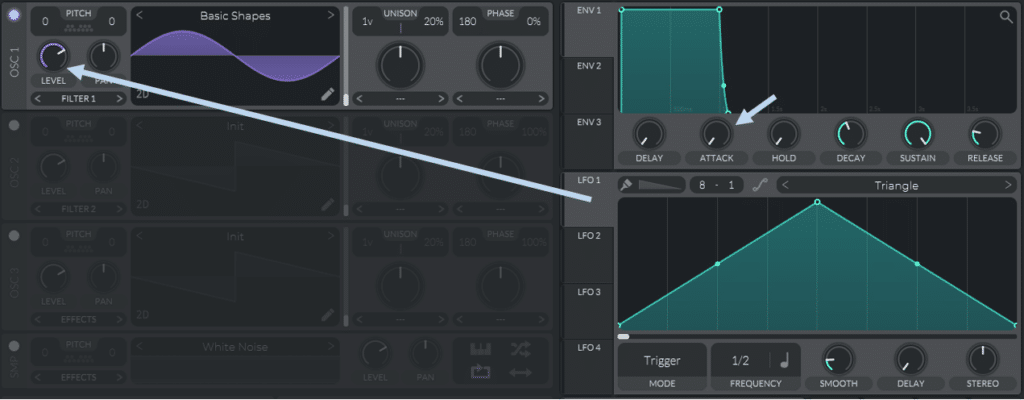
Let’s have a look at a primary instance. We’ll decide a sin wave for LFO 1, and assign it to the extent of our foremost oscillator:

You possibly can hear how the quantity is now “oscillating” in line with the LFO’s form.
A quite common approach to make use of LFOs is to assign them to the filter cutoff:
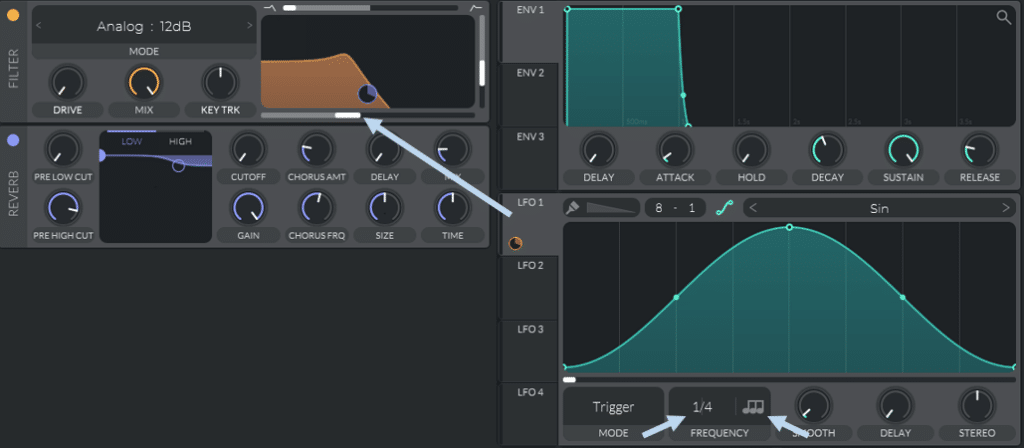
On this instance, I picked a comparatively quick tempo (1/4 tempo triplets), that means there shall be 6 cycles inside a bar. I’ve then assigned the LFO to the filter cutoff. I’ve additionally set the quantity of LFO modulation to about 30% to keep away from the filter opening up an excessive amount of:
Let’s take heed to the outcome:
Let’s get much more artistic. The sin wave isn’t the one form you need to use, so let’s strive a sq. wave with a excessive frequency (1/8 word). Let’s choose a formant filter, and apply the LFO to the Formant Transpose setting:
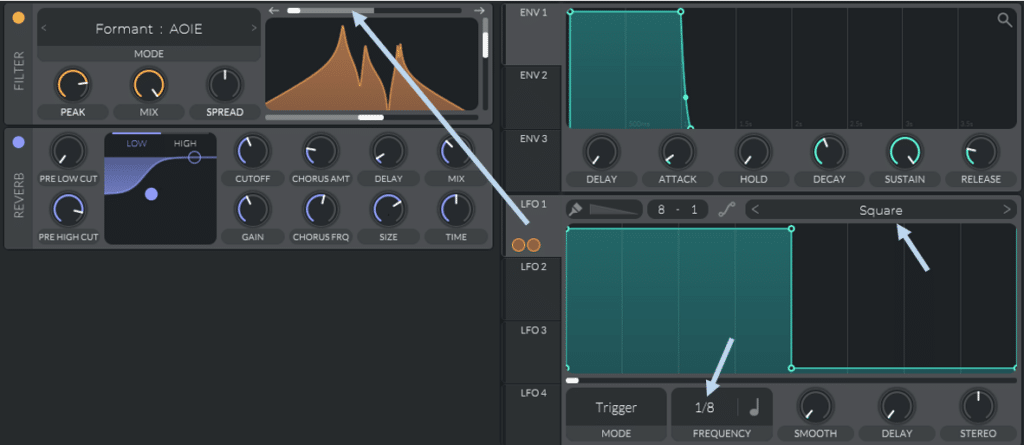
In impact, this implies the LFO is making the filter toggle between two positions:

Let’s hear the outcome:
Creating A Kick Drum
Lastly, let’s take a look at one final widespread instance. This one combines the usage of envelopes and LFOs: making a kick drum.
First, choose a primary sin wave and set the Phaze Randomization to 0%. This may make sure the word at all times begins on the similar level of the waveform:

Subsequent, set the assault of ENV 1 to 0s, and assign LFO 1 to the Degree of our oscillator:
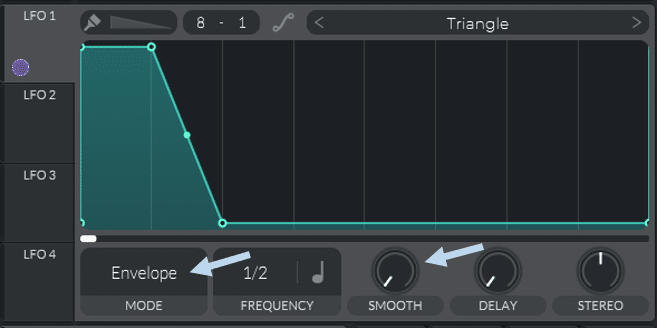
Subsequent, draw the next form for LFO 1, set the mode to Envelope and Easy to 0. Selecting the Envelope mode ensures that LFO form is performed solely as soon as per word (and never re-triggered):
Let’s take heed to what we now have thus far:
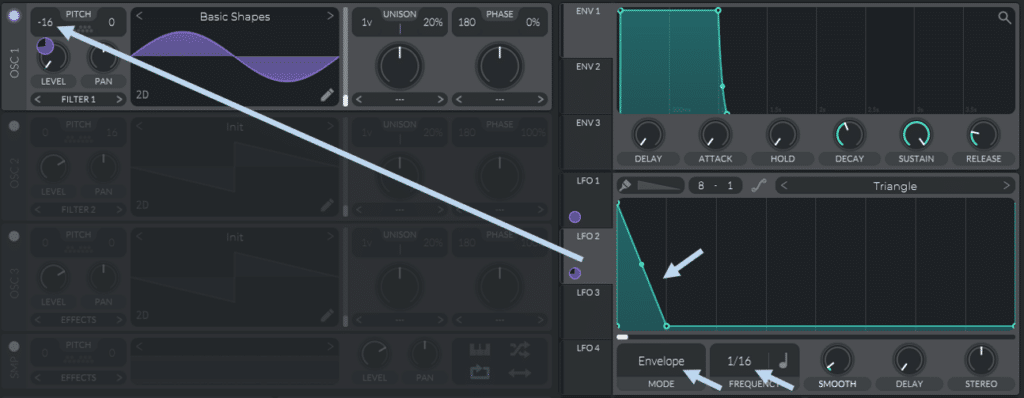
Subsequent, attract a downslope form for LFO 2, set to Envelope mode once more, set the Frequency to 1/16 and Easy to 0. Drag it over to the Pitch of our oscillator. This may give us our transient:
As a result of it is a subtractive synthesis information, I gained’t go into additional particulars. You possibly can apply common post-processing strategies similar to distortion and EQ’ing to additional form the sound to your liking.
I may go on all day concerning the energy of LFOs, however I believe you get the image. You may get assign LFOs to just about any parameter, creating loopy outcomes.
Though the next options should not unique to subtractive synthesis, they permit additional management over your sound design.
Pitch is a really helpful setting that means that you can fine-tune a specific oscillator. You need to use pitch controls to create harmonies inside your sound. Making a deep Reese bass is a standard software of this setting, similar to on this tutorial from Aden:
With out going right into a full bass design tutorial, let’s rapidly see how de-tuning an oscillator will help obtain a deep bass sound.
First, let’s hear a easy sawtooth wave with a low-pass filter:
Now, let’s add a second oscillator and de-tune it barely:
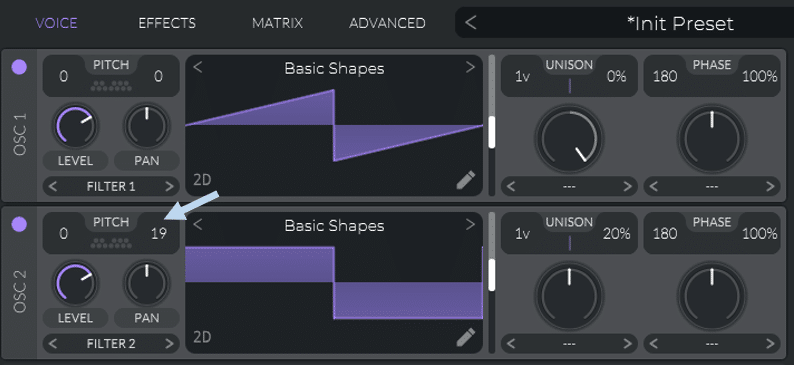
Let’s hear the outcome, with and with out the de-tuning:
You possibly can hear how de-tuning an oscillator brings width to the sound. An identical outcome may also be achieved by growing the Unison to 4 or 5 voices and de-tuning them barely.
Designing a bass would take a couple of extra steps, however I’ll cease right here for the sake of this information. If you wish to be taught extra about bass design, make certain to take a look at our Kick-Bass masterclass inside Drums By Design!
Glide is one other perform that is useful for bass traces. Because the title suggests, it permits notes to “glide” from one to the following:
When used subtly, it may well add quite a lot of motion and groove to your melodies.
Final Phrases
Hopefully, you’ll now have a greater grasp of subtractive synthesis.
Though subtractive synthesis was a cornerstone of early analog synths, most trendy VST synths mix completely different types of synthesis. Widespread synths similar to Serum mix wavetable synthesis with subtractive strategies.
However, it’s at all times helpful to recollect some primary rules and strategies. If you wish to enhance your total sound design strategies, make certain to take a look at our Breakthrough Sound Design course!