
For all of the discuss compressors and limiters, noise gates are a lesser-discussed subject in digital music.
However a noise gate may truly be the important thing to unlocking a cleaner combine.
Though they’re principally used throughout reside recordings, they’ll additionally assist take away noise and muddiness in your productions.
On this information, we’ll cowl:
- What a noise gate truly is
- How noise gates differ from compressors
- 5 methods to make use of a noise gate in your tracks
- 5 plugins (free and paid) to get you began
Let’s go! ?
What Is a Noise Gate?
A noise gate (or just gate) is a tool or software program which controls the amount of a sign. If the sign is beneath a sure threshold, then the sign will likely be attenuated by a hard and fast quantity (referred to as vary).
In impact, this vary will usually cut back the output to 0dB if the sign is beneath the edge.
Nevertheless, if the sign is above the edge, the sign will move by way of. The gate is then open.
On this graph, the sign’s stage is represented in blue. The output stage post-noise gate is in purple.
You’ll be able to see that because the sign is beneath the edge, the output is decreased to 0dB. However because the sign will increase above the edge, the gate opens up. The output stage then matches the enter stage.
In case you are extra of a visible particular person, think about a roller-coaster journey.

Most rides may have a top restriction. In case you are above a particular top (threshold), you may move and climb on the journey. In the event you’re beneath the edge, you’re out of luck.
(I do know this instance isn’t good – it doesn’t seize ideas like assault and launch. However hopefully, it helps paint an image.)
In apply, noise gates are used to take away small undesirable noises. This might for instance be throughout a recording (respiration noise, a click on monitor, and many others). It is also undesirable hums and hisses because of saturation items.
Nevertheless, you need to use them in lots of different inventive conditions, as we’ll discover.
How Does It Differ From a Compressor?
In case you are aware of compressors and limiters, then a noise gate must be intuitive.
A compressor will attenuate a sign by a sure ratio as soon as it exceeds a threshold. A limiter (which is an excessive case of compression) will merely block the sign from going any increased than the edge.
With make-up achieve, you may then enhance the perceived loudness of the quieter elements of the sign.
Against this, a noise gate acts as the other of a limiter. As a substitute of limiting the sign above a threshold, it’ll hold the sign at 0 if it doesn’t cross that threshold.
Parameters of a Noise Gate
Though every noise gate plugin may have its personal settings, most parameters are the identical. Let’s go over them:

There are 4 principal parameters that each good gate plugin ought to have:
- Assault. As with most plugins, assault determines how lengthy the plugin takes to come back into motion. In our case, the assault is the time it take the gate to open to let the audio by way of
- Launch is the time the gate takes to shut after the sign drops beneath the edge
- Threshold units the extent underneath which the sign’s achieve must be decreased
- Maintain is the period of time the gate should stay totally open after the sign has dropped beneath the edge. This can be a helpful setting to keep away from the gate opening and shutting in fast succession
Different settings similar to ratio and knee is perhaps accessible in your gate plugin. Ratio will usually be set to “∞ : 1” or -100dB. It is because we need to utterly reduce out the sign if it doesn’t cross the edge.
You’ll be able to alter the ratio in accordance with style, avoiding your sign slicing out sharply.
Now that we’re aware of the fundamentals, let’s discover some use circumstances.
In the event you’re in want of some samples to observe alongside, ensure that to take a look at our free assets right here!
When To Use a Noise Gate?
As talked about, noise gates are historically utilized in mixing. However you may as well use them in sound design too.
So listed below are 5 methods you need to use them!
Suppress Noise in Recordings
As talked about within the intro, noise gates are sometimes utilized in reside recordings. Respiration noises, a lyric web page being turned, a knock on the microphone…
Getting the right recording with out noise is virtually unattainable.
Let’s have a look at some examples of how noise gates might help.
Right here we’ve a vocal take the place the metronome bleeds from the headphones into the microphone:
Let’s set a noise gate:
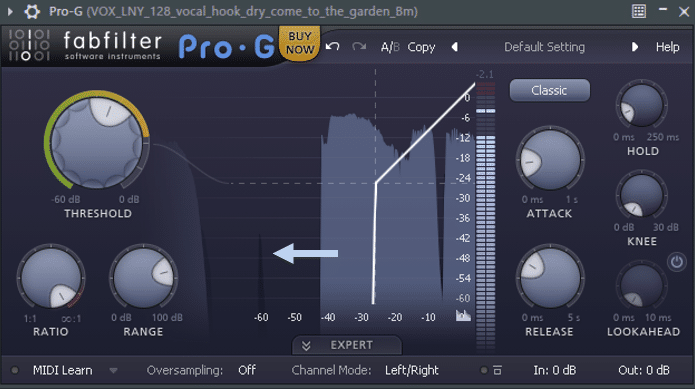
I’ve set the edge at about -26dB to ensure it doesn’t intervene with the vocal. You’ll be able to see the metronome hit in darkish blue. Its stage is beneath the edge, so it will get suppressed.
Let’s have a pay attention:
With vocals, spend a while setting the suitable assault, launch, and threshold settings. You don’t need to reduce out the top of a sentence too abruptly!
Let’s have a look at one other instance.
Right here we’ve a guitar recording with plenty of static:
Let’s use a noise gate to scrub this up:
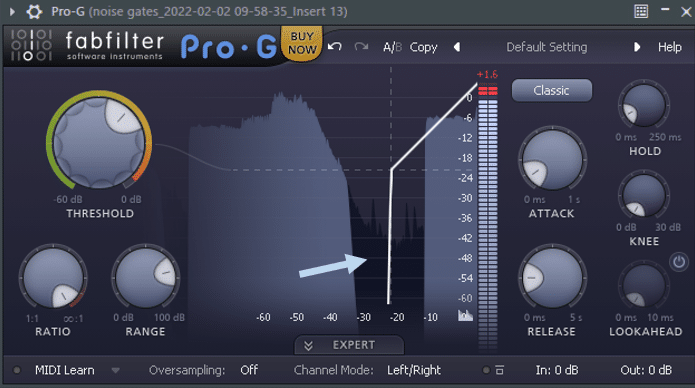
Discover the static noise doesn’t cross the edge. Let’s hearken to the consequence:
It’s necessary to notice right here {that a} noise gate won’t suppress background noise fully.
On this instance, I exaggerated the static to point out how the noise gate operates. However the static remains to be noticeable when the guitar performs.
In the event you discover that there’s an excessive amount of noise total, then a noise remover is perhaps a greater possibility.
Cut back Room Reverb
Room reverb happens naturally in poorly-treated rooms. It will also be the case {that a} pattern you need to use has an excessive amount of reverb.
Let’s see how a noise gate can take away a few of that reverb.
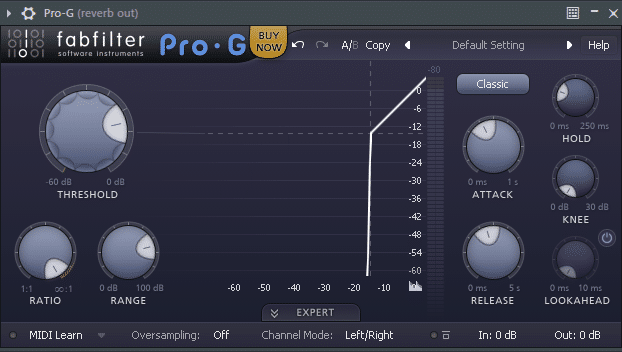
That is the unique pattern:
You’ll be able to hear numerous reverb between sentences. Let’s set a noise gate to dam it out:
Granted it isn’t good – however you may hear how the vocal already sounds nearer. Within the context of a full combine, the little artifacts will likely be barely noticeable.
Professional-tip: with vocals, attempt setting the assault fairly excessive (>40ms), and work your manner down. This can assist get a easy elimination of undesirable noise.
Shorten Lengthy Tails
Let’s face it: all of us love a little bit of reverb. Particularly when beginning out. Reverb can shortly flip a boring sound into one thing that sounds skilled.
However an excessive amount of reverb on too many sounds has a value.
Lengthy tails occur once you add reverb carelessly. When the decay time is simply too lengthy, reverb provides up, creating muddiness.
In addition they have the disadvantage of eradicating head-room for mastering.
Let’s hearken to an instance:

Even for those who don’t hear it, the reverb remains to be taking part in after 30 seconds!
One possibility might be to automate the amount. That can turn out to be cumbersome over a complete monitor.
Let’s attempt to shorten that tail with a noise gate:
Due to the character of the pad, I’m setting a fairly sluggish assault and launch. This can keep away from triggering the gate too shortly due to the little peaks in quantity.
Let’s hearken to the consequence:
You’ll be able to hear that after some time, the reverb drops beneath the edge. The audio then turns into muted.
Isolate Drum Hits to Create New Grooves
Ever come throughout a drum loop that you simply need to use, however don’t know the way precisely?
Chopping and re-arranging drum hits is nice. However typically you simply don’t know what you’re after. So one in every of my favourite tips is to make use of a noise gate to isolate drum hits.
Gating lets you merely experiment, and provide you with wonderful outcomes.
Let’s attempt it out. I’ve this drum groove that I actually like:
Nevertheless, there’s an excessive amount of taking place on this loop for me to make use of it. Due to the reverb, it’ll most likely be arduous to chop out any hits cleanly.
Let’s throw a noise gate on it and experiment:
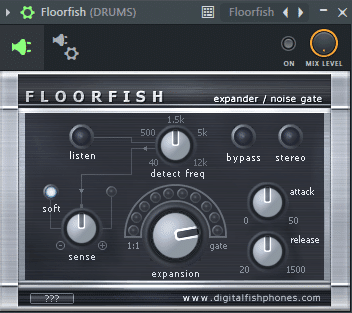
I’m utilizing Floorfish, a free noise gate plugin. Let’s set the growth to “gate”, and play with the “sense” and “detect freq”.
Listed below are some cool outcomes I got here up with:
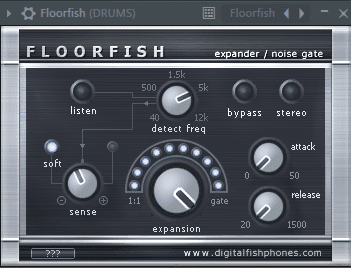
By setting the assault and launch very low, the gate is appearing as a transient shaper. This creates a cool percussion layer that I can simply add over some drums.
Let’s try a second instance:
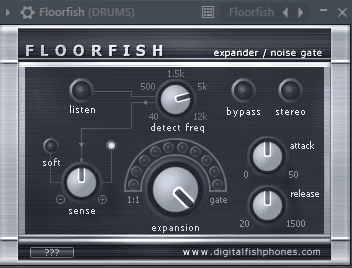
Right here I’m adjusting the frequency increased. This fashion I exclude the kick drum and the low rumbling. I’ve additionally added a tiny little bit of reverb after the noise gate. This helps fill out the house.
Generally, chopping up drum breaks doesn’t fairly reduce it. Noise gates are an ideal different.
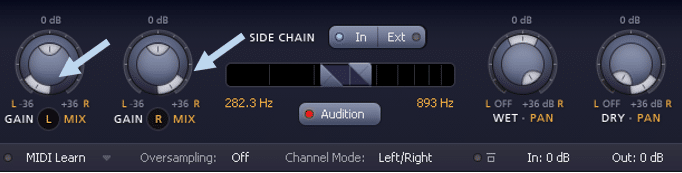
Mix With Sidechaining to Create Rigidity
Many noise gate plugins may have a sidechaining possibility. That is nice if you wish to management your sound primarily based on another enter.
Let’s see how we are able to make the most of this with FabFilter Professional-G:
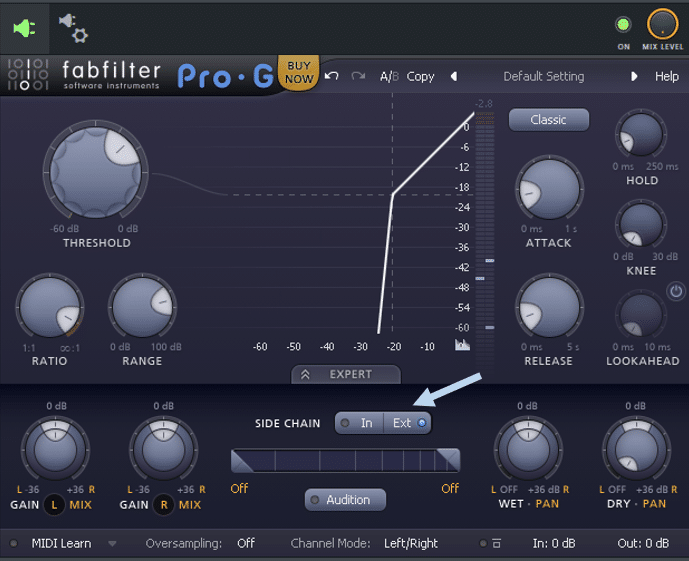
Open up the Professional part, and underneath Aspect Chain, choose Ext. This can will let you management the gate with an exterior sound supply. This might be a kick, a snare, or any MIDI sample.
Now, we are able to play with the Launch knob to create a way of anticipation. Once you enhance the discharge time, the gate gained’t have time to shut again. This can successfully let extra sound by way of.
You’ll be able to hear on this instance how the principle synth is ducking behind the drums. Because the construct progresses, I’m growing the quantity of reverb coming by way of. Mixed with a change in drums, this makes for an ideal transition.
5 Plugins to Get You Began
Most (though not all) DAW may have some model of a noise gate. Let’s discover a few of them, in addition to some third-party plugins.
FL Studio Fruity Limiter (Free)
Though not a devoted noise gate, FL’s Fruity Limiter has a Noise Gate part:

Sadly, this noise gate is kind of restricted. And it’s the solely inventory noise gate in FL Studio.
You’ve received your fundamental controls: launch, achieve, and threshold. So… no assault knob.
As you enhance the edge knob, the part lights up. Set the edge to the specified stage, then cut back the extent by turning down the Acquire knob.
There are many free alternate options available on the market, so I wouldn’t spend an excessive amount of right here. It might act as a fast repair for those who don’t need to open one other plugin. However more often than not you can be higher off utilizing a free different.
Observe: for reside recordings, there’s a approach to arrange a gate inside Edison. It’s a bit convoluted, so we’ll skip it for this information.
Ableton Stay Gate (Free)
Ableton Stay’s Gate on the opposite is a fully-fledged plugin:
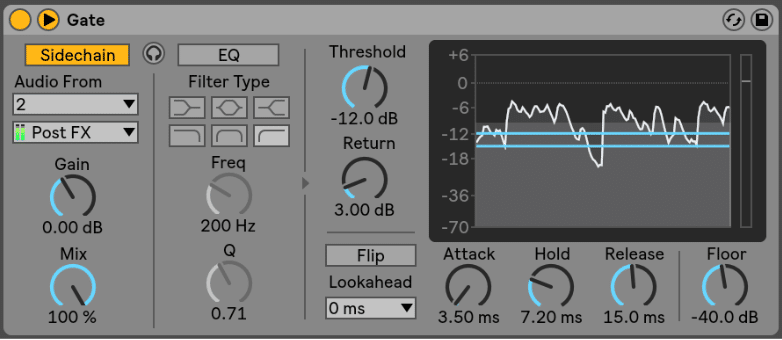
You’ve gotten your normal Assault, Launch, Threshold and Maintain knobs. You additionally get a variety of customized settings which can be value going over:
- Return units the worth at which the noise gate will shut. Say your threshold is ready at -12dB. By setting your Return at 3dB, you get will shut when the audio drops beneath -15dB. Setting your Return at 1-3dB will assist keep away from the gate opening and shutting. This will happen when the sign stage is oscillating across the threshold worth.
- Flip basically flips the gate, in order that the noise will solely move when it’s beneath the edge.
- Lookahead will assist protect the transients. For acoustic drums for instance, ensure that to choose a better lookahead time to protect the punch.
- Flooring features just like the Acquire setting within the Fruity Limiter. It determines how a lot the sign is attenuated when the gate is closed.
- Lastly, the EQ part permits the gate to be triggered by a particular frequency band. This can be utilized in tandem with the Sidechain secion, which lets you set off the gate with an exterior supply.
Logic Professional Noise Gate (Free)
Equally, Logic additionally has its personal fully-formed noise gate plugin:
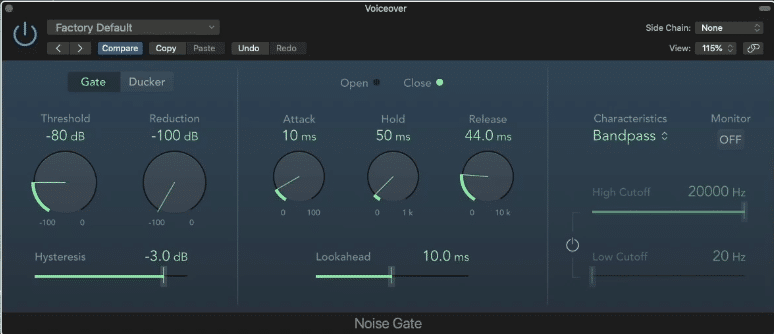
It does nevertheless lack of a visible illustration of the sign. In place, we get an Open / Shut gentle indicating when the gate is energetic. In addition to that, Logic’s Noise Gate comes with traditional bells and whistles.
Equally to Ableton, Logic supplies a Hysteresis (aka Return) and a Lookahead possibility
We even have a Aspect Chain possibility, in addition to frequency cutoffs. Lastly, the Ducker possibility works a bit just like the Flip operate of Ableton. When enabled, the audio will solely come by way of when the amount drops beneath a sure threshold.
A typical software can be with delayed vocals. By setting the mode to Ducker, the delays are suppressed when the singer is singing. However as quickly as (s)he finishes a phrase, the delays will seem.
FabFilter Professional-G (Paid)
I used the Professional-G fairly extensively on this information, and for good cause. Like lots of FabFilter’s plugins, it doesn’t get significantly better than this.
As with most FabFilter plugins, you get a variety of presets to select from. Some are designed for vocals, drums, and even an FX part for inventive functions.
As touched on earlier, the Professional part helps you to set off the noise gate with an exterior supply:
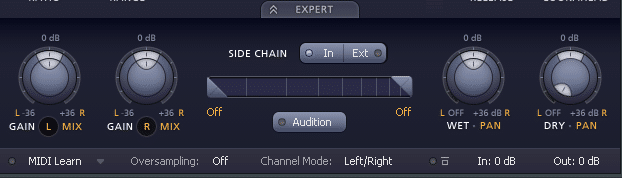
It additionally helps you to decide a particular frequency vary between which the gate will open.
Professional-tip: you may set a hard and fast frequency vary, after which sweep throughout the spectrum by holding ALT/Possibility.
Better of all, you may management the Left and Proper channels independently. To the left, alter L and R Acquire/Combine knobs to decouple the left and proper channels. By setting the left outer ring 100% L, and the suitable outer ring 100% R, left and proper channels are actually totally unlinked:

A1 Triggergate (Free)
Though not technically a noise gate, A1 Triggergate can obtain spectacular outcomes. And it’s free!
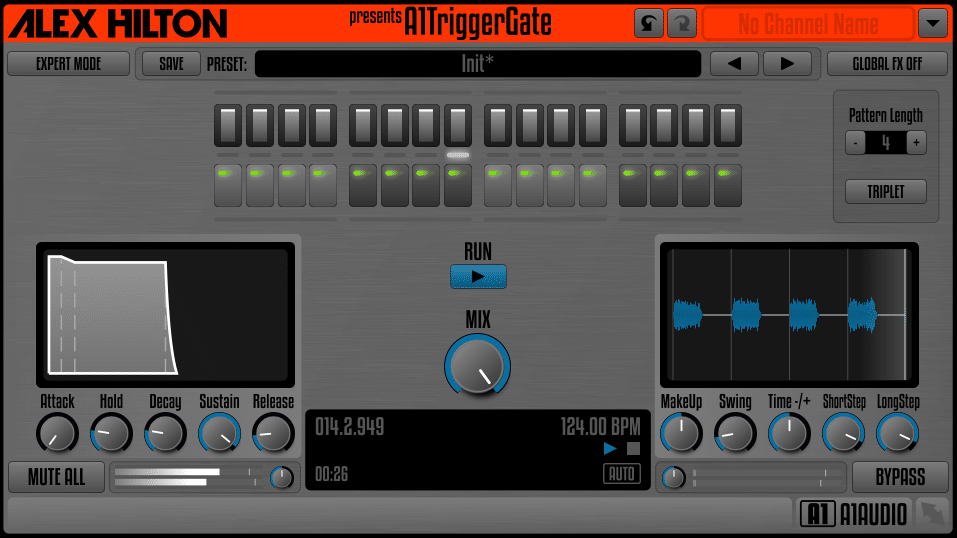
A1 Triggergate is an incredible instrument to create the Gate Impact. This impact basically turns a protracted sound right into a rhythmic sequence. And it does so by gating the amount.
Let’s have a look at an instance utilizing A1 Triggergate. That is the sound we’ll work with:
Let’s set A1 Triggergate to “TranceGate 01 + Echo”:
All with the contact of 1 button!
Basically what A1 Triggergate lets you do is management the extent of every step inside a 16-step sequence. It lets you:
- customise the envelope of the gate with ADSR controls
- low-pass the whole sign
- add some drive
- add echo / delay to fill out the blanks neglected by the gate
For a free plugin, the extent of choices you may have is kind of beautiful. Let’s pay attention to 1 final instance of what A1 Triggergate can do:
On this instance, I’m:
- growing the Combine knob in order that the gate impact more and more comes by way of
- growing the delay Stage and Feed
- low-passing because the drop approaches
All with only one plugin! Do your self a favor and seize A1 Triggergate, I can’t say sufficient good issues about it.
Ultimate Ideas on Noise Gates
I hope you loved this information and realized one thing new! Though noise gates are principally used for reside recordings, you need to use them in a ton of how for digital music.
Be inventive, break guidelines and provide you with wonderful sounds!
Need to enhance your sound design methods? Take a look at our Breakthrough Sound Design course!