
Wish to discover ways to make dubstep?
Whether or not you wish to make tearout brostep like Skrillex, or deep dubstep like old-school Skream – it appears so complicated to make. Particularly in relation to sound design.
Don’t concern – on this information, we’ll cowl the complete manufacturing technique of a dubstep monitor. Alongside the best way, there will likely be loads of artistic choices to take issues in your individual path. We’ll go over:
- The best way to nail the straightforward half-time drum sample that defines dubstep
- The significance of simplicity
- Bass sound design suggestions & tips
- Arranging your monitor for max drop impression
- Mixing and mastering loud for the membership
Let’s have a look – we’ll be utilizing Ableton Dwell, however you may observe alongside in FL Studio, Logic Professional X, or every other DAW! ?
The Fundamentals Of Dubstep
Earlier than we get into the steps, there are a number of key issues you should find out about dubstep.
First, dubstep tends to sit down round 140BPM-150BPM and contains a half-time drum sample.

Which means as a substitute of the kick that includes on the 1 and three, the kick options on the 1, and the snare on the three.
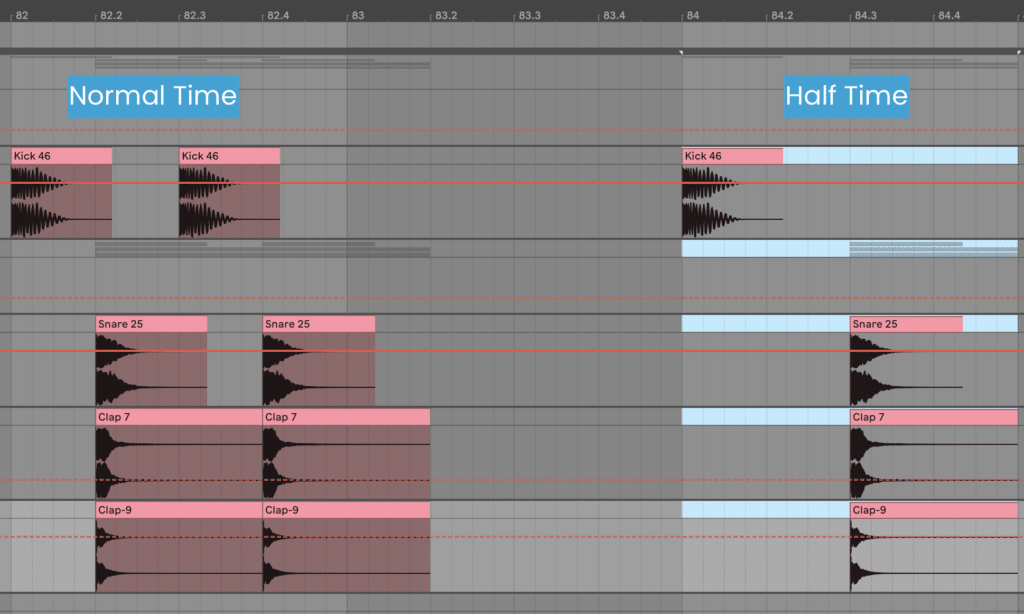
Some individuals favor to outline dubstep at 70BPM as a substitute because of this – it’s half as quick.
Secondly, as dubstep falls into the class of ‘bass music’, the keys have a tendency to stay round E Minor-G Minor, though this isn’t a hard-and-fast rule.
The rationale for that is that E-G is reproduced nicely on subwoofers in golf equipment, making these scales superb as a result of the basis notes stick round this vary.

So for this monitor, I’ll decide F# Minor.
Lastly, as beforehand alluded to, there are two ‘faculties’ of dubstep: trendy dubstep (AKA ‘brostep’) and conventional dubstep.
I’m no snob, so I’ll be protecting each on this article, with strategies on find out how to take issues in both path.
Right here’s a fast instance of every.
Trendy Dubstep:
Discover how Digital Riot makes use of loads of shiny synth sounds and aggressive, digital basses?
Conventional Dubstep:
Evaluate that to the deeper sound of Visages – much less aggression however loads of sub-bass motion, distinctive sound design, and atmospheric vibes.
With this in thoughts, let’s begin making our dubstep monitor! ?
Step #1: How To Make An OG Dubstep Drum Sample
As you might need guessed, drums are important in dubstep. In order that they’re usually an excellent place to start your thought.
Now that we perceive what a half-time drum sample is, we will begin our monitor off by programming one in.
Don’t do what I did once I began and decide any previous samples – selecting a high quality kick and snare will make the manufacturing course of manner simpler.
I’m going to pick out a pleasant kick and snare from our EDM Starter Equipment. These will work nicely for a extra energetic, trendy type of dubstep.
Kick:
Snare:
You may work in both MIDI or audio for this, relying on the way you usually program your drums. I’m going to work in audio as I really like the visible workflow.
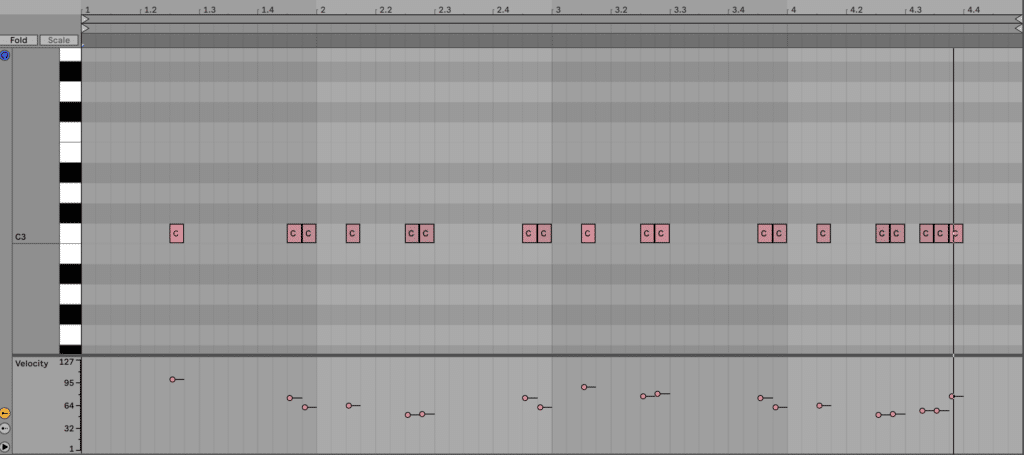
Merely drag your kick onto the primary beat, and the snare onto your third:
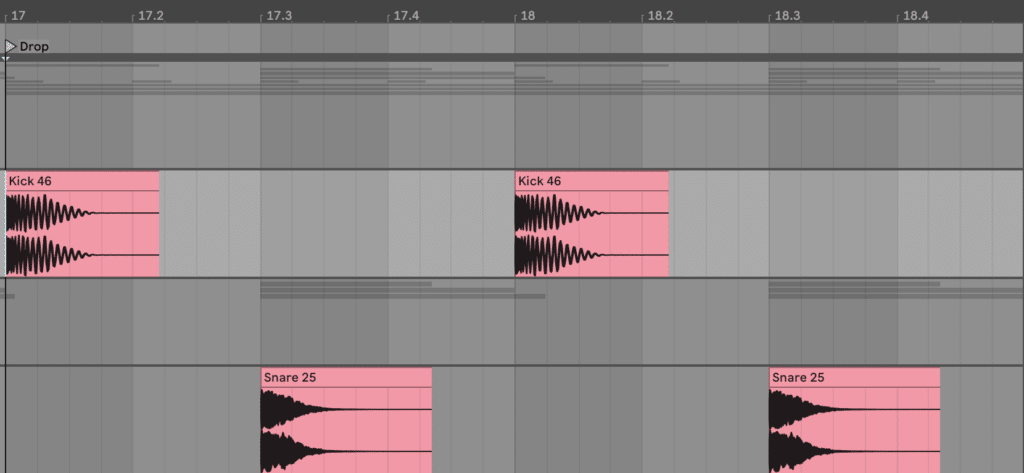
This two-bar sample is the inspiration of your dubstep monitor. However let’s make issues a little bit extra fascinating by duplicating this easy loop 4 occasions and programming in a number of kicks. I’ll add:
- a second kick the beat after the second snare in bar 2 (at 2.4)
- one other kick in bar 3 proper earlier than the snare (3.2.2)
- the identical kick in bar for (4.2.2)
- a kick proper after the final snare (4.3.2)
Right here’s what it’s best to get:
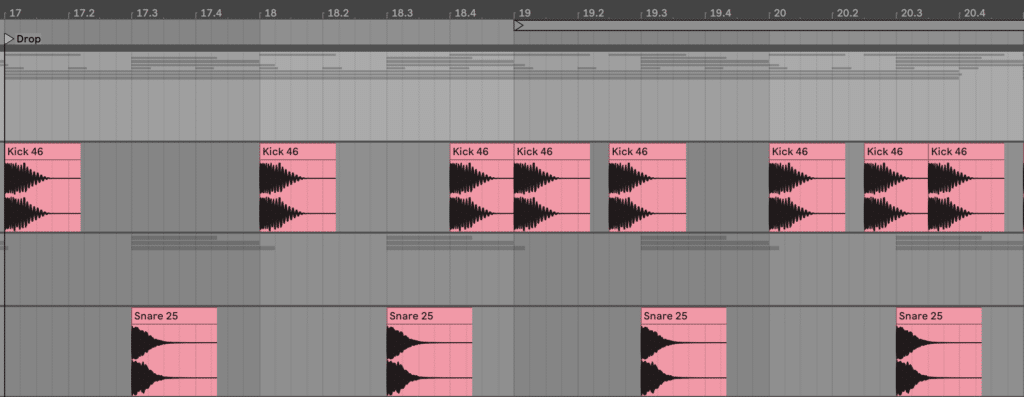
Now now we have a stable 4 bar loop that includes our huge kick and snare. However the snare lacks a little bit of top-end physique, so let’s layer in two claps:
Clap:
Clap Punch:
Merely layer each snare up with these two samples and group them collectively.
Lastly, let’s add some reverb to those two layers. It will give the snare a pleasant ethereal tail, filling within the gaps between every hit.
I’m utilizing a modified model of Ableton Dwell Reverb ‘Excessive Verb’ preset at 38% moist:

With the principle snare, it ought to sound one thing like this.
As you may think about, though the rhythm is easy, the sound of your kick and snare kind the idea of the whole monitor. So don’t neglect this step.
Subsequent, let’s layer this up with some hats and different percussion hits.
Step #2: Programming in Intricate Hats & Percussion
The way in which you employ hats in your dubstep monitor determines the general vitality stage.
Extra Frequent Hats & Extra Layers = Extra Vitality
Much less Frequent Hats & Much less Layers = Much less Vitality
However as with something in music, simplicity is essential. Don’t have 10 hat layers and 5 crashes – simply decide a number of good sounds and run with it.
Fundamental Hat Rhythm
So first, let’s discover a good stable semi-open hi-hat sound. I’m going to select this one from the EDM Starter Equipment:
Hello-hat:
It’s brief, shiny, and easy. Excellent for a dubstep monitor.
To start out this off, I’m going to program it to hit on each beat (1/4 word). This carries the vitality of the loop fairly properly.

For extra stripped again and conventional types of dubstep, you could possibly depart it right here (and possibly use a little bit of reverb to fill out the area). However I wish to take it up a notch.
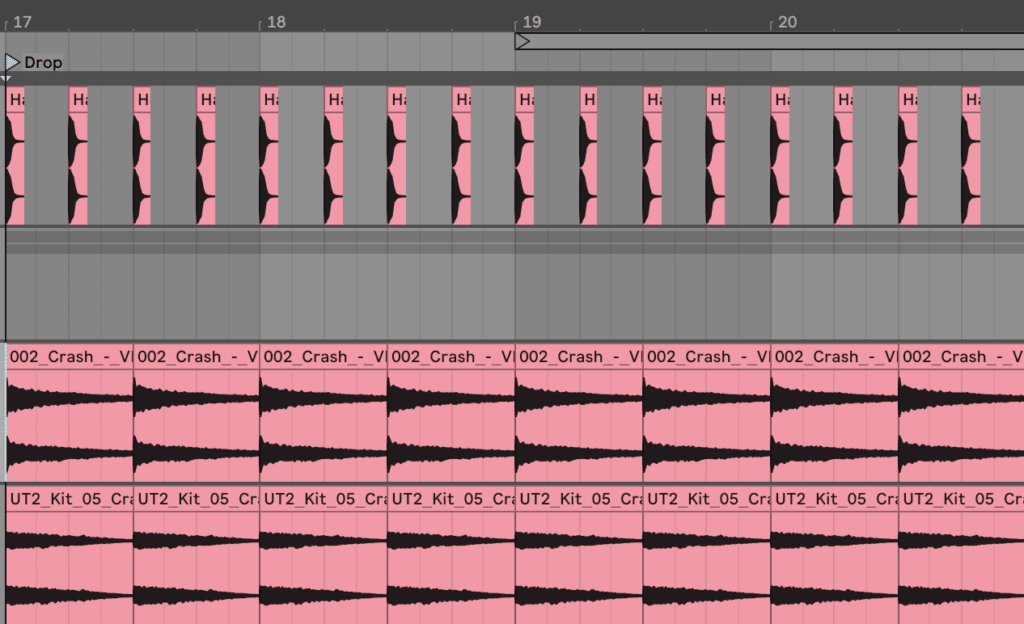
Background Crashes for Drop Vitality
Again once I first made dubstep, I puzzled why my drops lacked vitality and fullness.
Then I noticed that many dubstep producers (Skrillex, Kill The Noise and so on.) use crash samples to fill out their backgrounds.
So let’s discover a crash so as to add on each 1st and third beat, matching up with most kicks and snares.
You don’t need to, however to get a wider sound, I’m going to select 2 crashes from an exterior pattern pack and pan one 30% left, and the opposite 30% proper:
Crash 1:
Crash 2:
We’ll group each collectively, and switch this down so it’s quieter within the combine, filling out the background vitality.
Lastly, I wish to add in one other hat sound to create some groove on the 16ths, as issues are fairly ‘straight’ proper now.
Hello-hat 2:
I’m going to make use of MIDI so I can simply regulate the rate of every hit, and program that hats in the place they really feel proper.
Now now we have a stable 4 bar loop of drums. Discover how the loop feels much less static and extra fascinating to hearken to? That’s the facility of that second hat!
Let’s duplicate this loop as soon as to eight bars for the following step – making a fats bassline.
Step #3: A Enormous Bassline For The Drop
Though dubstep is thought for its loopy bass variations and sounds, most tracks function one main sound that carries many of the music.
Usually, this can be a bassline with sufficient midrange frequencies to be heard on any system.
That is true of the basic dubstep monitor Bass Cannon by Flux Pavillion (certainly one of my all-time favourites):
The Bass-ic Sound
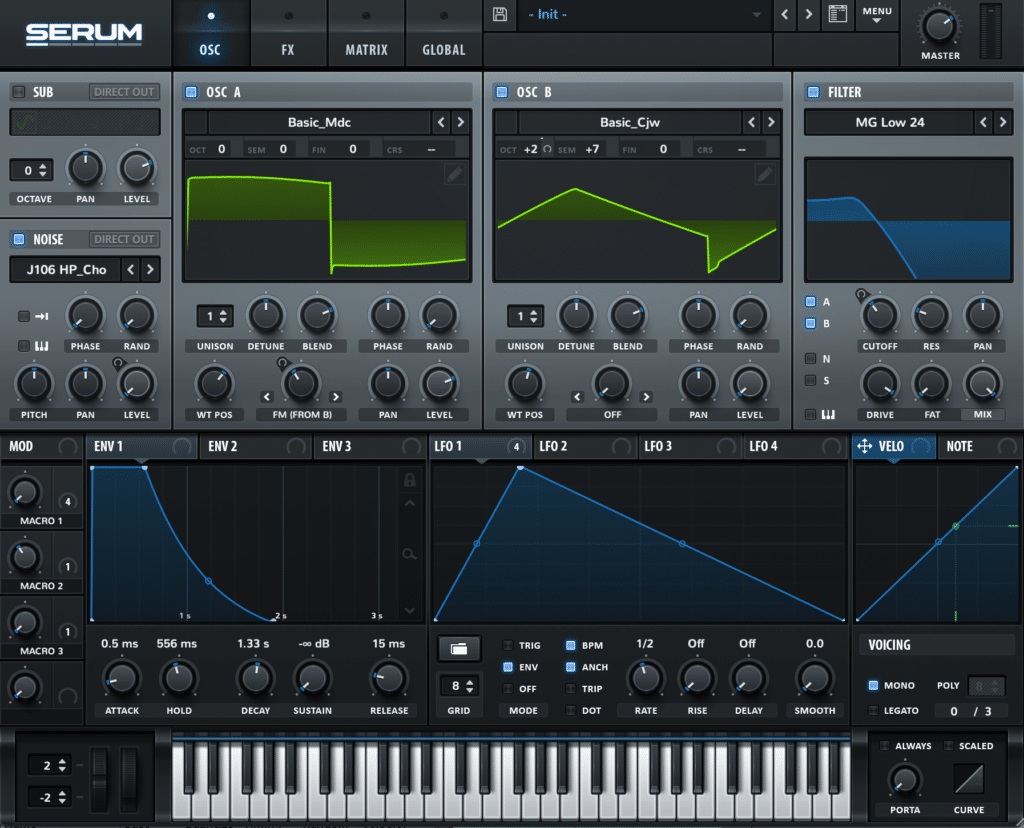
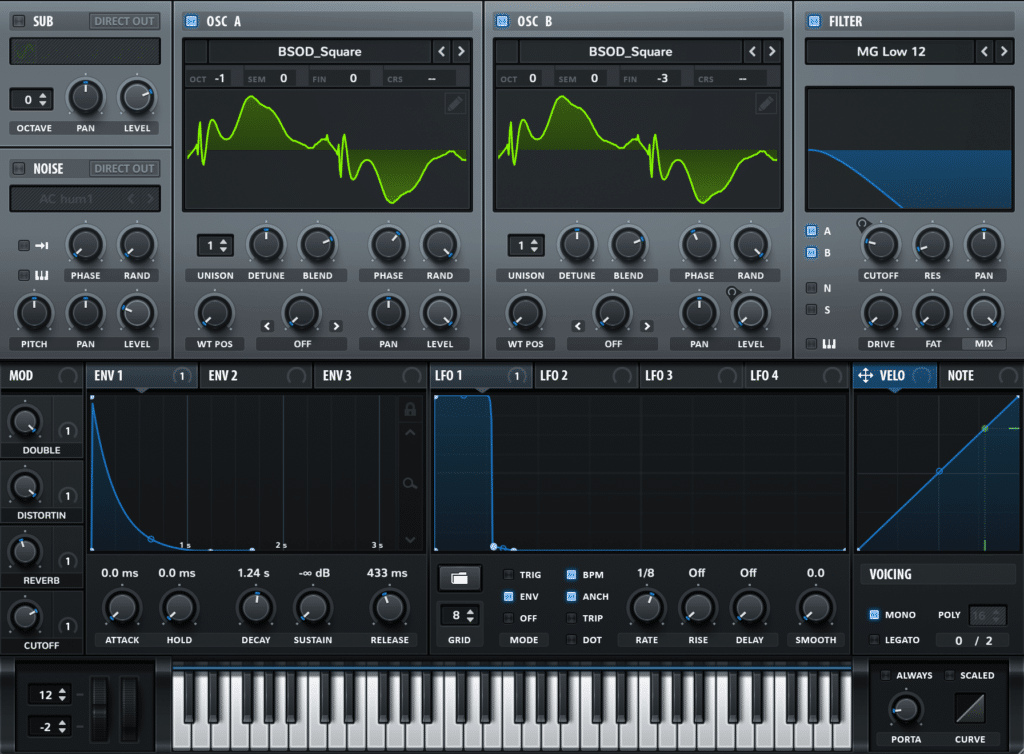
For the monitor we’re engaged on, I’m going to design the sound from scratch (since sound design is integral to dubstep).
If you happen to’d favor, you may seize this preset contained in the EDM Starter Equipment (BS Neo Deep Bass). Presets are an excellent software to make use of in case you favor to not dive into sound design.
Let’s use Serum to create this. I’m going to load up an preliminary preset:
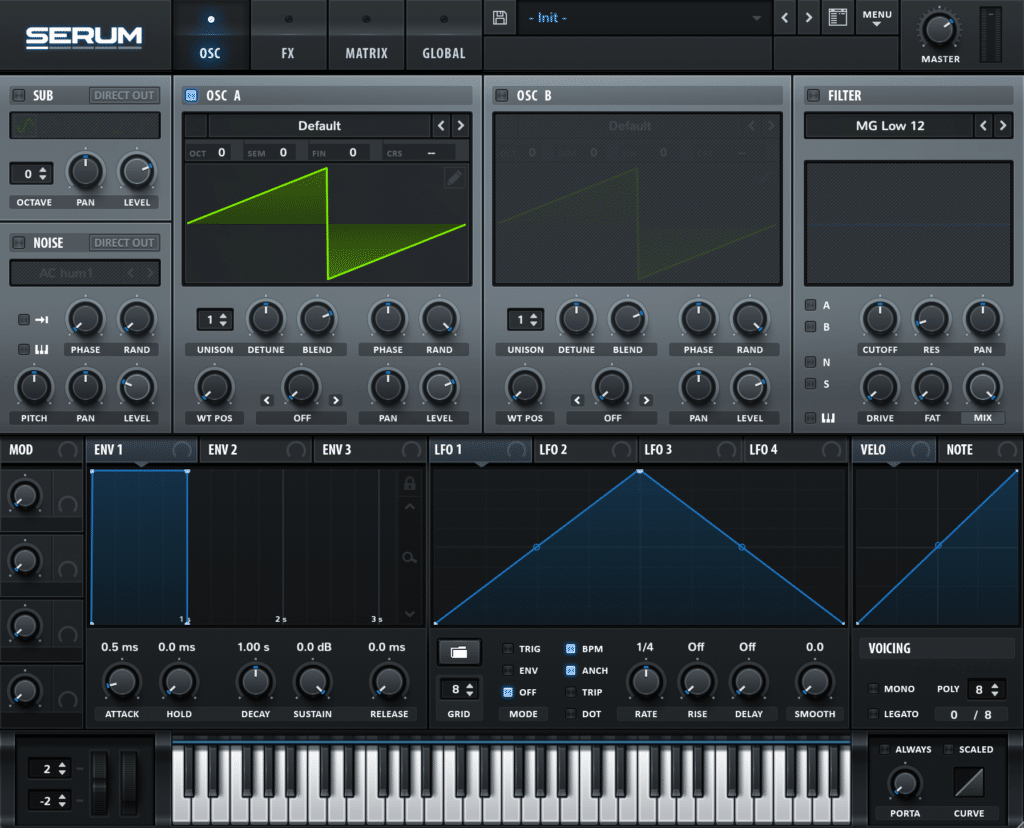
I’m not going to cowl the whole course of in-depth, so right here’s a abstract of how I made this sound. You may tweak any of those to your individual preferences:
- OSC A: Basic_Mdc wavetable, WT POS at 166, FM from B at 38%
- OSC B (for FM): Basic_Cjw wavetable, WT POS at 143, +2 octaves & +7 semitones, stage turned down
- Noise: J106 HP Refrain
- Filter: MG Low 24, Cutoff at 150Hz, OSC A + B on
- ENV 1:
- LFO 1: Customized form, mapped to Noise Stage, FM from B, Filter cutoff & Distortion Drive
- FX:
By the tip, it ought to sound (and look) one thing like this:
The Finest Bass Notes To Use
Now that the sound design is out of the best way, we will begin programming in our bassline notes. The word vary is kind of vital, as dubstep is designed for membership play.
Significantly – once I first discovered to program basslines, I believed all of the sounds I used to be utilizing sucked. Turned out I had simply written all of them an octave too excessive. So it pays to get this proper.
You may both observe alongside precisely right here or write your individual bassline.
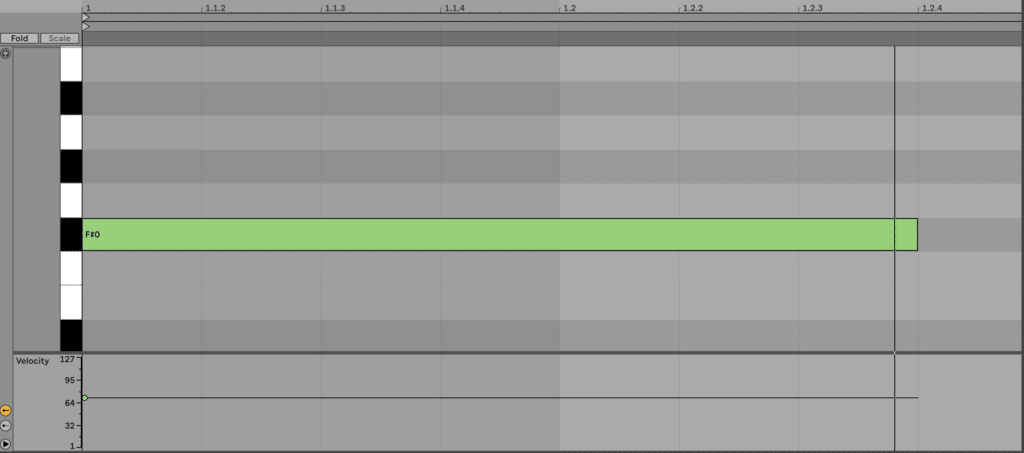
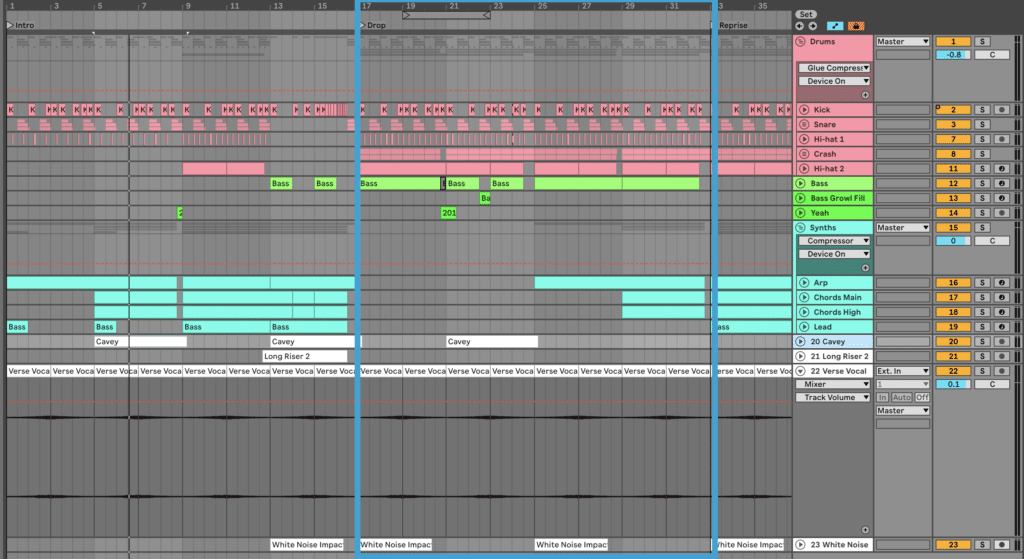
Let’s begin with the basis word of our key, F# Minor. I’ll use F#0.
I’ll play with the rhythm so it hits on the one for a bit, after which on the 2nd bar, I’ll perform a little scale run-up to A0.
Subsequent, I’ll return down however borrow a word from the Ionian mode (F0 as a substitute of E0). This offers it a darker really feel.
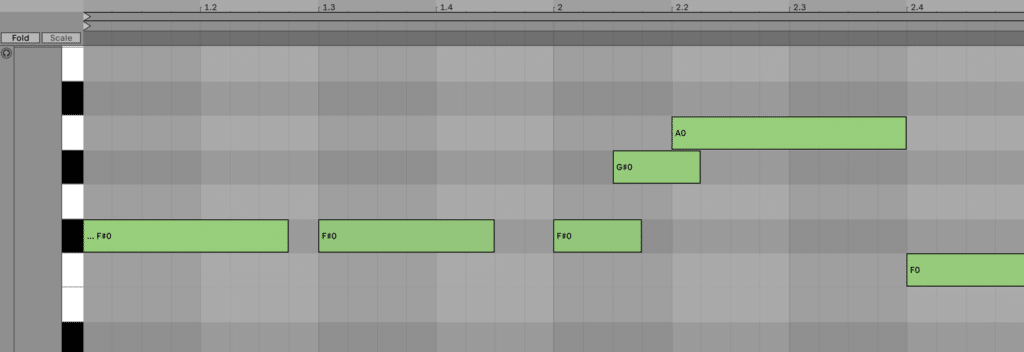
Lastly, I’ll duplicate this all and make some delicate adjustments to the second repeat. This is named ‘name & response’, and it’s nice for making your music extra fascinating.
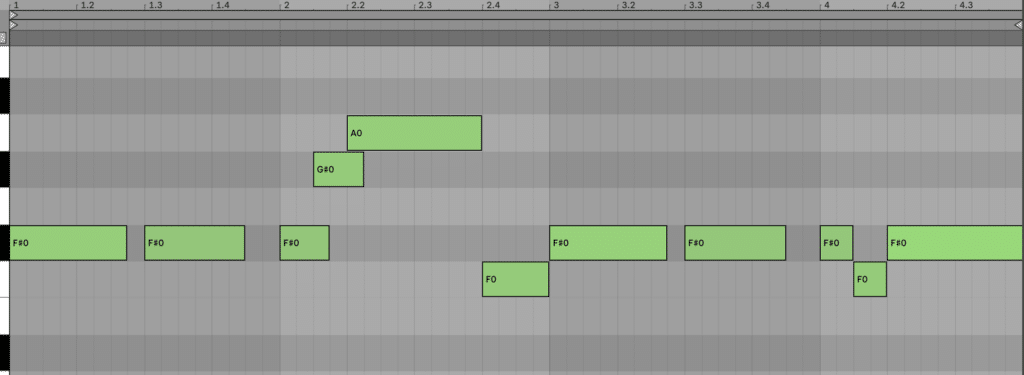
That is beginning to form as much as a stable bassline.
However our final step is so as to add some motion with our macros arrange within the preset. Macro 1 controls the distortion quantity, whereas Macro 2 scales the filter cutoff. If you happen to’ve designed the sound from scratch, test the preset model to get the mappings.
I’m not going to counsel a specific sample right here, however right here’s what labored in my monitor:
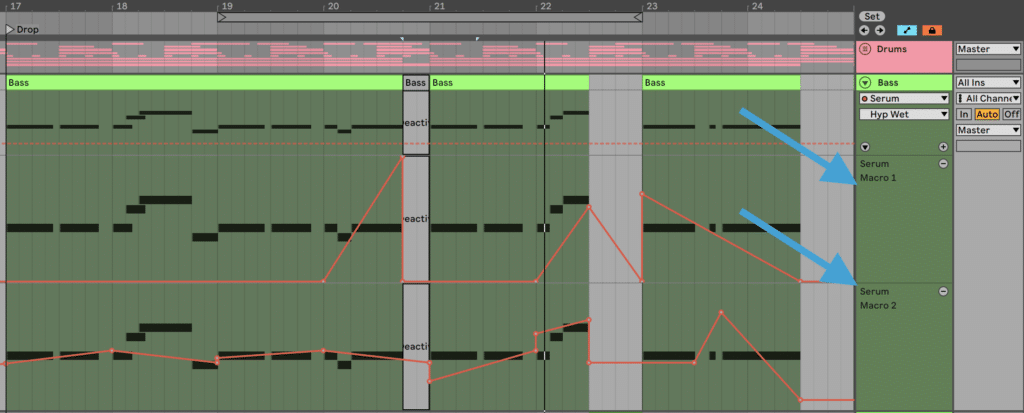
The distortion growing in the direction of the tip of the primary 4 bars creates plenty of pressure. Plus the slight actions in filter cutoff provides natural movement.
Submit-Processing – Deliver The Sound To Life
Including FX to sounds past the synth you design them can deliver life and taste to in any other case generic sounds.
Actually, as soon as I began post-processing my bass sounds correctly, it took my manufacturing recreation up one other stage.
And in case you take a look at all the professionals, they use post-processing on just about every little thing.
Proper now our sound is sweet however fairly easy. We are able to post-process it a bit extra so as to add extra grit and physique to it.
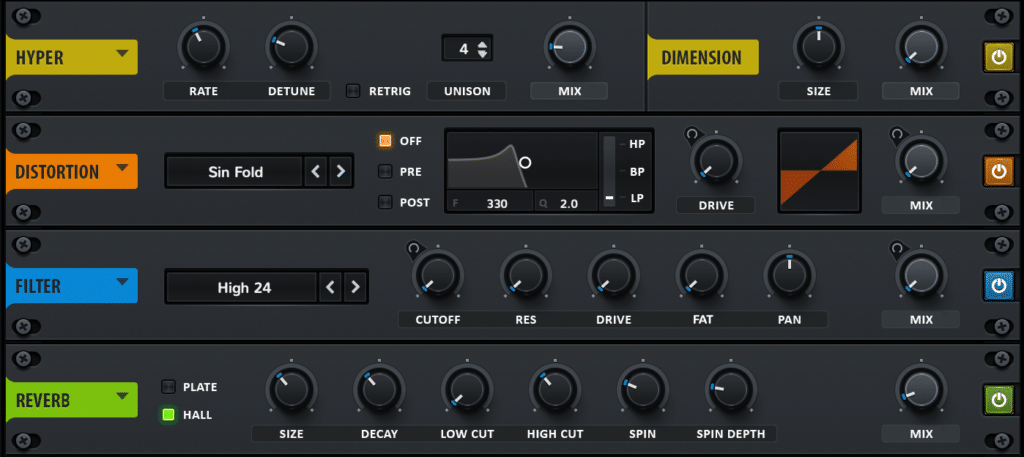
Right here’s the chain I ended up utilizing. Let’s undergo every of those results one-by-one to clarify the reasoning behind every:
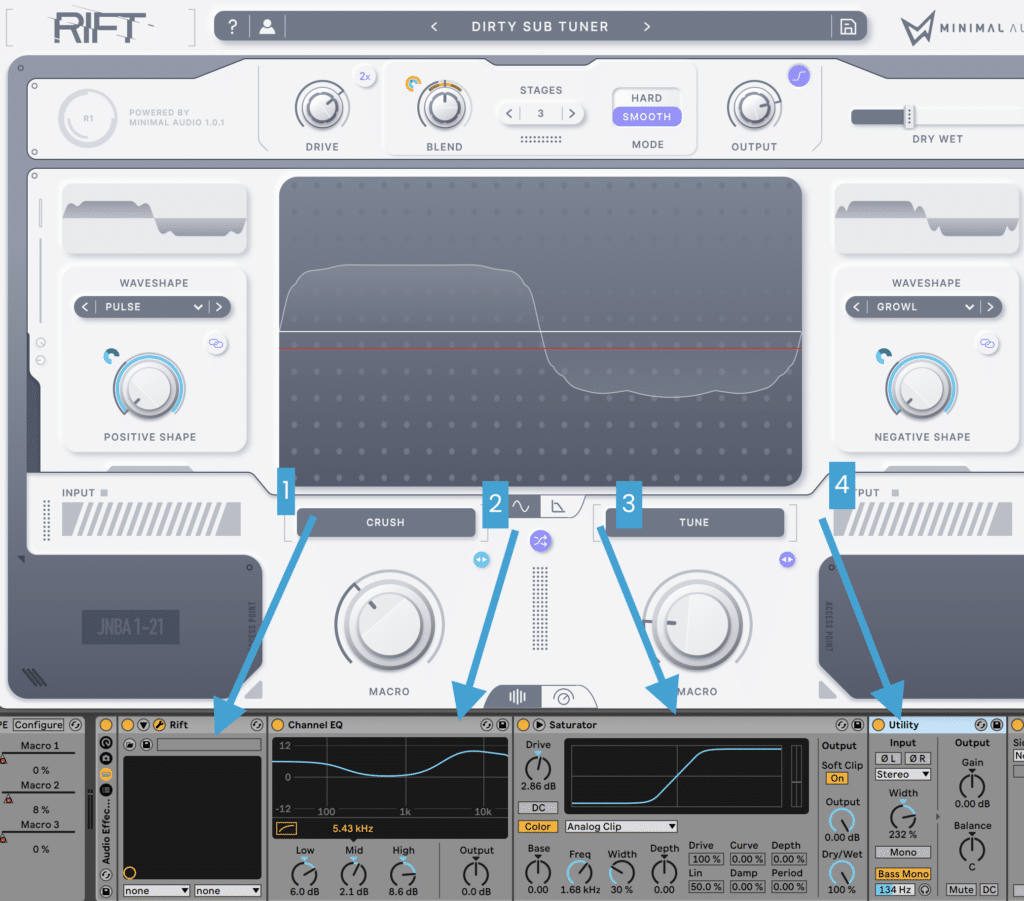
- Minimal Audio Rift: It is a distortion plugin with a number of options. Since distortion can add distinctive traits to sounds, I attempted a bunch of presets till I stumbled upon one thing I favored. Then I tweaked the settings to style.
- Ableton Channel EQ: A easy EQ to spice up the lows and highs of the sound so as to add extra vitality. Not tremendous technical or overcomplicated, and sounds good.
- Ableton Saturator: A bit of extra easy distortion to heat up the sound a little bit extra after the EQ enhance. The bass sounds fairly good after this.
- Ableton Utility: Each Serum and Rift add a little bit stereo info to this bass sound. So I needed to deliver it out extra with the Width knob, in addition to management my low-end through the use of Bass Mono swap.
Submit-processing, like all facet of sound design, entails balancing experimentation with intentional selections. So no matter you do right here, don’t overprocess and damage your sound.
Right here’s what it’s sounding like now:
Way more fats!
After processing the bass, let’s mix the quantity with our drums and transfer on to the following step.
Wish to dive extra into sound design? Try our Breakthrough Sound Design course.
Step #4: Bass Variations & Different Drop Sounds
Now we will flesh out our drop with a number of extra sounds. As good as the principle bass is, by itself, it’ll get a little bit previous.
Growl Bass Fill
This bass sound will present a little bit of shock and pleasure all through the drop, giving listeners a motive to maintain paying consideration.
Let’s load up BS Stable Growl from the EDM Starter Equipment:
We’ll place this sound on the final 2 beats of each third bar. I’ll program in two notes identical to this:
Now our drop must be sounding like this:

Spoken Vocal Minimize
Including in little vocal phrases or phrases can deliver a brand new stage of vitality to your drop, in addition to create moments of pressure in between your bass sounds.
On this instance, I’m going to fee you to seek out your individual favorite vocal pattern and mess around with it.
I personally discovered a ‘yeah’ pattern and have positioned it on the final beat of the 2nd bar (each 4 bars).
As you may hear, the delayed impact offers it a cool metallic texture, making it match proper in with that different bass fill we simply added.
Right here it’s in context:
Different dubstep tracks will incorporate much more bass sounds with a number of modulation. However for the sake of this construct, we’ll preserve issues easy.
If you wish to make issues extra complicated, take a look at this video from Kermode.
Now that our drop is taking form, let’s flip to our different major parts.
Step #5: Melodic Synths For The Intro Hook
In dubstep, the drop tends to strip every little thing again to bass and drums. However the intros and breakdowns can function something from synths, to melodic samples, and to atmospheric results.
On this case, I wish to use some synths to create a euphoric intro and construct. So let’s transfer our drop to bar 17, and cargo up 3 cases of Serum so we will create:
- An arp
- Some chords
- A lead melody
We received’t layer these with the drop, as it is going to be for a distinct part.
The Arp
I’ll begin with the arp as a result of it’s a straightforward win, and it stays fairly constant.
From the preliminary Serum preset, simply load up the ‘PL Bit Enjoyable’ preset from the EDM Starter Equipment. Or you may design your individual sound.
Let’s additionally program in some MIDI. I’m going to program in an arpeggiated F#m7 chord (with a number of adjustments):
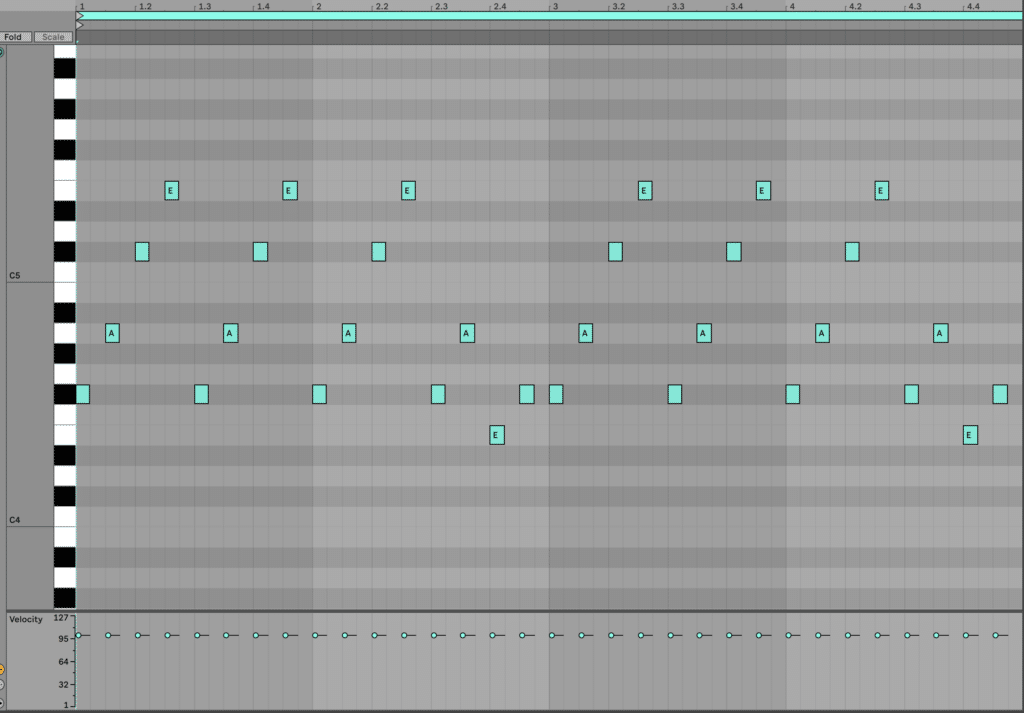
Now we received’t simply depart it right here – we’re going to make use of an arpeggiator machine, which is a good software for creating good melodic patterns.
On this case, we wish every word so as to add an ‘octave trill’ impact, the place the sound strikes up an octave at a 1/thirty second interval after the preliminary word.
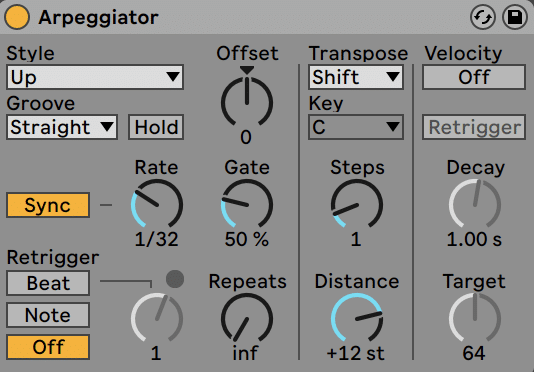
Now this sounds very ‘chiptune’ – excellent for grabbing consideration and constructing vitality in our intro.
(Wish to get much more artistic with arps? Try some superior suggestions under on our YouTube channel!)
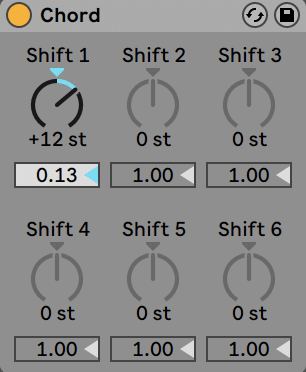
The Chord Synth
The chords right here will create the euphoric feeling within the build-up.
Once more simply obtain it from our EDM Starter Equipment (CHD Drop Supersaw – Skinny Layer):
When it comes to post-processing, we simply wish to thicken it up with some refrain and overdrive. Right here’s what I added utilizing Ableton Dwell’s inventory gadgets (you may change Professional-Q 3 with any inventory EQ):
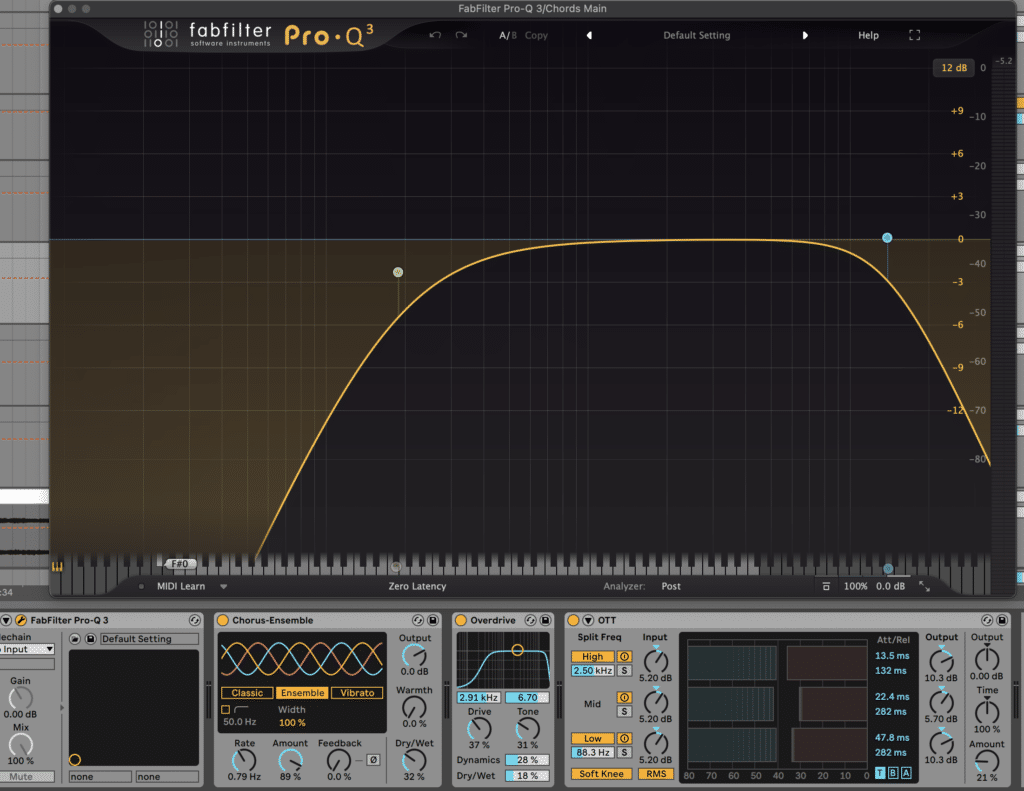
The overdrive after the refrain amplifies the thickening impact, giving it that massive feeling. And the OTT squashes all of it collectively and brings out the highs.
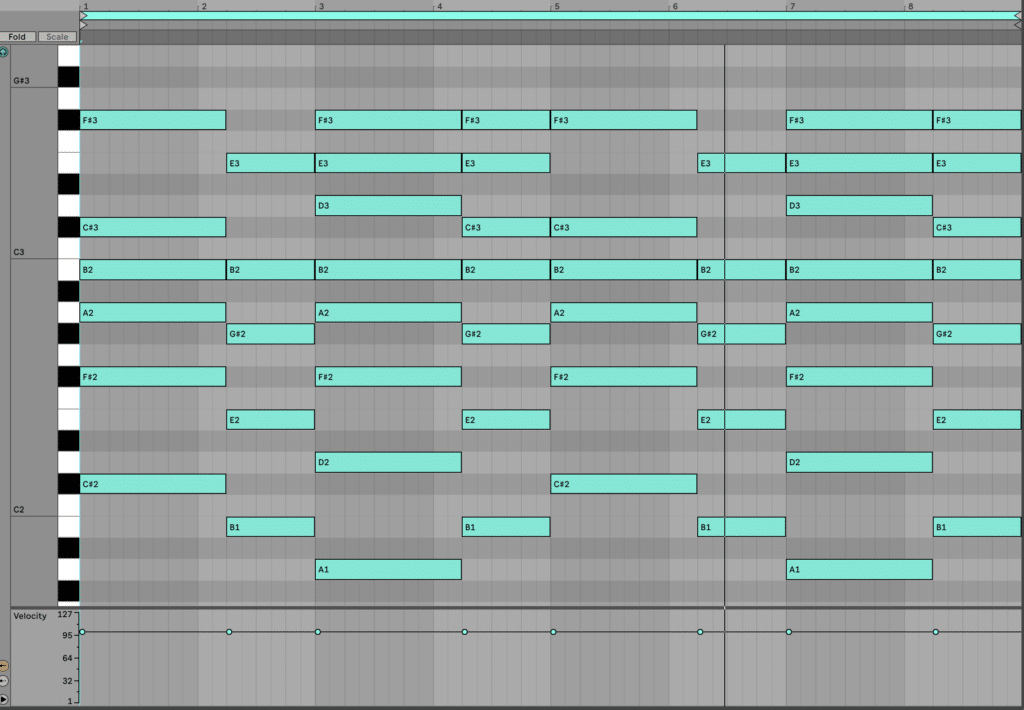
Right here’s the MIDI I’ve used – word that there are plenty of doubled notes (identical word up the octave) to create a full sound.
Be happy to repeat it (it’s good follow)!
To make this even larger although, I’m going to duplicate the entire channel and create a second layer.
Right here’s what I did to thicken out the supersaw:
- Pitched the MIDI up an octave
- Added the ‘Shiny White’ noise in Serum (nice for including vitality)
- Modified the refrain impact to change the sound (every little thing sounding the identical doesn’t layer nicely)
- Eliminated OTT to let it breathe
Right here’s what it seems like blended with the unique chords:
A lot larger! Now let’s add the lead excessive.
The Lead Synth
This one was truly a synth preset we use inside our course EDM Foundations, however for you guys, we’ve included it within the EDM Starter Equipment. It’s referred to as LD Filter Flute.
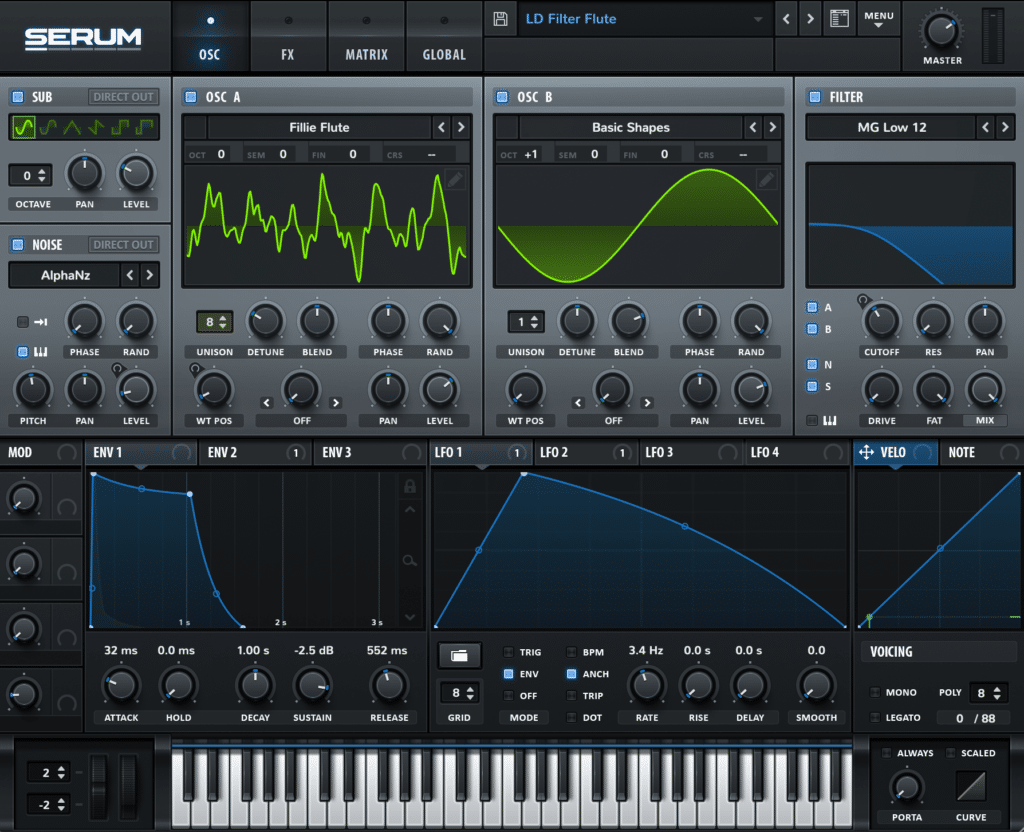
I’m truly going to begin with the bassline MIDI for the lead synth in a better register. This ties the drop and intro to one another in a pleasant manner, whereas nonetheless leaving the heavy bass for the drop.
I’m additionally going to layer it up the octave with a decrease velocity. It is a killer trick to get your results in lower by means of the combination.
We’ll depart it enjoying all through the whole intro for now, however later we’ll come again and provides it a correct association.
Lastly, right here is the MIDI I’ve used. I used the bass sample up a number of octaves, because it’s loosely associated to the chord synth, however with its personal rhythm to separate it out.
Once more, you may copy it precisely, or add your individual twist:
The second repeat up the octave helps to extend vitality in the direction of the drop.
And now that we’ve bought a fundamental melodic intro, we will flip to doing a correct association.
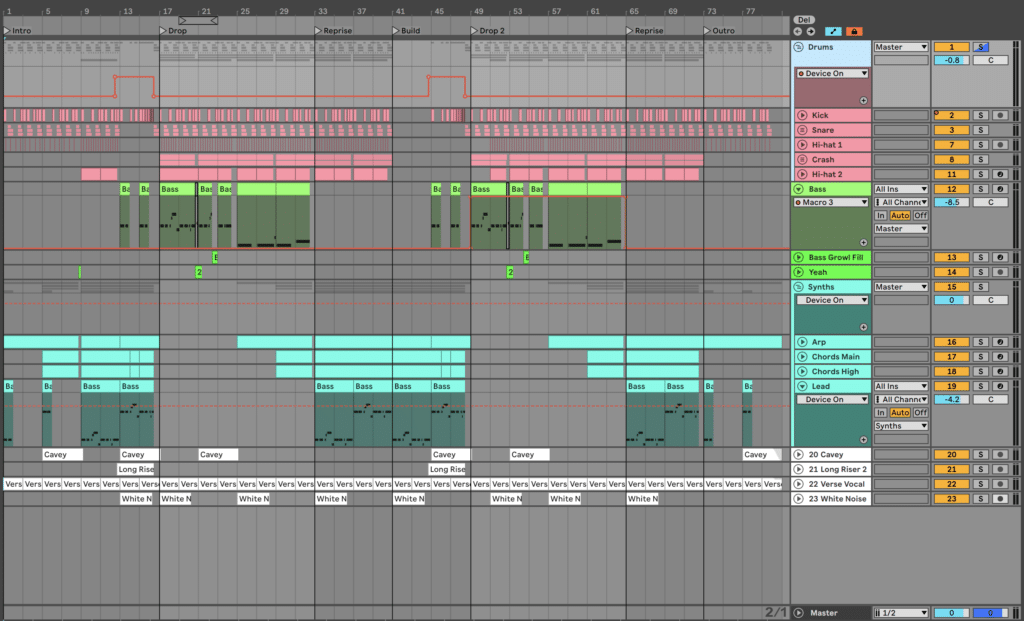
Step #6: Arranging A Robust Intro, Construct & Drop
Now we will actually begin to remodel this concept right into a full monitor. That is the place we create distinctive sections, add fascinating fills and usher in background FX.
For the needs of this text, we’ll be utilizing a extra easy construction. However you may take this and alter as a lot as you need!
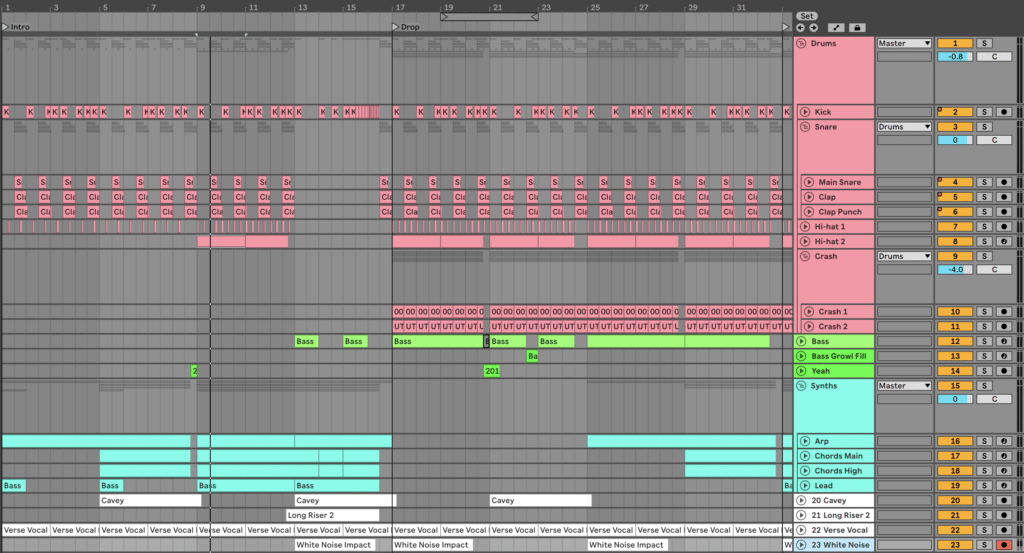
Intro (First 12 bars)
The aim of the intro is to hook the listener in with one thing fascinating.
Right here’s what I’m going to do to our intro – you may be happy to borrow any of those strategies:
- Put the Hello-hat 1 on the off beat just for the primary 8 bars
- Introduce Hello-hat 2 at bar 9, just for a bit till taking it out at bar 13
- Deliver the total Hello-hat 1 on the identical time
- Place the ‘Yeah’ pattern proper earlier than Bar 9
- Place the primary bar (two notes) of the Lead synth sample solely, each 4 bars
- Automate the filter cutoff of the Arp up over the primary 8 bars
- Introduce the Chords filtering up at bar 5, totally coming in at bar 9
These adjustments are designed to slowly introduce and tease the principle thought, with out enjoying all of the playing cards from the beginning of the music. Then the principle thought hits with full impression.
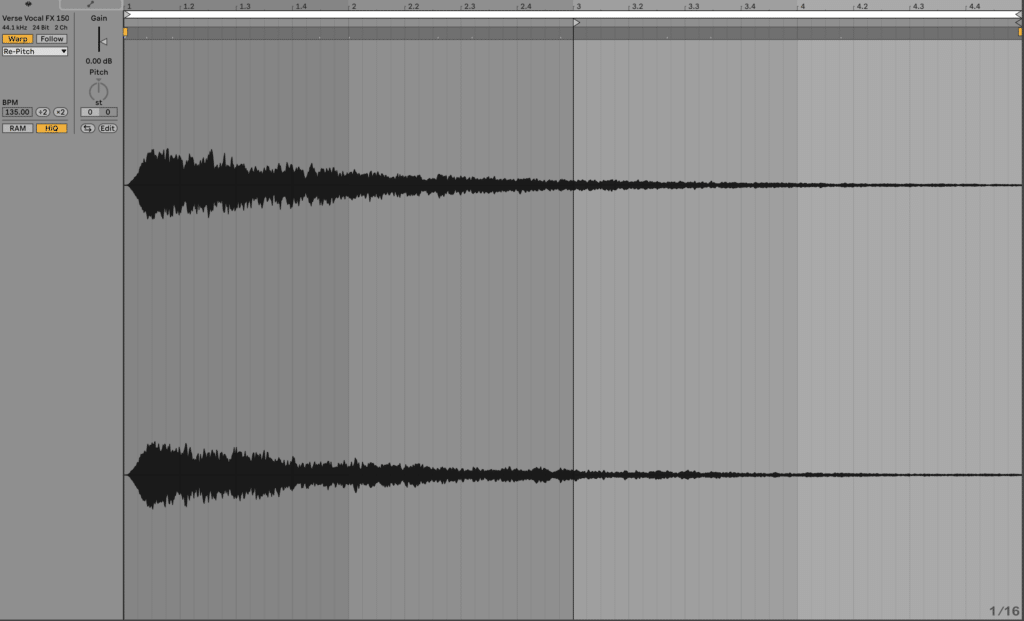
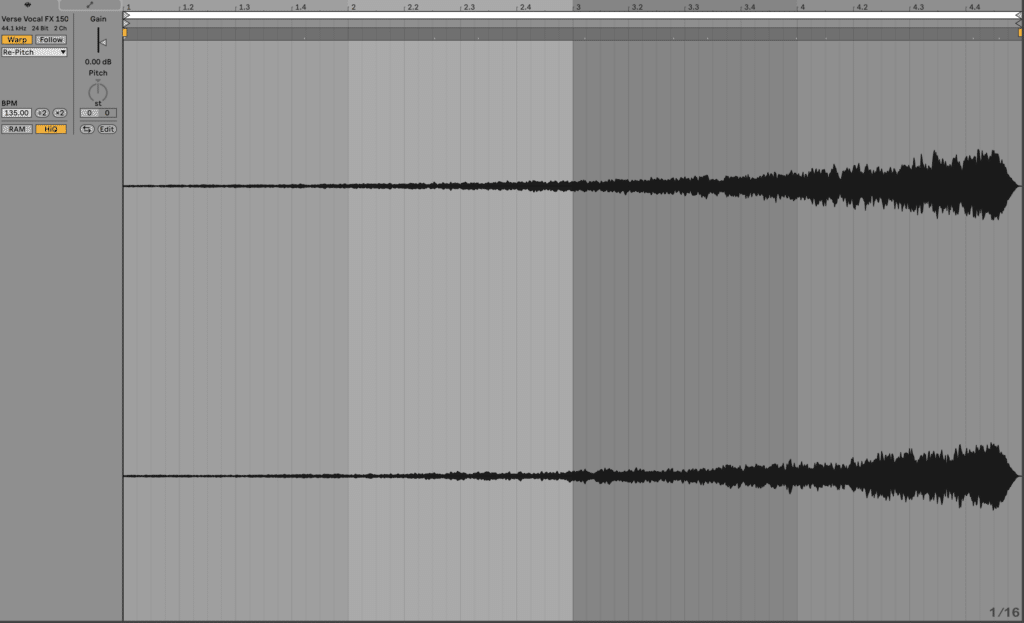
I’ve additionally introduced within the ‘Verse Vocal FX 150 A#’ pattern from the EDM Starter Equipment. I’ve warped this in time utilizing Ableton’s Repitch mode, which occurs to transpose our pattern into our key.
I’ve then began the pattern at bar 3 and reversed the primary one, to create a cool alternating impact.
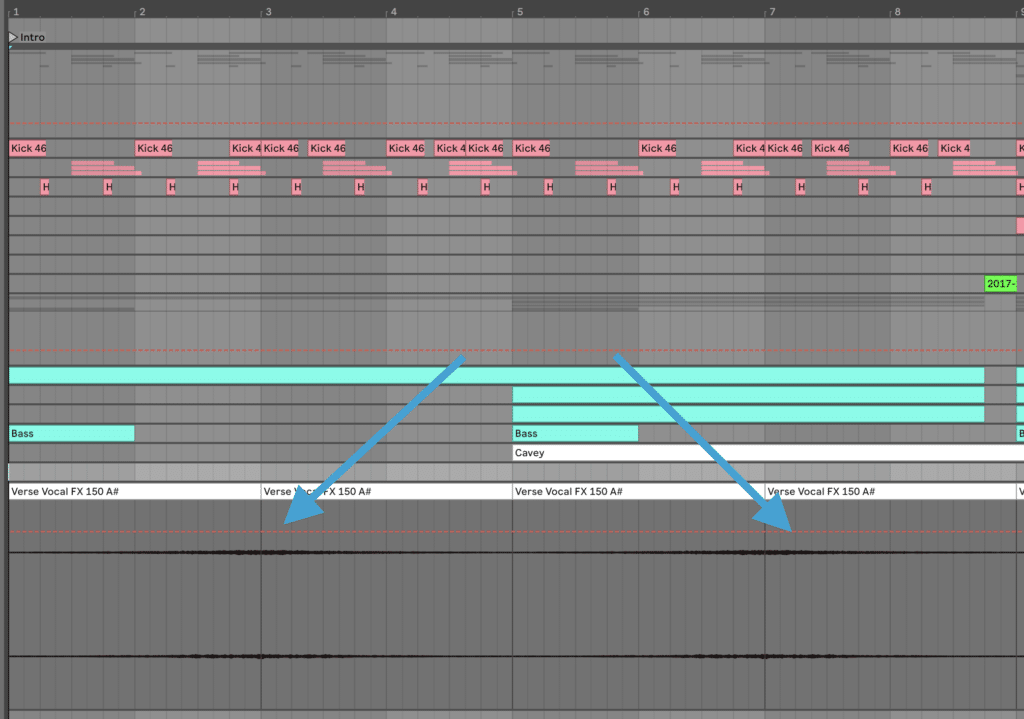
This sound just about repeats each 4 bars at some point of the monitor, together with within the construct.
Right here’s what the intro will sound like!
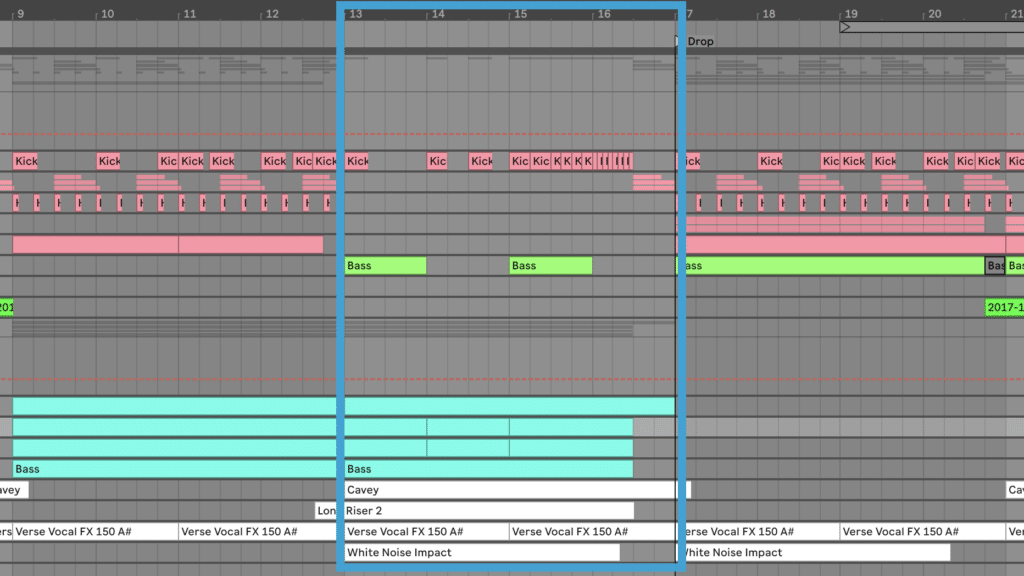
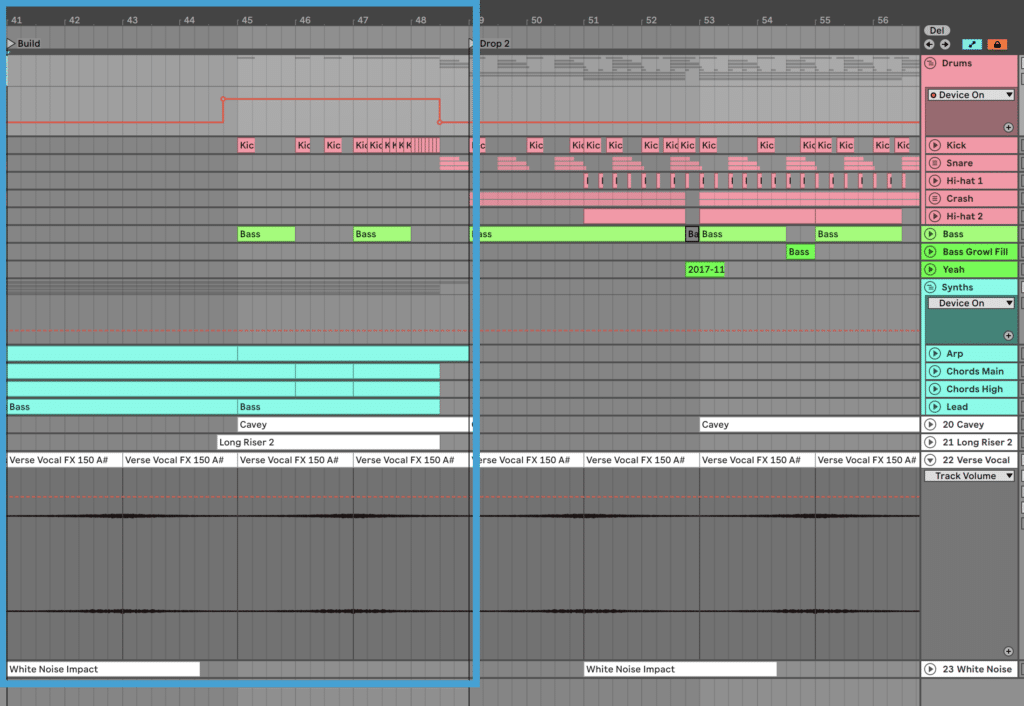
Construct (4 bars)
Now that your musical thought has been launched (and also you’ve created curiosity within the intro), you can begin to transition as much as the drop through the use of a mix of strategies.
On this specific fashion, I’m transitioning from a musical thought to extra of a bassline-driven thought, so what I do at this second is essential:
- Take away Claps and Snares besides the one proper earlier than the drop
- Introduce 1 bar of the Predominant Bass sound with a filter automating up
- Deliver within the Lengthy Riser 2 pattern from the EDM Starter Equipment, and have it sweep up till 2 beats earlier than the drop
- Place the White Noise Impression pattern on bar 13 (from the EDM Starter Equipment)
- Place the Cavey pattern on bar 13 (from the EDM Starter Equipment)
- Have the Kick double in rhythm proper up till the drop
All of those strategies are tried and true build-up strategies in dubstep, and so they work for a motive. You don’t all the time have to make use of all of them, and there are occasions to attempt one thing new. However constructing vitality this fashion is assured to create an impactful drop.
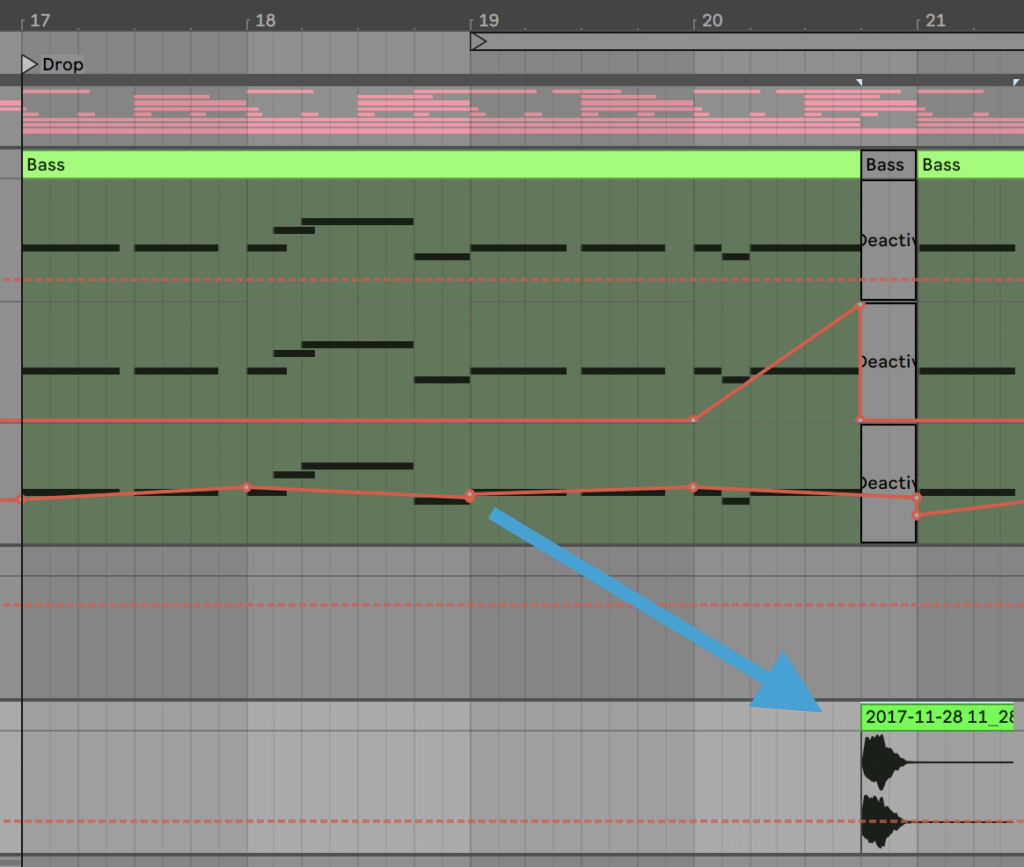
Drop (8 bars)
That is the place the bass is available in correctly, and the place all the stress is launched
- Take away all synths besides bass
- Full drums with all hats
- Herald crashes (lower out at 20.4 and 28.4 to depart area for ‘Yeah’ pattern)
- ‘Yeah’ pattern proper earlier than bar 21
- Deliver Hello-hat 1 and a pair of out at 24.2 to offer them a break
We’re going to additionally create a distinct 2nd half of the drop, to introduce the Arp and different melodic parts.
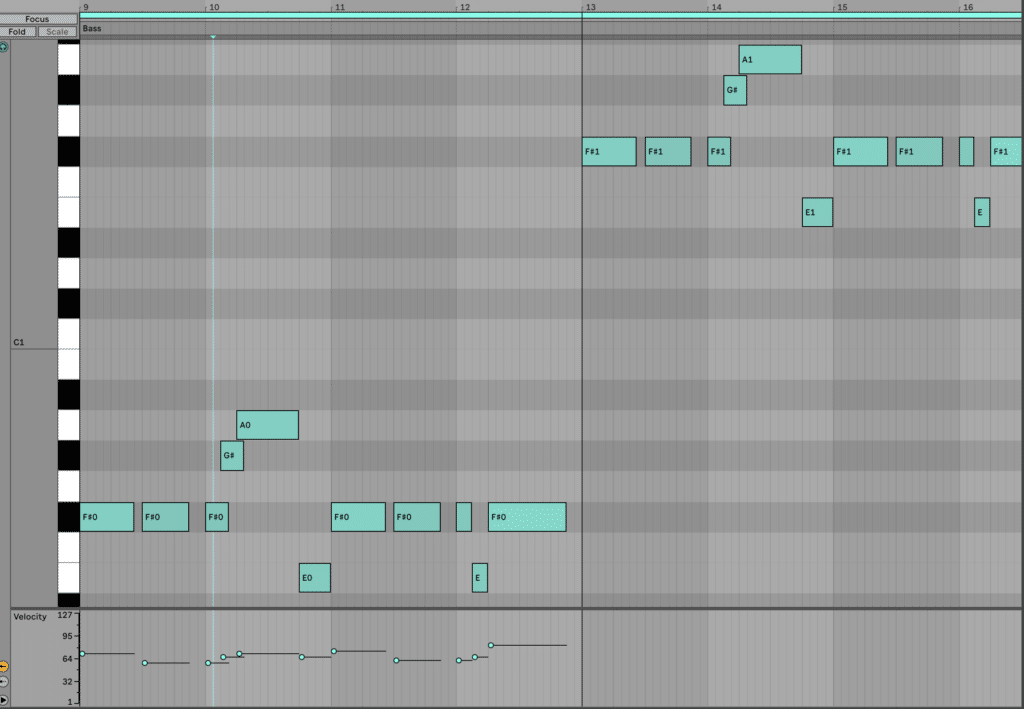
The very first thing we’ll do is make the bassline extra easy to depart area for the opposite parts. Listed below are the notes I’ve used, that are a lot decrease:
After this, the arp comes again in with a low-pass filter engaged, that slowly opens up over time.
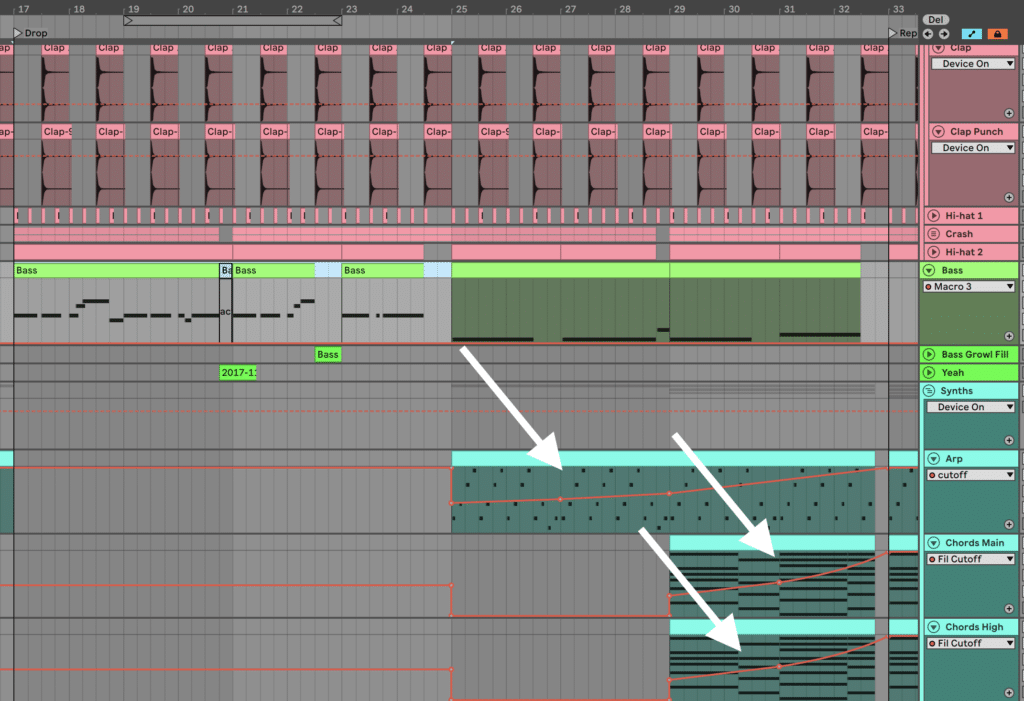
Within the final 4 bars, each of the chord layers additionally come again in with a sweeping low-pass filter.
And right here’s the total drop!
Now let’s transfer onto the second half of the monitor.
Step #7: The Submit-Drop, Second Drop & Outro
Within the second half of the monitor, we wish to be balancing repetition with a number of new concepts. So we received’t be introducing too many new parts.
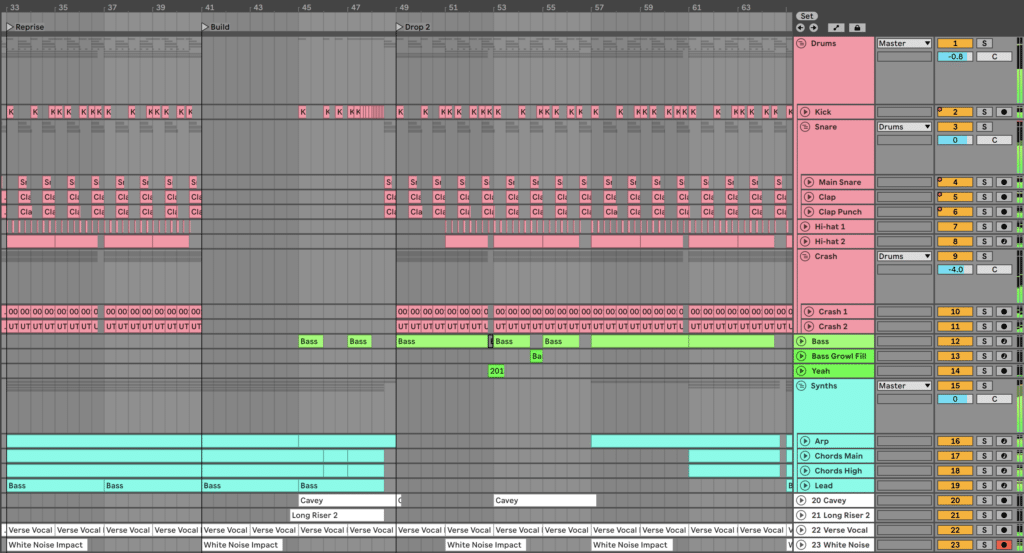
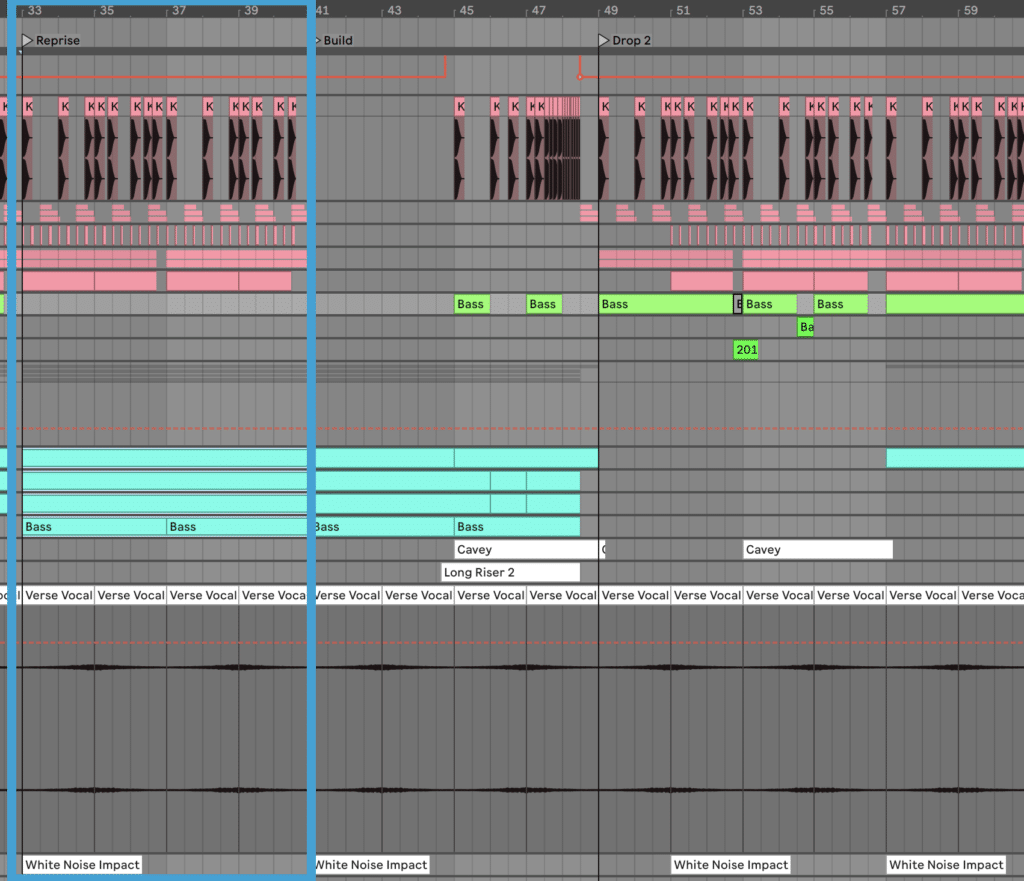
Reprise (8 Bars)
This part carries the identical drum sample however simply copies the melodic parts from the unique intro/construct like so:
You can even deliver the filter down on the chord synths in the direction of the tip of the part, to create some pressure for the oncoming construct. However the arp will keep fairly constant so the vitality is maintained.
Construct (8 Bars)
This part is actually comprised of bars 9-16 copied, however with out drums for the primary 4 bars. As I mentioned, don’t overcomplicate it ?
Drop 2 (16 Bars)
Once more, begin by copying everything of Drop 1 to the place Drop 2 will likely be. Nevertheless, we’ll be altering up the Predominant Bass for this drop.
I’ve automated the octave on OSC 2 in Serum to go up by 1 through a Macro, which provides the bass a distinct harmonic texture:
Past this, I muted the kick and snare for the primary 2 bars, in addition to eliminated each hi-hats. This creates an additional little bit of pressure throughout this part.
Lastly, I pitched the Bass Growl Replenish an octave to distinguish it from the primary drop.
Right here’s the way it ought to sound:
Reprise & Outro (16 Bars)
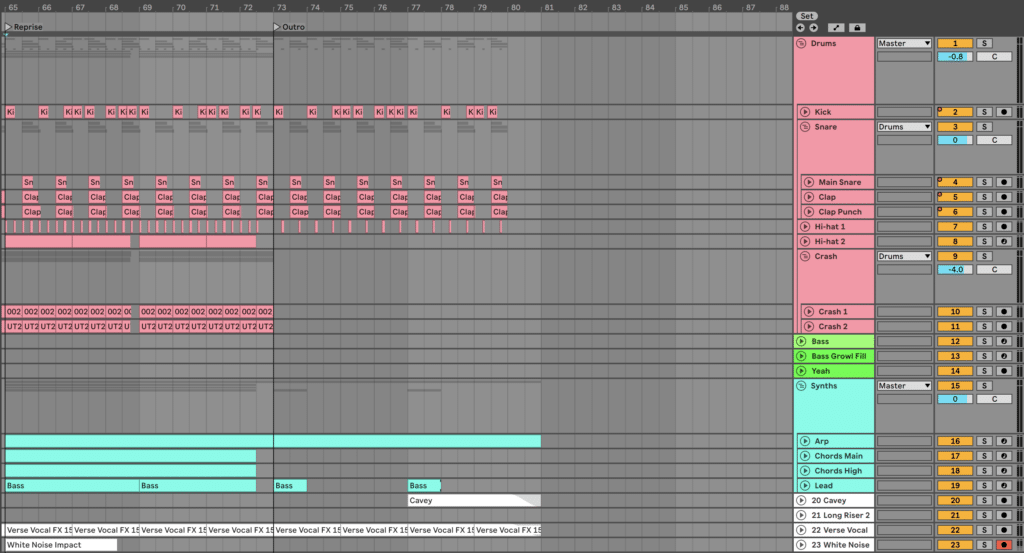
For the primary 8 bars (the Reprise), you may simply copy the earlier one. And for the outro, copy the primary 8 bars of the intro, however:
- Take away the Chords
- Begin the Arp with the filter open, and produce it down in the direction of the tip
- Take away the final 1 bar of drums
And that’s all you want for a fundamental outro! With that achieved, our association is wanting completed, and we will begin refining and mixing our monitor.
Step #8: Cleansing Up – Mixing & Ultimate Polishes
Now we’re as much as the dreaded mixing stage. The excellent news is that in case you’ve produced your monitor nicely, mixing doesn’t need to be a chore.
As with all genres of digital music, 80% of the blending work occurs within the fader balancing.
As a result of fader balancing is like EQ in your complete combine – if you need extra low-end, flip up the kick and bass!
Listed below are the fader ranges I ended up at. The purpose right here is to not copy me straight however to realize an identical relative steadiness.
You need your kick, snare, melody, and bass to be on the forefront, and every little thing else to be supporting the combination at completely different ranges:
Faders
- Kick: +0.3dB
- Predominant Snare: 0dB
- Clap: -3dB
- Clap Punch: +2.1dB
- Hello-hat 1: -6.6dB
- Hello-hat 2: +0.2dB
- Crash GRP: -4dB
- Crash 1: -15.7dB
- Crash 2: -10.7dB
- Predominant Bass: -8.5dB
- Bass Growl Fill: -3dB
- ‘Yeah’ Pattern: -4.8dB
- Synths GRP: 0dB
- Arp: -7.1dB
- Chords Predominant: -6.1dB
- Chords Excessive: -7.4dB
- Lead: -4.2dB
- Cavey FX: -8.2dB
- Lengthy Riser 2: -9dB
- Verse Vocal FX: +0.1dB
- White Noise Impression: -21dB
EQ
When you’ve bought a good-sounding combine from balancing the faders, the following software to make use of is EQ. EQ can resolve imbalances within the sound that merely adjusting the faders can’t repair.
To exhibit, listed below are a number of adjustments I made with EQ (I’ll be utilizing Fabfilter Professional-Q 3, however you should utilize inventory EQ too):
Bass Vitality
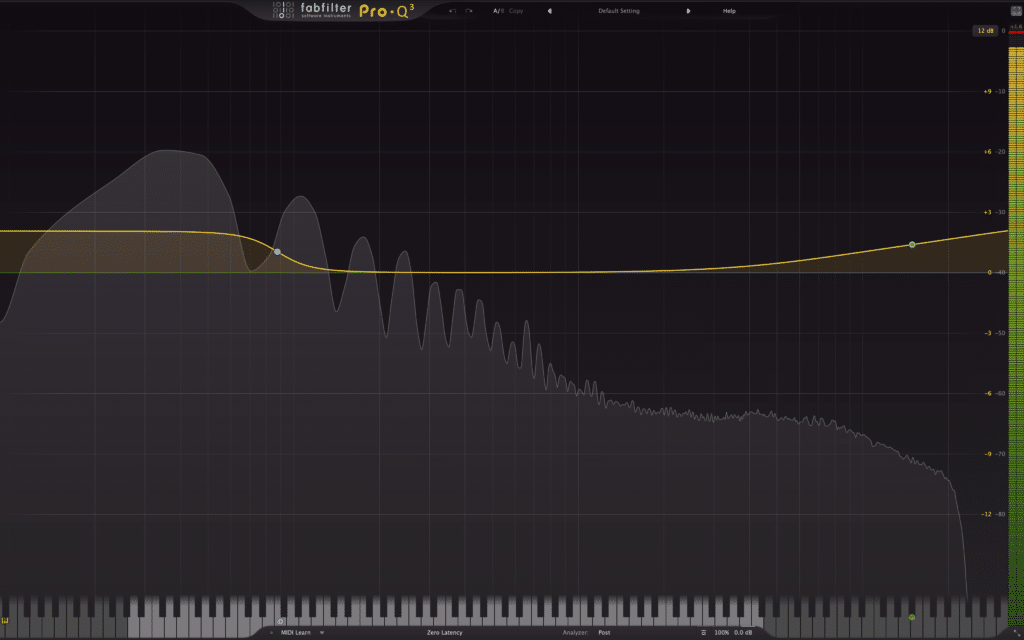
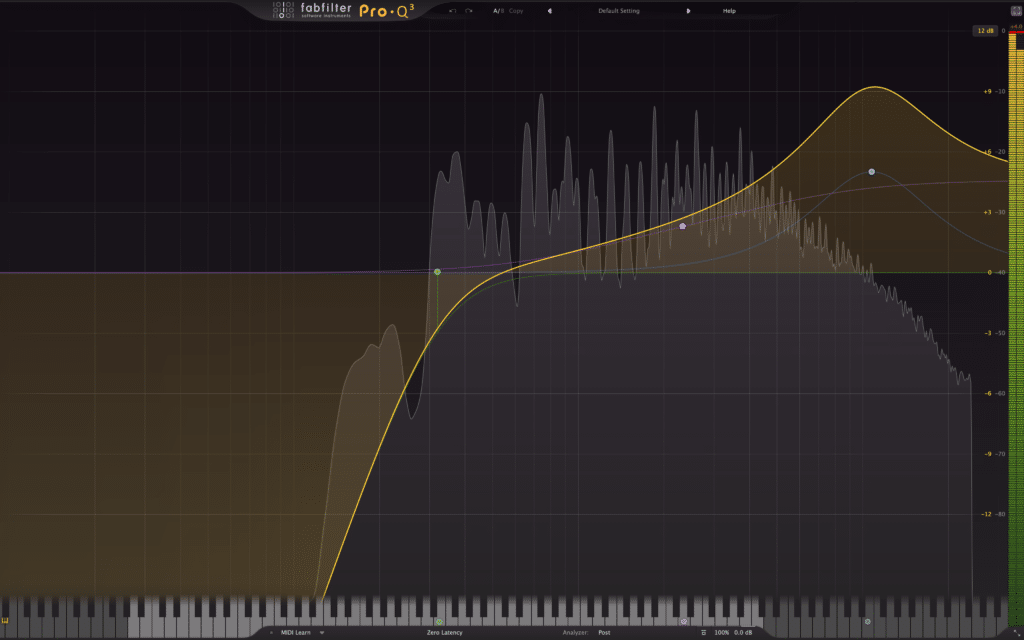
Although I already boosted within the lows and highs within the bass, the distortion afterwards can usually weaken our sub frequencies. Plus I felt it might do with a little bit extra top-end.
There’s a 2dB low shelf enhance at 87Hz, which targets simply the sub as we’re utilizing a 48dB/oct slope. This slope could be very focused, so neighboring frequencies received’t be too affected.
Lastly, the excessive shelf is a delicate 3dB enhance at 15kHz, so as to add extra readability to the bass.
Lead Readability
I admit this can be a fairly drastic enhance round 8-10kHz with a high-shelf and bell, however for this sound, it labored to assist it lower by means of the combination.
The high-pass filter at 320Hz additionally helped to wash out low-end mud that conflicted with the chords too.
Carving The Arp
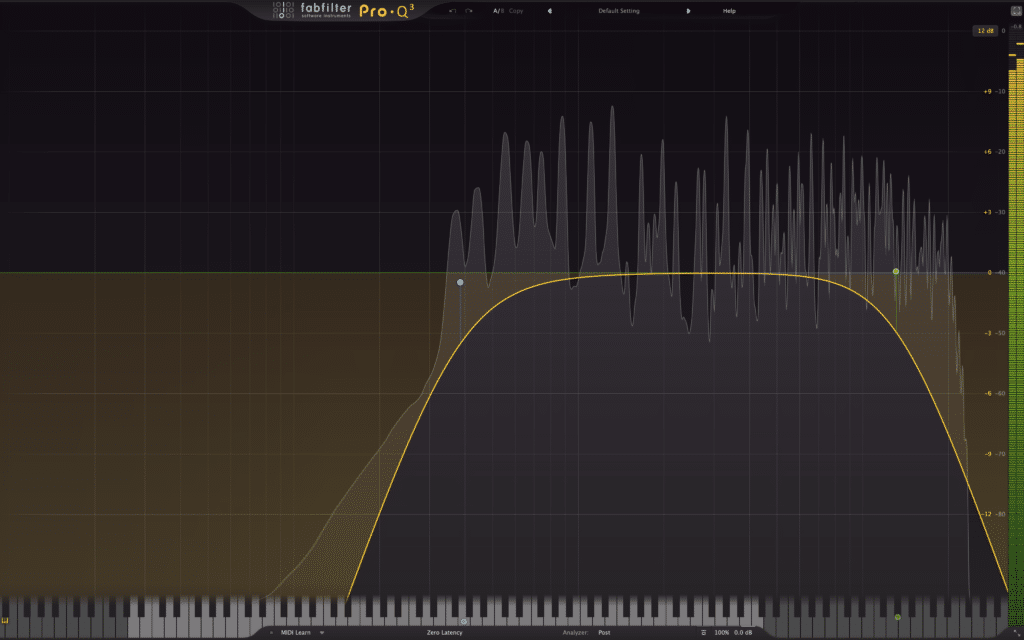
The arp sounds nice on it’s personal. However within the context of the monitor, the highs battle with the lead an excessive amount of, which is meant to the principle component. So low-passing it round 13kHz solves that subject.
Moreover, a high-pass at 380Hz eliminates pointless low-end that battle with different melodic parts.
Compression
Compression may be overused in digital music. Particularly when the weather have already got fairly flat dynamics.
However on this case, the three layers of the snare resulted in a reasonably flat sound, so I wanted to regulate it and add some punch again.
Right here’s what settings I used on the Snare Group:
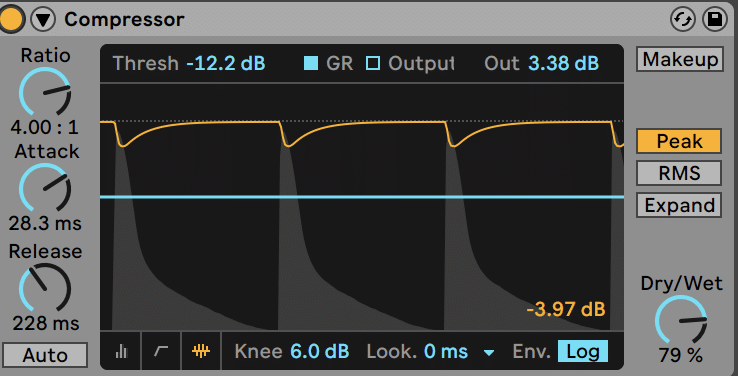
The longer assault nonetheless lets the punch of the snare by means of, however we’re controlling the physique of the sound much more.
Right here’s what it seems like with out and with the compressor engaged:
It’s a delicate distinction, however the second sounds lots fuller to me.
Sidechain Compression
In dubstep, sidechain compression is crucial for 2 causes:
- Balacning the low finish and avoiding mud
- Making a pumping impact with different devices
For these causes, I’ve added sidechain compression from each the kick and snare to the:
- Crash Group
- Predominant Bass
- Synths Group
Listed below are the settings if you wish to copy them precisely:

Drums Buss
Lastly, to tighten up and glue all of the drums collectively, I’ve used a little bit of buss compression on the Drums Group.
I’m utilizing Ableton Dwell’s Glue Compressor for this job, however any compressor can do:
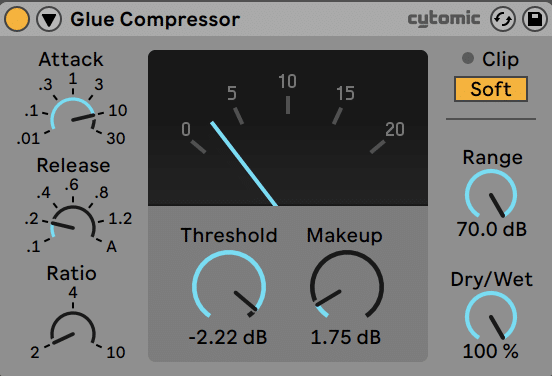
Right here’s a rundown of every parameter:
- 10ms assault for a little bit little bit of punch, however catching many of the peaks
- 200ms launch for a pure but quick pumping impact
- Ratio of two:1 for a delicate sound
- Threshold adjusted to get 3dB of achieve discount
- Make-up achieve to spice up common quantity again to the place it was
- Comfortable Clipping on to chop off any transients and add loudness
The comfortable clipping on the finish of Glue Compressor’s processing additionally offers some good, loud drums as soon as we enhance the make-up achieve.
With the blending achieved, now all that’s left is the mastering!
Step #9: Mastering for Most Loudness
We’re going to maintain mastering easy for this construct, because it’s simply to get the dynamics stage and make it sound prepared for membership play.
I’m going to be utilizing a limiter – FabFilter Professional-L 2 to be actual.
Merely use the ‘Trendy’ setting and produce the achieve as much as style:
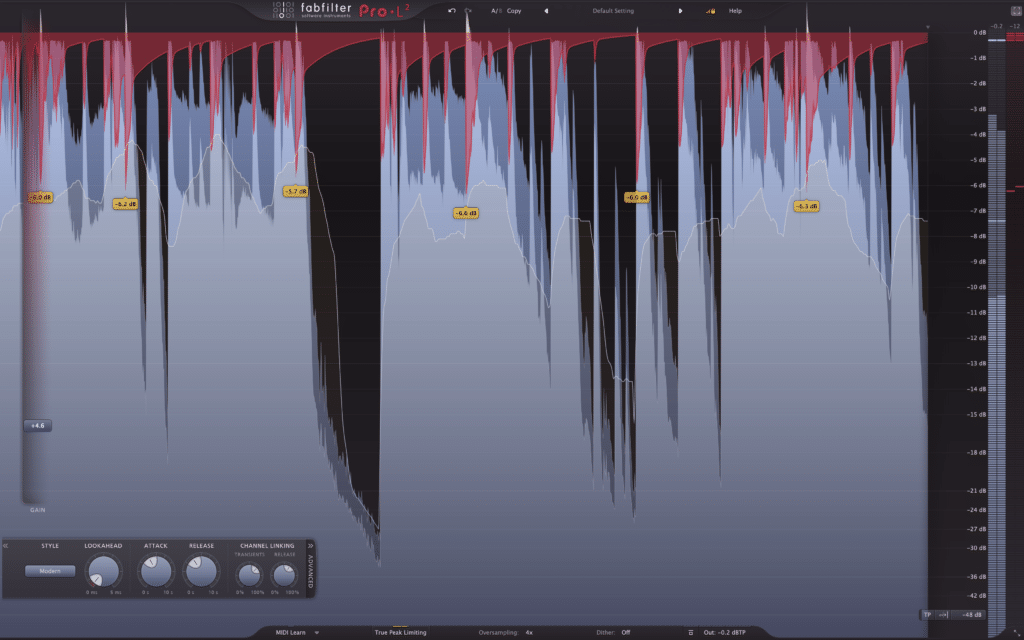
Yep! It’s that easy (so long as you’ve blended nicely within the final step).
At this stage, you may go additional and add multiband compression, saturation, and no matter else you wish to get that ultimate polish. Simply be certain so as to add it earlier than the limiter.
However the limiter does 90% of the heavy lifting anyway.
Right here’s the ultimate outcome!
That’s How To Make Dubstep!
Phew – in case you made it by means of all of that, nice job. You’ve simply made an entire dubstep monitor!
At this stage, you’re welcome to make whichever tweaks you prefer to make the music your individual. Or higher but, use this general framework to create your individual from scratch!
If you wish to take your studying additional as a producer, be certain to enroll in our Free Masterclass which can assist you:
- concentrate on the precise issues as a producer
- speed up your musical joruney (so it takes months, not years to get good)
- offer you all of the sources you want
Did I miss one thing on this information? Flick me an e mail at [email protected].
Lastly, take a look at a number of of our different style guides right here at EDMProd: