
Reverb is likely one of the first results producers study to make use of.
And why wouldn’t they? Reverb immediately provides depth and emotion to any sound.
However if you happen to’re not cautious, you may fall into the entice of “simply including reverb” – which is the quickest option to destroy your combine. So it pays to grasp it nicely.
On this information, we’ll cowl the fundamentals of reverb. We’ll take a look at the most typical parameters, tips about the right way to use reverb, and a few of the greatest plugin choices you should utilize right this moment.
Let’s go! 👇
What’s Reverb? 🤔
Earlier than speaking about reverb results, let’s speak about reverberation.
Reverberation is what you get when a sound persists after the unique sound has been produced.
Think about this:
You’re standing in an empty church and also you shout out your title. You in all probability shouldn’t, however let’s think about for illustrative functions.
As quickly as you end announcing your title, the church will nonetheless be stuffed with the sound you produced. That’s reverberation.
Or image your self in a tunnel, you shout out “Hiya!” and also you hear the echo again at you. That’s additionally reverberation.
This occurs as a result of the sound is being mirrored off a number of surfaces. These reflections construct up and attain your ears after the preliminary sound was emitted.
That is what creates a way of house and quantity. And a reverb impact in your DAW replicates this bodily phenomenon of reverberation.
Rooms, Halls, and Plates… What’s the Distinction?
For those who’ve used any reverb plugin previously, you’ll have come throughout phrases like plate, spring, or corridor.
These phrases confer with various kinds of {hardware} reverb items that had been created over time. Let’s go over a few of the hottest ones:
Room reverb
Room reverb is essentially the most fundamental sort of reverb, and can emulate the sound of a small room.
The aim of this kind of reverb is to recreate the pure reverb you hear when speaking or taking part in an instrument. Frequent room sorts may embrace bedrooms, residing rooms, and and even bogs.
The decay time (extra on that later) is kind of quick, making it nearly barely noticeable.
Chamber reverb
A chamber reverb refers to studios that had a devoted room for recording reverb.
These rooms had been padded with reflective supplies, and outfitted with a microphone and speaker to document the reverberation.
They sometimes present a reverb that’s lush and stuffed with distinct traits however with extra readability than a room or corridor reverb.
Corridor reverb
Corridor reverbs are a producer favourite. They purpose to emulate live performance halls, i.e. lengthy and spacious reverberations.
They’ll sometimes final for a number of seconds. Because of this you must watch out when utilizing them as they’ll rapidly muddy your combine.
Plate reverb
All of the reverb sorts mentioned beforehand are modeled off precise bodily areas. However there are different kinds of reverbs that don’t observe the identical logic.
Plate reverbs had been invented within the 50s and encompass a vibrating metallic sheet towards which sound is emitted. These sheets can range in dimension, from a couple of centimeters excessive to a number of sq. meters.
Such a reverb is commonly described as darkish, heat, and dense. It is likely one of the most original and attribute reverb sounds:
Spring reverb
Much like plates, spring reverbs are a mechanical creation to create reverberation. Their mechanism is much like a plate reverb, however metallic springs are used as a substitute of metallic sheets:
They’ve a shorter decay time than plates, and have a attribute metallic sound to them. They supplied a classic fashion of sound, and are particularly common on guitars.
Convolution reverb
Lastly, let’s speak about convolution reverb.
Convolution reverbs are usually not a particular sort of reverb, however a approach of re-creating any sort of reverb.
Through the use of impulse responses, reverberations by way of bodily areas are recorded. They’re then re-created digitally and could be utilized to any sound.
Right here’s why that is so highly effective:
It means that you can seize the sonic traits of say, your personal toilet, after which apply that reverberation to any sound you need.

Loopy, proper?
The Most Essential Parameters of a Reverb
Earlier than diving into sensible examples, let’s go over the most typical settings you’ll find on any reverb plugin.
For every of those, I’ll make the behavior of adjusting it within the context of the total combine. An enormous decay time may sound nice in isolation, however fully drown different devices!
Decay
Essentially the most simple setting on a reverb plugin is the decay time.
It’s the size of the reverb “tail”, or how lengthy it takes for the reverb to die out. It’s presumably essentially the most essential half, and the simplest to get unsuitable.
Much less is extra with decay, so begin small and improve progressively.
Measurement
Additionally referred to as “Room dimension” or “Area”, this defines the dimensions (duh) of the house through which your sound has reverberated.
Choose a small dimension for a bedroom-style reverb, or improve it to loopy ranges to imitate a cathedral.
In the true world, Decay and Room Measurement often go hand in hand and are adjusted in tandem. For instance, the larger the house, the longer the decay might be.
If you’re going for a natural-sounding reverb, keep away from rising the Decay an excessive amount of whereas conserving the Measurement low.
Within the following instance, I’ve used a 5s Decay time (which may be very lengthy), however a really small Measurement:
You may hear an unnatural and ugly ringing. Nonetheless, conserving the lengthy decay time however rising the dimensions offers a extra pure sound:
Delay
Additionally referred to as “Pre-delay”, this setting introduces a brief pause between the preliminary sound and the reverb. Delay introduces some separation between the supply and the impact:
Combine (Dry / Moist)
Lastly, as with most plugins, a Combine or Dry / Moist knob permits controlling the quantity of impact utilized.
0% will go away your sign dry of any reverb, whereas 100% will solely go away the impact and take away the dry sign.
When processing by way of a ship channel (extra on that later), you need to all the time set your Combine to 100%.
4 Methods to Use Reverb Results
Now that the fundamentals are coated, let’s get into alternative ways you should utilize reverb creatively:
1. Improve Vocals
Processing vocals is presumably the most typical use of reverb.
As talked about beforehand, pure reverberation is current in any room you document in. Because of this vocal recordings will happen in devoted vocal cubicles or with isolation shields:

This gives a “dry” recording in order that the specified reverb could be utilized afterward.
The kind of reverb you select will rely in your fashion. Orchestral, dramatic takes may name for an enormous corridor reverb, whereas a extra intimate folks observe may want a small room reverb.
In any case, introducing a little bit of delay will create some separation with the primary vocal and create readability.
Right here’s an instance:
If you’re working with the primary vocal line, it may also be a good suggestion to work in parallel. Primarily, you create a duplicate of your dry sign the place you apply 100% impact to it:
This allows you to mix in simply the correct quantity of reverb that you really want. Moreover, you may then sidechain the reverb in order that it peaks and geese behind your dry vocal, creating readability in your combine:
You may hear how the second model is quite a bit cleaner and leaves room for the primary vocal to breathe.
For those who want a refresher on all issues Sidechain Compression, ensure to take a look at our newest article!
2. Make your drums extra natural
Frequent suggestions you may obtain in your early tracks is that your drums are “a bit dry bro”. This was undoubtedly my case after I began out, and an effective way to resolve that is with reverb.
The aim right here is to duplicate the room mics which are typically utilized in reside drums recordings:

Now, you could possibly merely add reverb in your essential drum bus, however that may simply turn out to be messy and washed out.
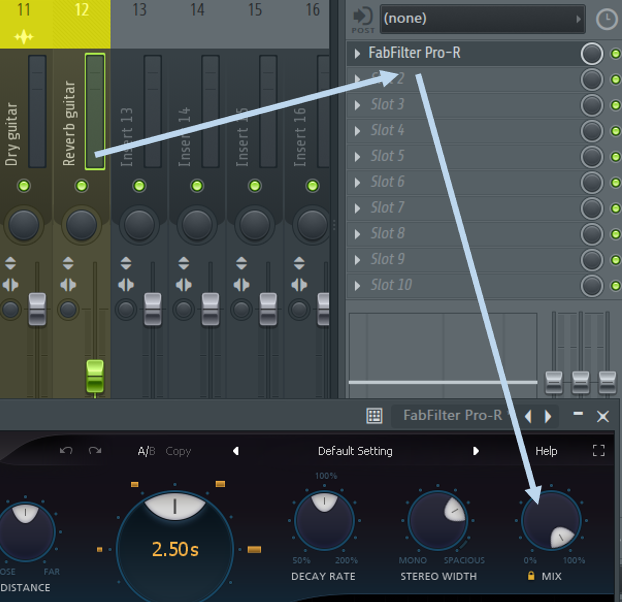
A greater approach is to make use of a parallel channel:
First, arrange your parallel channel and add a reverb unit with a 100% moist sign. Be certain the decay is brief.
Subsequent, use an EQ plugin reminiscent of Professional-Q 3 to take away the mid info. This may go away a reverb with solely the facet sign:
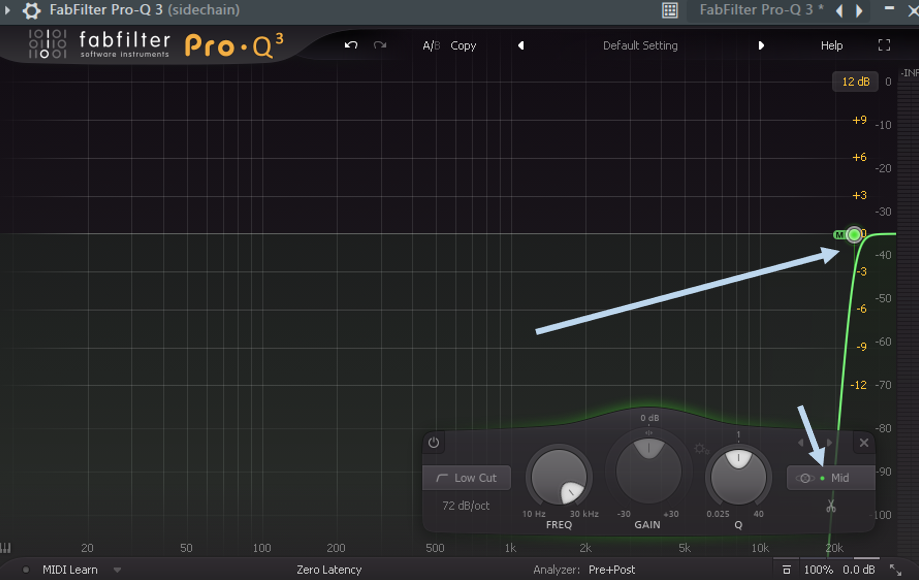
At this stage, you may add your favourite stereo shaper plugin so as to add some width to the reverb. Lastly, low-cut all the things under roughly 200Hz and mix to style with the dry sign.
3. Create in-context atmospheres
One situation you may run into when writing tracks is that the weather really feel disjointed.
Your pads, piano, arps, and vocals may sound nice in isolation, however in some way they don’t gel collectively.
One trick you should utilize so as to add cohesion to your tunes is to create pads and atmospheres based mostly on different parts in your tracks. For instance, creating an environment based mostly on the vocal you employ.
Let’s test this out with an instance. I’m beginning right here with a fundamental loop together with drums, bass, and vocals:
I want to add some sort of underlying ambiance. As an alternative of including a model new sound, I’m going to make use of the vocal to create a pad.
In a separate channel, I put a duplicate of the vocal and add some big reverb to it. This can be a good place to experiment with extra-long decays, sizes and many others.
Now, I’m going to make use of the lengthy tail of that vocal reverb to create a pad.
Subsequent, I add a little bit of compression to even out the quantity and take away a few of the low. Throw in some sidechain and that is what I ended up with:
I can now mix on this pad with my essential vocal, and I’m positive it would slot in properly:
This may work with any melodic factor you might have: vocals, piano, synth traces, and many others.
4. Introduce new parts with reversed reverbs
The reversed reverb trick is likely one of the most typical methods to introduce a brand new factor in your tune. This works particularly nicely if there’s a little bit of silence earlier than your new factor hits.
Let’s take a look at a sensible instance:
Proper now, the synth loop comes a bit out of nowhere. Let’s use the reversed reverb trick to introduce it extra easily.
First, choose simply the primary few seconds of the sound. Reverse it and add a ton of reverb. Ensure you have one thing with a pleasant and lengthy tail:
Now, document it and re-import it into your undertaking as a brand new stem. Reverse it as soon as extra so that you create a swelling impact:
Line it up with the beginning of the synth line, add some extra quantity automation, and voila!
This trick works particularly when introducing vocals or piano chords.
The Finest Reverb Impact Plugins (Free and Paid)
Lastly, let’s go over a few of the hottest reverb plugins in the marketplace.
1. Fabfilter Professional-R (Paid)
Thought of by many because the Rolls-Royce of reverbs, Professional-R comes with all the same old settings you’d count on.
Nonetheless, it goes nicely past your customary plugin because of its Decay Price EQ and Put up EQ choices:

In blue, the Decay Price EQ permits controlling the velocity at which numerous frequencies will decay. For instance, you could possibly make the low frequencies die out a lot sooner than the excessive frequencies with the next curve:
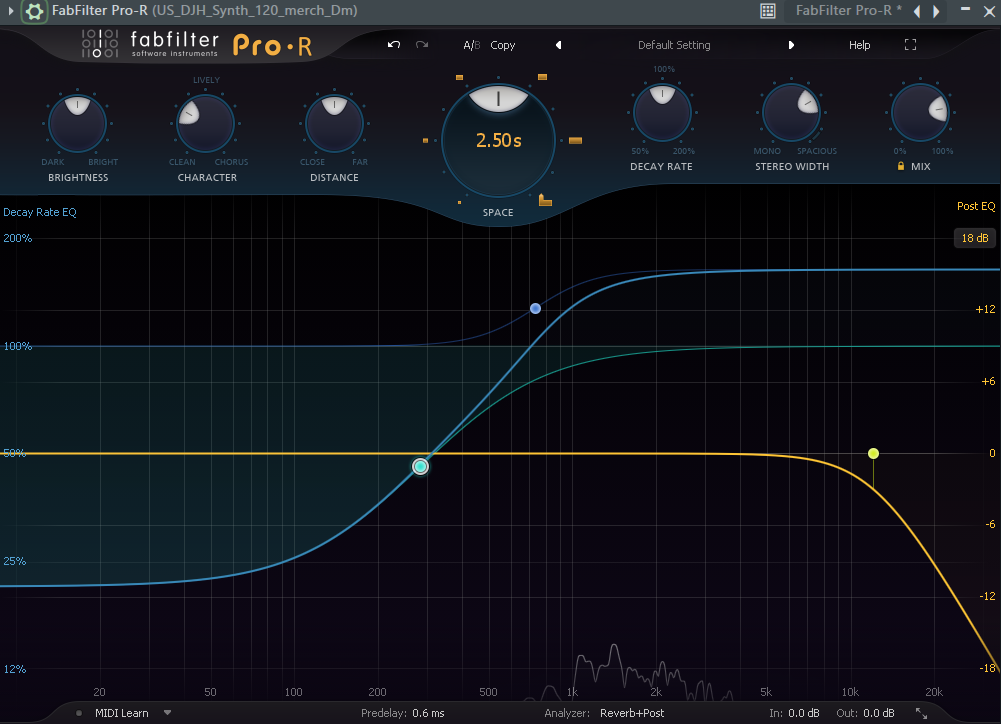
In orange is the Put up-EQ curve which permits to EQ the ultimate output sound.
One function that I like is the power to lock within the combine stage you need. This manner, even if you change between presets, your dry/moist steadiness stays the identical:

As is the case with all Fabfilter plugins, you get a shocking array of presets to work with. There are a ton of different settings you may tweak, however suffice to say this one is a must have in your arsenal.
2. Valhalla VintageVerb (Paid)
For those who’ve spent any time watching manufacturing tutorials on YouTube, you’ll have certainly seen individuals use Valhalla VintageVerb:
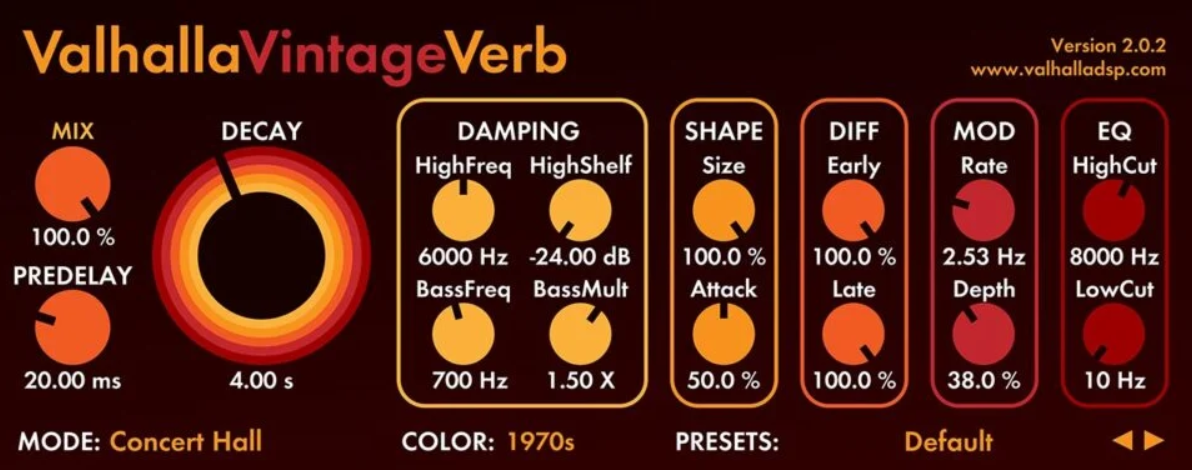
Valhalla VintageVerb boasts 19 reverb modes, from Plate to Refrain Area to Cathedral. It additionally has 3 totally different “colours”: Seventies, Nineteen Eighties, and “Now” (the format really modifications shade as you turn, which is a pleasant contact).
One of many distinctive options of VintageVerb is the power to show the decay all the way in which as much as 70 seconds. For reference, each Professional-R and FL Studio’s inventory reverb max out at 20 seconds. This lets you create wonderful lush atmospheres.
Different cool options embrace:
- Form: enables you to management the dimensions of the room, in addition to the proximity to the supply sound
- Diffusion: controls the density of the early and late reflections. Setting it to 0% will create an nearly delay-like impact
- Modulation: enables you to modulate the frequency of the reverb
For those who’re searching for a reverb unit that gives you a number of character and expression, look no additional!
3. Valhalla Supermassive (Free)
From the identical makers as VintageVerb, I’ve misplaced rely of what number of instances I’ve advisable this plugin. In my view top-of-the-line free plugins on the market, Supermassive is my go-to to create otherworldly atmospheres:
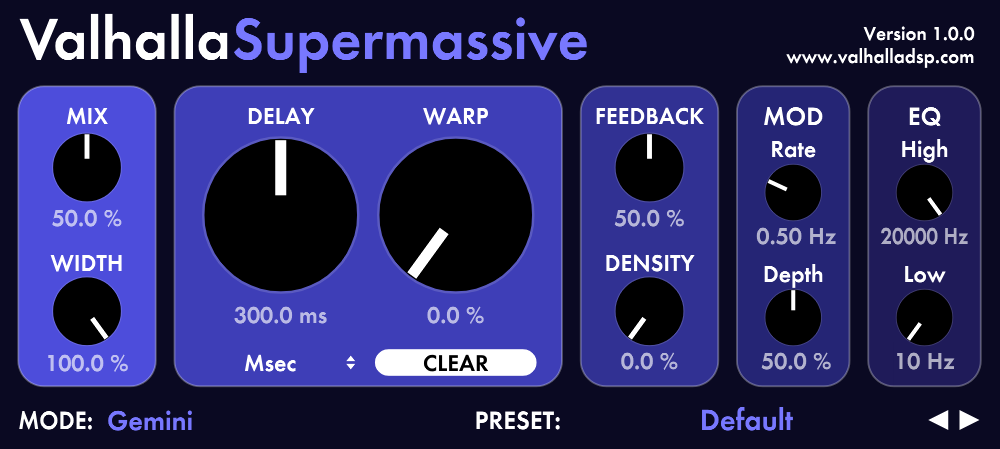
Though technically a delay plugin, pushing the delay setting and warp setting will create large reverbs. My favourite presets are “DarkMatter” and “Barnard33”, which flip any single be aware into haunting textures:
One cool function of Supermassive is that it re-interprets audio in real-time. This implies you may tweak knobs because the sound performs to create cool artifacts:
I’ve really gone over this one in my Delay 101 Information, so ensure to test that one out!
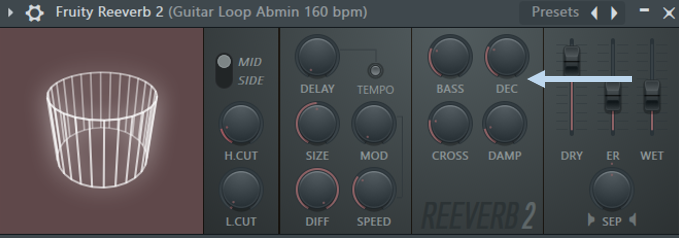
4. Fruity Reeverb 2 (Free)
Fruity Reeverb 2 was my plugin of alternative for a lot of years after I began producing. So it’s solely logical that it will get a point out right here:
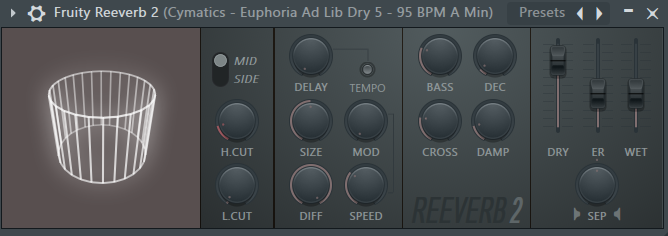
Though it does lack options in comparison with different choices in the marketplace, it would get the job completed for many functions.
Past your customary settings, you get a cool “tempo” function. This allows you to sync the pre-delay with the tempo of your undertaking. The “ER” setting stands for “Early Reflections” and lets you management the relative stage of the primary reflections.
Lastly, the Stereo Separation knob will create some extra width in your reverb.
With a couple of helpful presets at hand, Reeverb 2 is a good inventory plugin to begin out with and get acquainted.
5. Ableton Stay Reverb (Free)
Final on our listing is Ableton Stay’s inventory plugin reverb unit:
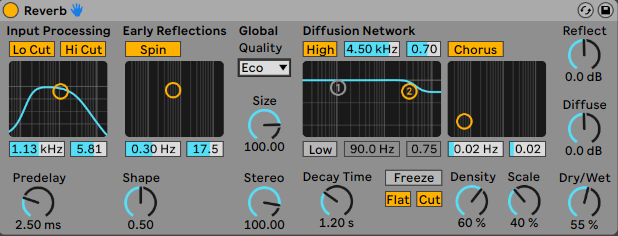
For a inventory plugin, this one goes nicely past what you’d count on. Let’s go over a few of its controls:
- Lo Minimize and Hello Minimize: will let you sculpt the enter sign earlier than any processing
- Spin: enables you to modulate the early reflections
- Diffusion Community: like Professional-R Decay Price EQ, this allows you to management the decay price of high and low frequencies within the tail of your reverb.
It’s additionally price noting that equally to VintageVerb, this reverb’s delay time goes all the way in which as much as 60 seconds.
After some extra free plugins? Take a look at our big roundup right here.
Final Phrases
That’s it for this information on all issues reverb! I hope you discovered it helpful and had been impressed to create some wonderful sounds! Did I miss out on something? Let me know at [email protected].