Granular synthesis is an excellent enjoyable solution to create never-heard-before sounds.
However the interfaces on many granular synths are complicated, and you may really feel overwhelmed.
So on this information, we’ll cowl all the pieces you should learn about granular synthesis and FX, together with:
- Understanding the essential controls so you can also make sounds with confidence
- The significance of the pattern you employ (and find out how to discover the best sounds)
- Choices for granular synth plugins and VSTs that fit your wants
Let’s begin with what granular synthesis is! However first, seize our free Foley Pattern Pack so you may have loads of materials to load up!?
Desk Of Contents
- What’s Granular Synthesis?
- The Fundamentals of Granular Synthesis
- Examples Of Granular Synthesis in Motion
- The Greatest Granular Synth VST Plugins (Free & Paid)
What’s Granular Synthesis (& Why Is It So Distinctive)?
In a world of subtractive, additive, wavetable, and FM synthesis, granular synthesis feels a little bit area of interest.
Conventional synths use oscillators, waves, and tones to generate sound, whereas granular synths use audio samples. It slices something up into grains, rearranging them quickly altering patterns.
Due to this, you may create utterly totally different sounds that you just in any other case couldn’t obtain.

Because of this granular synthesis is understood for its glitchy nature and is used quite a bit in genres like Glitch Hop, Neurofunk, and IDM.
However you should use it any style to degree up your sound design.
Listed below are a number of methods you might use granular synthesis:
- Slowing down a vocal pattern by chopping it into grains and overlapping them
- Making glitchy drums by granulizing a drum loop
- Creating glitchy textures by taking random snippets from a area recording
As a result of granular synthesis relies on samples, you may create any variety of distinctive timbres. You’re solely restricted to the supply materials.
As a result of it’s sample-dependant, it’s vital that you’ve got financial institution of samples to select from. So make sure that to spend a while curating beforehand.
To grasp how a granular synth transforms these samples, let’s have a look at the essential performance!
The Fundamentals Of Granular Synthesis
There are numerous knobs on a typical granular synth, however not all of them are important to the sound.
Nevertheless, there are a set of ‘normal’ controls, although each synth has a distinct set of phrases for every of them.
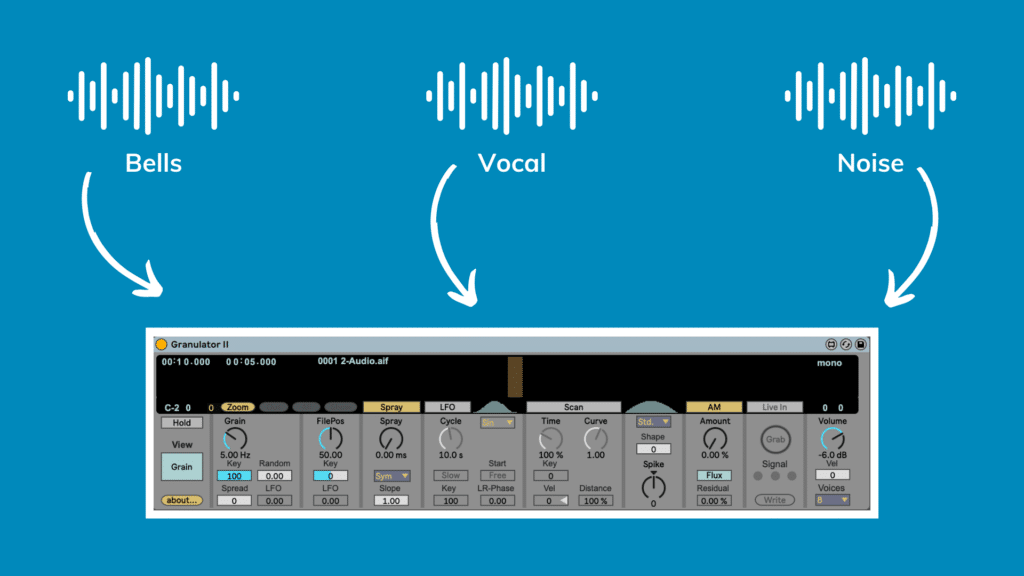
As you may see, FL Studio and Ableton Reside‘s native granular gadgets look very totally different from one another:
Crucial factor to know is that no two granular synths are created equal. However though the above two choices do perform in another way, there’s some overlap.
Let me cowl the principle three controls you’re prone to come throughout on most granular synths:
Grain Measurement
Also called: period, measurement
A granular synth chops a sound down into particular person grains. The size of that is usually within the millisecond vary or Hz, often called the Grain Measurement.
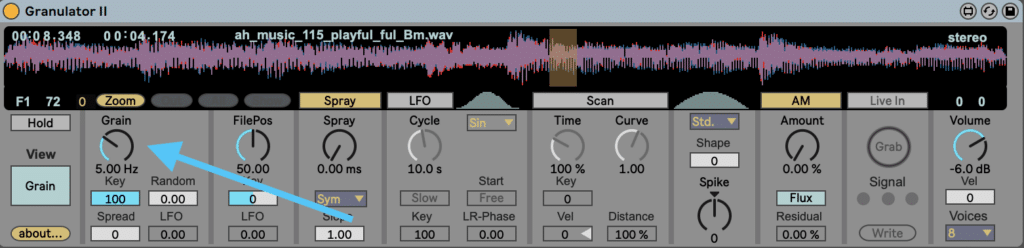
In case your grain measurement is in Hz, much less is longer. Should you’re in ms, extra is longer.
Shorter grain sizes create glitchier sounds, whereas longer sizes bleed into one another. Because of this the longer sizes are very nice for pads and ambient FX.
Fee
Also called: grain spacing, form
The hole between these grains additionally performs an enormous position. That is often often called the Fee or Grain Spacing.
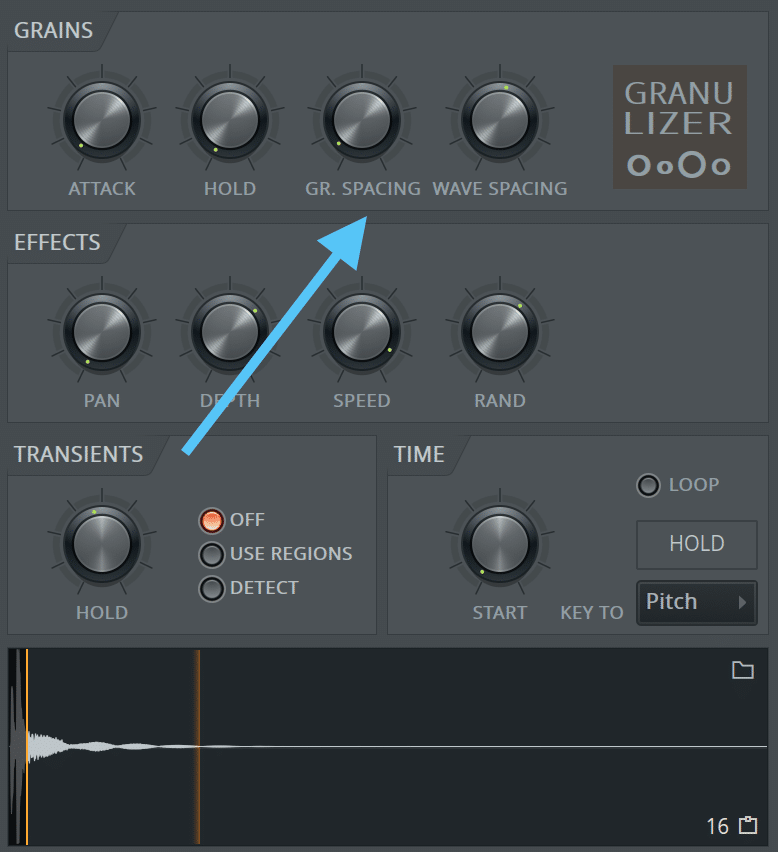
This hole determines the ‘smoothness’ of the granular sounds, as extra overlap will sound easy and extra gaps will sound grainy.
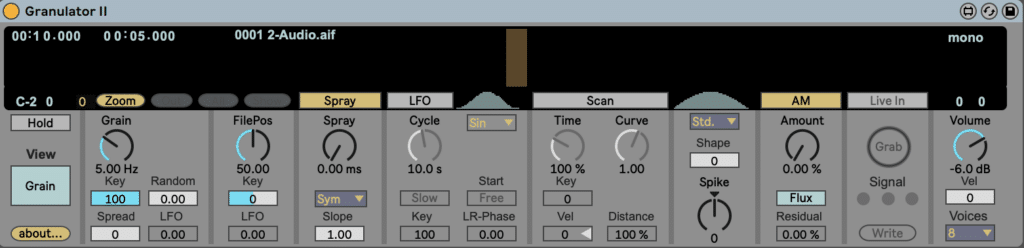
Some granular synths (i.e. Ableton Reside Granulator II) don’t have a Fee management. As a substitute, they use a ‘form’ parameter to manage the envelope of every grain. Though that is technically totally different, it’s the closest factor.
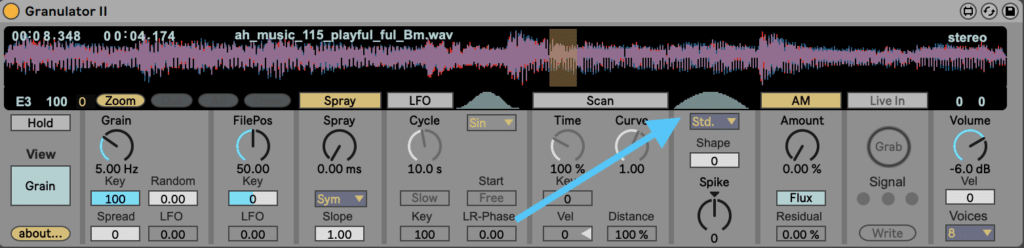
Within the case of Granulator II, you management the ‘Spike’ parameter to make the sides sharper or smoother.
Place
Also called: begin time, file place
Lastly, the precise begin level of the pattern can drastically change the tip end result.

For instance, in the event you’re utilizing a vocal pattern, at one level the vocal could also be creating an ‘oooh’ sound, and at one other level an ‘ahh’ sound.
Should you’re utilizing a drum loop, this may decide in the event you’re processing a kick, snare, or hat.
And in the event you’re utilizing a musical loop, it should decide which notes shall be chopped up.
Which half you employ will make a giant distinction, particularly in the event you’re scanning by way of the waveform.
Different Controls
Past this, granular synths can differ on the opposite choices supplied to mangle the sound.
A lot of them additionally function the normal function set of most synths, similar to ADSR envelope and pitch controls.
Right here’s a fast rundown of what you would possibly discover:
Pitch
This lets you change the pitch of the pattern. You will have some modulation choices right here so you may change the pitch with every grain (Rnd in Granulator II).
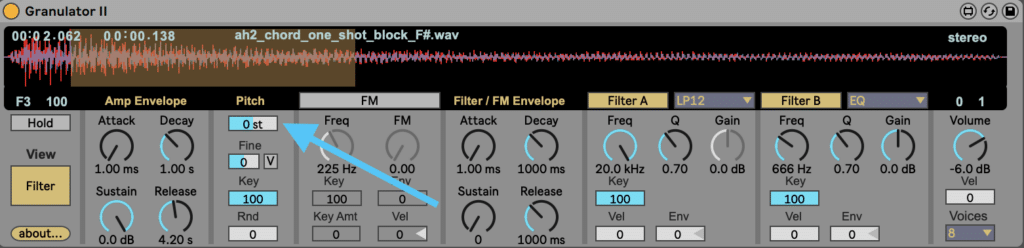
Typically, altering the MIDI be aware may even change the pitch of the pattern too. However bear in mind that the unique pitch of the pattern could not align with the MIDI be aware. You’ll be able to manually align this in the event you like.
Reverse
Not all synths have this feature. But when yours does, this usually adjustments the playback motion so it scans backward by way of the pattern as an alternative of forwards.
Nice for these pretty reverse textures – all the pieces sounds good in reverse.
Scan
Scan adjustments the beginning place with every new grain, shifting by way of the sound over time.
Nice if you wish to retain the movement of the unique pattern. For instance, you’re granulating a vocal pattern and need to hear the phrase the singer is talking nonetheless.
Random/Spray
This management randomizes the beginning place of every grain. The ensuing sound is extra inconsistent and natural.

I personally love utilizing this on melodic and pad sounds, as a result of it will possibly flip something into a stunning soundscape.
ADSR & Different Normal Controls
Shapes the quantity or filter envelope to provide the sound a sure attribute (plucky, easy, constant, and so forth.) That is often for the general be aware, not the ADSR of every grain.
You’ll additionally discover the usual set of controls that the majority synths have – filtering, quantity management, and LFOs.
Many granular synth plugins could have much more choices, however these can get fairly superior. I’d encourage you to discover these upon getting nailed the essential controls above.
A Fast Observe On Granular FX
On this article, we’re principally speaking about granular synthesis.
However typically you’ll see granular FX plugins, which have an effect on the incoming audio and chop it up utilizing the above parameters.
That is one other enjoyable approach to make use of granular processing in just about any context. We’ll cowl a few of these FX plugins later.
Now let’s see how we will use these on some precise samples!
Examples of Granular Synthesis In Motion
As you will have gathered, granular synthesis is all about experimentation. So there’s no proper or incorrect approach to make use of it.
That being mentioned, it’s excellent for FX sounds, basses, and pads.
Let’s check out every of those – I’ll be utilizing the Ableton Reside Granulator II for these examples.
Bass Granulizing
Taking a heavy bass sound and operating it by way of a granulator is usually a actually fascinating solution to get some trippy textures.
Right here’s the bass pattern I’m going to make use of for this instance:
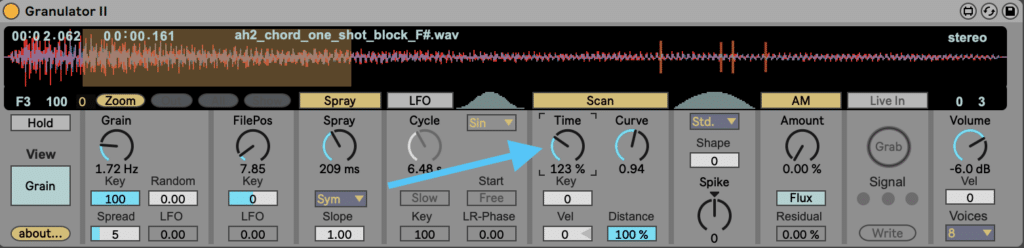
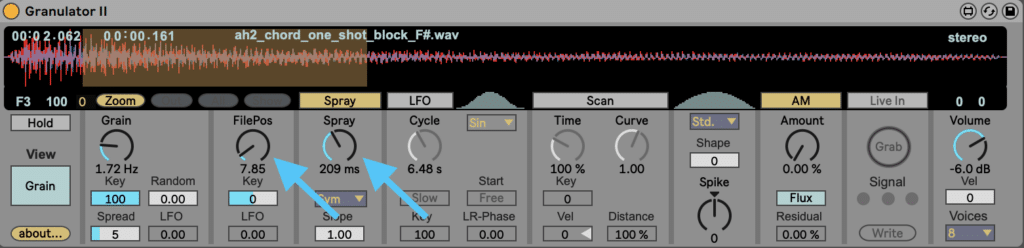
After loading it up into Granulator II, I’m going to maneuver the file place to the beginning. I’m additionally going to allow the ‘Scan’ function so it performs by way of the pattern from begin to end.
Now I can tweak the grain measurement till I get a pleasant tonal but clear sound. I’ll additionally use a little bit of spray to randomize it.
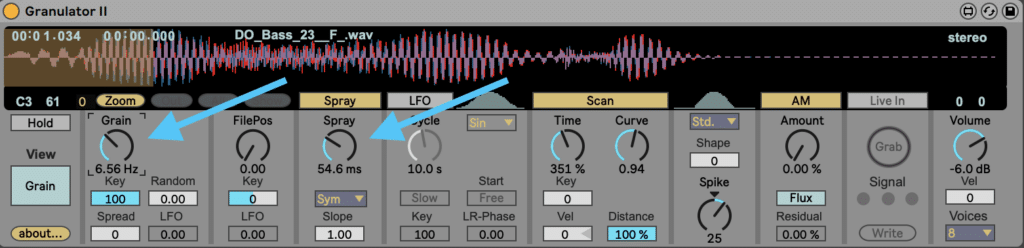
Lastly, I’ll play it 3 notes down from the unique be aware to get a pleasant aggressive sound.
At this level, I may add extra post-processing and resample till I get the sound I need.
However basses aren’t the one sounds you may put in a granular synth. Let’s strive making a pad out of a piano.
Pad Atmosphere
Chopping chordal or pad sounds into grains may give you an eternal mattress of sound to work with. Particularly when including reverb and delay.
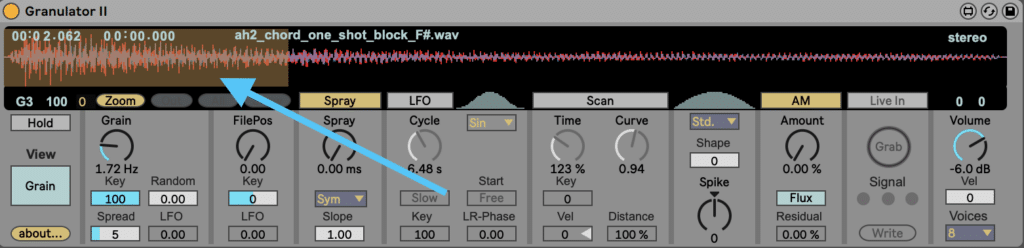
I’m going to begin with a piano chord pattern and switch it right into a pad:
Let’s load it up into Granulator II and fiddle. For pads, usually longer grains work nicely as they may overlap to create some easy textures.
So you may lower the Hz or improve the size, relying in your synth.
I’m additionally going to program a number of notes so we will hear this in motion:
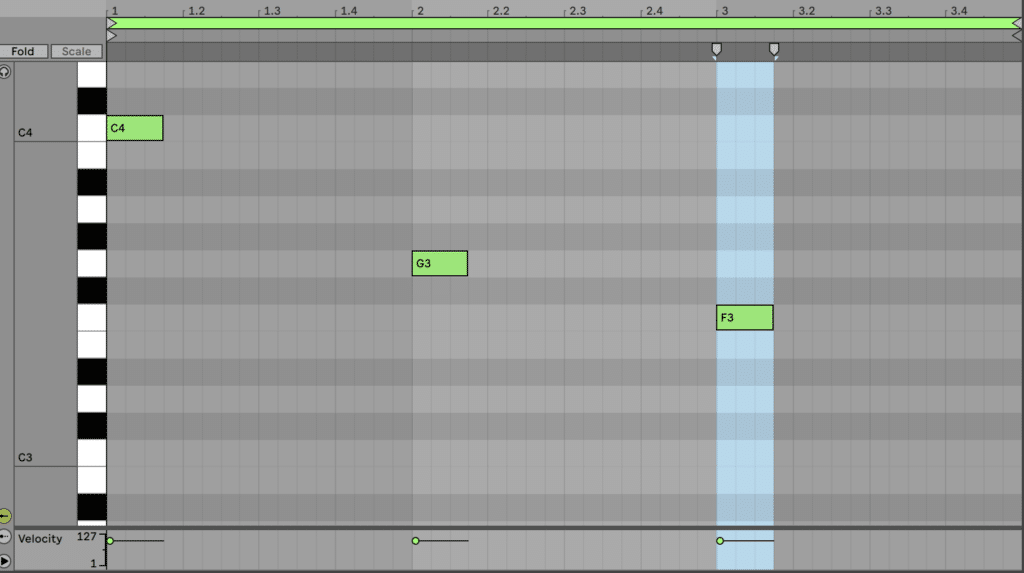
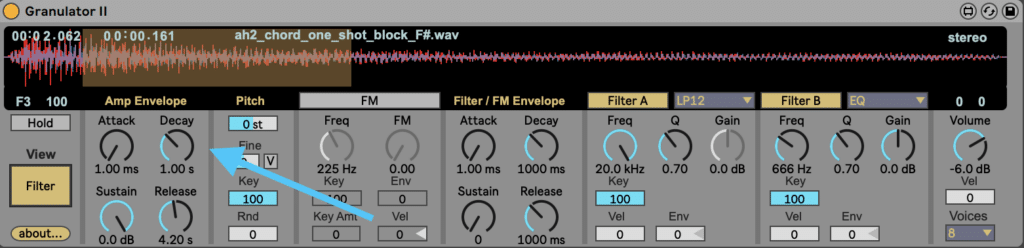
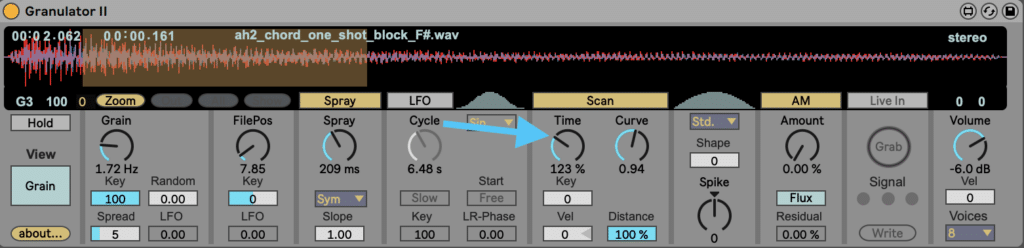
Now let’s add a number of extra adjustments to make this extra pad-like. I’m going to increase the ADSR launch out to about 4 seconds, so every be aware overlaps into the subsequent.
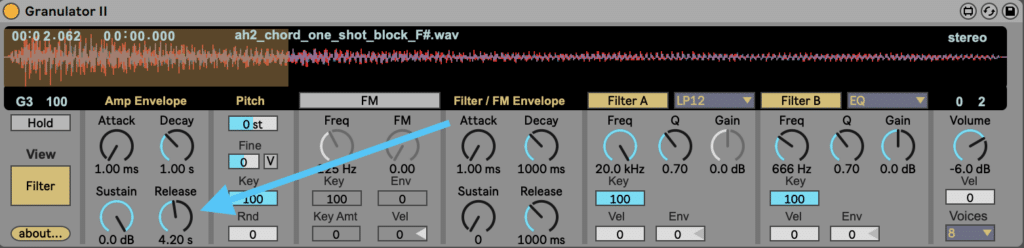
To make this sound much more easy, I’m going to maneuver the file place a little bit ahead in order that the tough assault of the piano is minimize off.
I’ll additionally improve the ‘spray’ in to make the sound rather less predictable, and extra like a pad.
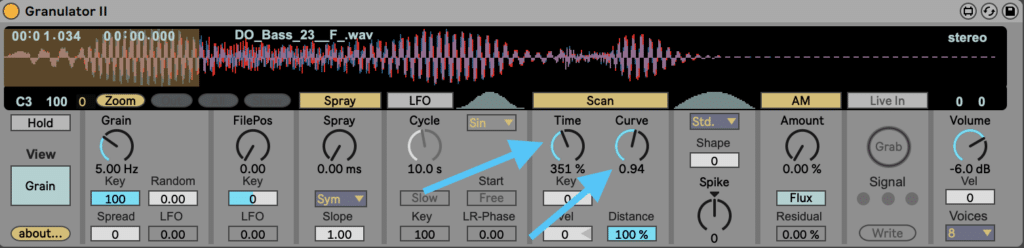
Lastly, I’m going to make use of the ‘scan’ function to maneuver by way of the sound a little bit, including extra to the natural really feel of what I’m making an attempt to realize. Slowing it down (going over 100%) will assist this impact.
I’ve additionally topped this off with a little bit of reverb, which is a should in the event you’re making pads.
Right here’s the ultimate end result:
Lastly, let’s have a look at creating some glitch-type results by mangling some foley sounds.
Glitchy FX
The graininess of granular synthesis means which you can flip just about any sound right into a cool glitchy impact.
I’m going to begin with a sound from the Foley Sample Pack (Boat Perc 10.wav) I discussed earlier, and drag it into Granulator II:

As a result of I need this sound to be really random, I’m going to depart the file place within the center and convey the ‘spray’ as much as round 1 second, which is in regards to the size of the pattern.
It will imply that every grain shall be at a random level within the pattern.
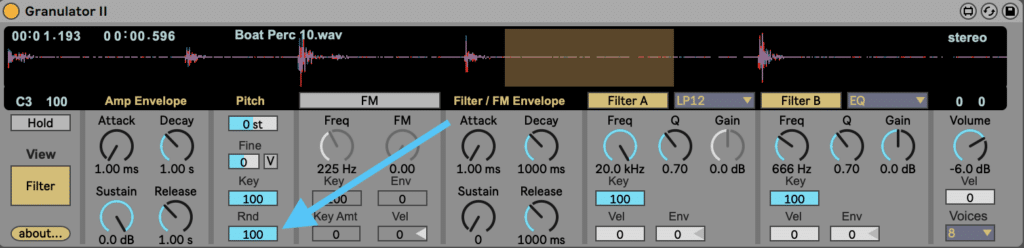
Now we will make this much more random. I’m going so as to add some random pitch modulation by switching to the Filter View and growing the ‘Rnd’ management:
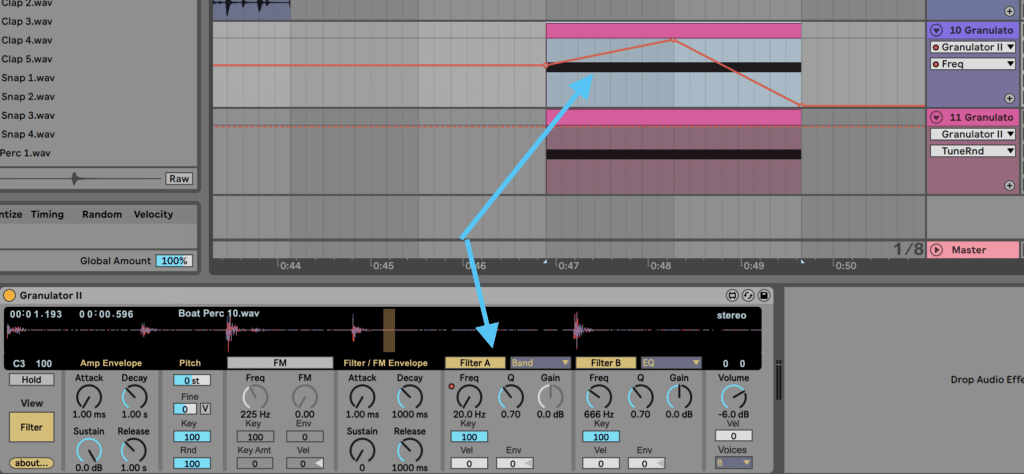
Lastly, you may activate the filters and transfer the cutoff, giving the sound a ‘sweeping’ impact. I’ve used a bandpass filter on this case:
Right here’s the end result!
That’s only a few of the numerous methods you should use granular synthesizers to create distinctive sounds.
However the potentialities additionally change relying on the device you’re utilizing. So right here’s quite a lot of totally different granular synthesis plugins and gadgets, every with totally different strengths:
The Greatest Granular Synthesis VST Plugins (Free & Paid)
It’s time to select a granular synth that works for you. Though there are {hardware} choices on the market, it’s best to begin with software program.
The primary 3 listed here are all inventory instruments, so in the event you’re in Ableton Reside, FL Studio, or Logic Professional X, it’s greatest to begin with what you’ve acquired.
Should you’re on the lookout for one thing a little bit extra superior, otherwise you don’t have entry to a inventory granular synthesizer, there are different free/paid choices beneath as nicely.
Let’s dive in!
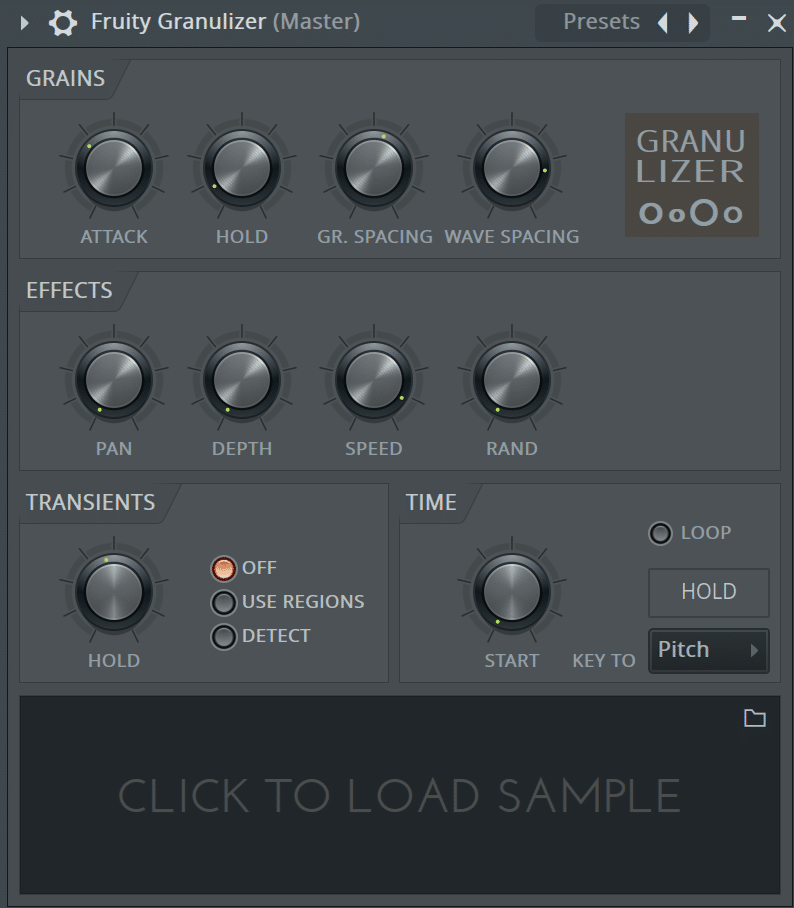
FL Studio Fruity Granulizer (Free)
Fruity Granulizer is without doubt one of the greatest inventory granular synthesis instruments and it’s sworn by many FL Studio customers. As are lots of their inventory plugins.
The easy interface and quantity of management over the sound make it a pleasure to make use of and create one thing with that grainy goodness.
Key Options:
- Devoted grain and wave spacing knobs to form texture
- Easy consumer interface
- Transient detection for grain snapping
- Looping
- Drag and drop in samples
Ableton Reside Granulator II (Free)
As you’ll have seen all through this information, Ableton Reside’s Granulator II is a strong device for chopping and processing sound.
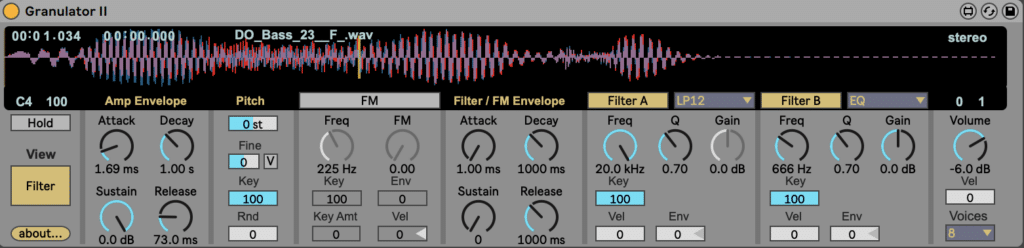
It’s a Max For Reside gadget, that means you’ll want Suite or M4L entry to make use of it. Merely seize it from the ‘Packs’ part of your Ableton Reside browser.
Key Options:
- Visible suggestions of grains
- Scanning and grain-shape modulation
- LFOs to maneuver the beginning place
- Left-right offset
Logic Professional X Alchemy (Free)
When Apple acquired Camel Audio a few years in the past, there was hope that they’d proceed supporting the Alchemy plugin.
These days, you’ll solely discover it unique to Logic Professional X.
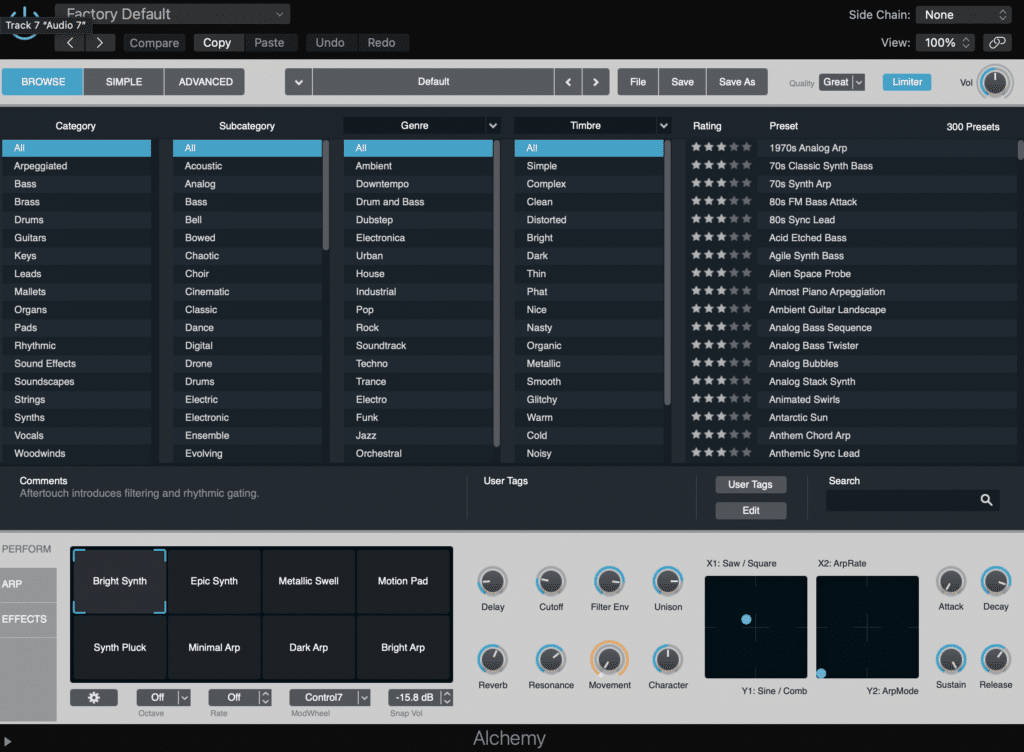
Not like the opposite choices, Alchemy isn’t strictly a granular synth. It combines subtractive, sample-based, and granular synthesis to create a variety of distinctive textures.
Key Options:
- Unbelievable preset library – numerous choices
- Macros for simple sound tweaking
- Change oscillator sorts relying on the specified sound
Hyova Audio Ribs (Free)
Should you’re not in Logic, Ableton, or FL Studio and are needing a free granular synth, Ribs is a stable contender.
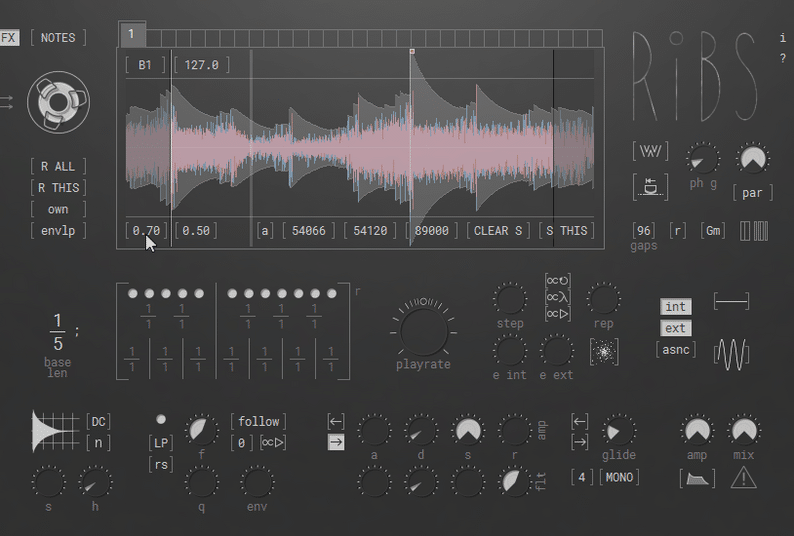
Though it comes with a really trippy interface, there’s lots of energy beneath the hood when you’ve spent a little bit of time with it.
Key Options:
- Devoted FX mode (for utilizing as an audio impact)
- Inspiring interface
- Loopy quantity of controls for limitless enjoyable
- Beat mode for syncing together with your host DAW
- Forwards and reverse motion
To take a look at the facility on this synth/FX unit, take a look at their tutorial video beneath:
Glitchmachines Palindrome (Paid)
With Palindrome, you come for the interface and keep for the options.
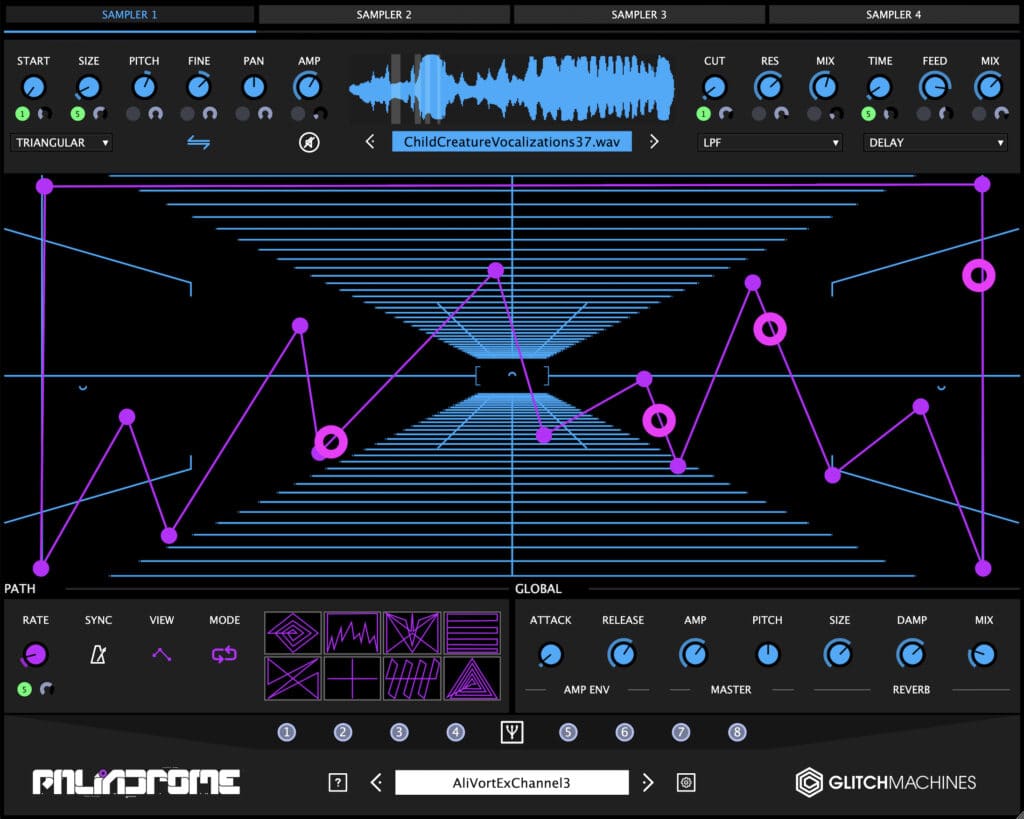
In all seriousness, it’s an insanely highly effective device and actually enjoyable to make use of. The Morph Plotting within the heart of the interface is a specific favourite, which lets you mix between 4 units of granular processing.
Key Options:
- As much as 4 samplers for combining totally different sounds
- World settings to manage the general sound
- Morph plotting and paths for limitless inventive sound fusions
- Inspiring preset library
Observe: in the event you love glitchy FX plugins, take a look at their different free choices on our free VST plugins listing.
Sound Guru The Mangle (Paid)
The Mangle might be one of many high paid choices for a stable, utilitarian granular synthesizer.
Don’t be confused although – it nonetheless has tons of inventive choices for modulation. It additionally has a really clear interface, so that you received’t be confused by what’s occurring.
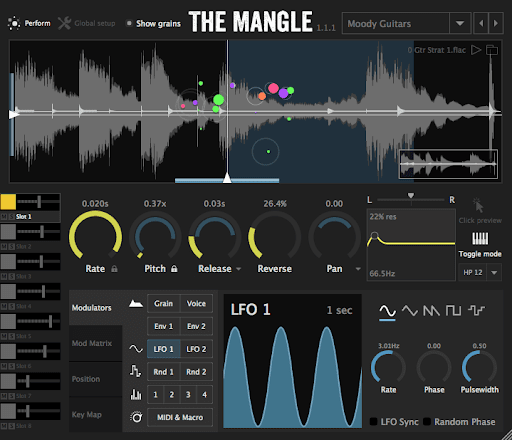
Key Options:
- Pitch and tempo locking for fascinating rhythmic & tonal results
- Kickstarter pattern library for excellent beginning factors
- XY plot for altering begin place and price
- Reverse and panning of grains
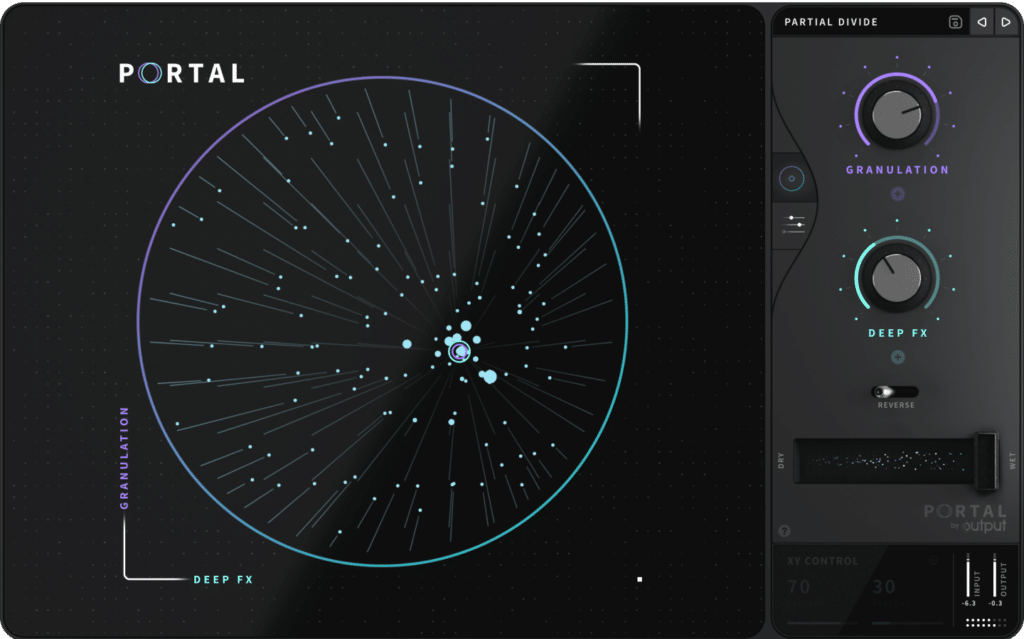
Output Portal (Paid)
I discussed Portal a bit earlier on this information for motive. It’s technically not a synth, however extra of a granular-based FX plugin.
It could actually enter any sound and output a fantastic mess of grainy goodness. Mixed with different inventive FX, you’ll find instantaneous inspiration everytime you like.
Key Options:
- Clear, easy format for immediate outcomes
- Visible suggestions
- Superior mode to manage modulation sources, timing and way more
- Dry/moist with the unique sound
Past Granular Synthesis
Hopefully, now you can grasp the limitless potential of granular synthesis.
Should you’re eager to dive deeper into the advanced work of sign processing and mangling audio, I’d advocate you take a look at MaxMSP and begin coding your personal options.
However most of us simply needed to get began. And as you’ve seen, you want good sounds to work with.
That’s why we’ve created the EDMProd Foley Pack – loaded with over 150 samples from creeks to metallic sounds. Seize it totally free beneath
Missed something on this information? Let me know at [email protected].