Right here’s your first New 12 months’s Decision: hearken to extra Future Rave. David Guetta & MORTEN proceed their acclaimed challenge with their newest monster ‘Permanence’, able to kick begin your yr one of the best ways potential.
‘Permanence’ surprisingly begins within the midst of what would possibly often be known as a breakdown. This teasing intro takes its time, giving snatches of the lead melody whereas constructing the stress effortlessly. A delicate construct slams us headlong right into a dizzying techno groove, with stuttering synth blasts chopping towards throbbing bass and that snarling predominant motif. The haunting breakdown options an ethereal operatic vocal that soars skywards, resulting in a second of tense silence. Out of nowhere comes an intense buzz of synth strain, which loops and shudders all the way in which to the drop. It’s a darkish, heady monitor that’s designed to take aside massive rooms and can ship your thoughts to an altogether totally different place wherever you hearken to it.
“Folks hold asking for extra, so we ship extra! It’s unimaginable to see the affect Future Rave has on the dance music scene and I can’t wait to proceed creating it this yr.” says David Guetta. On ‘Permanence’, MORTEN says “David and I’ve each performed this monitor in our units and the gang went wild each time, I’m actually excited for the monitor to lastly be on the market for them to hearken to wherever and each time they need!”
Following on from the large ‘Alive Once more’ and the Future Rave remix of David Guetta & Sia’s traditional ‘Titanium’ (for its tenth anniversary), ‘Permanence’ joins an extremely spectacular catalogue from these two. We count on a lot extra from this unbeatable partnership throughout 2022.
The Weeknd has turned in a model new visible for “Gasoline” from his brooding fifth studio album, Daybreak FM. Beating an aged model of himself to a bloody pulp because the thumping, erotically charged environment of the membership flooring envelops him, The Weeknd shares one other masterful glimpse into his newest inventive imaginative and prescient, as he navigates the gray house between this life and the subsequent.
After Hours adopted the Worry and Loathing in Las Vegas-esque expertise of a wild evening out, pulling affect from movies like Joker, On line casino and Uncut Gems. The red-pigmented document from Abel Tesfaye ended with him damaged and bleeding. Its successor, Daybreak FM, picks up proper the place After Hours left off, with Tesfaye caught in visitors as he made his means into the sunshine with a soothing radio present hosted by none apart from Jim Carrey.
An knowledgeable hear by Daybreak FM makes it clear that there’s extra to be desired, bridging the hole between the final document, whereas clearly alluding to the subsequent. The Weeknd confirmed on social media that followers are within the midst of a trilogy—and if After Hours and Daybreak FM are any indication, the top of the trilogy is more likely to be one other conceptual masterpiece.
Featured picture: The Weeknd by way of Instagram
Tags: after hours, album, Daybreak FM, LP, music video, stream, The Weeknd, trilogy, video
In seven easy phrases, REZZ completely encapsulated the gorgeous stage design for her upcoming “Spiral” tour: “probably the most REZZ factor you’ve got ever seen.”
In a brief video shared to Twitter this week, REZZ addressed her followers and said that her subsequent tour manufacturing is “the proper definition of her model to this point.” She then follows with a brief showcase of her jaw-dropping stage, set to the sounds of her newest single, the Spiral bonus monitor “MENACE.”
Throughout her upcoming tour, attendees will get pleasure from her hits on a stage highlighted by a spiraling array of lights that encompass her within the middle of the stage. Hand-in-hand with a big LED show that includes her signature imagery, REZZ’s audiovisual arsenal appears to be her most spectacular but and an ideal accouterment for brand spanking new releases like “Chemical Bond,” and “Vortex.”
REZZ’s “Spiral” tour kicks off on February 18th, 2022 in Detroit, Michigan and can conclude in Vancouver, Canada on Could twentieth. Tickets to the tour are on sale now and you may try the whole slate of reveals here.
Giorgio Moroder is promoting his Cizeta-Moroder V16T prototype on RM Sotheby’s, with the car anticipated to promote for as a lot as $9 million USD. The Father of Disco had teamed up with Claudio Zampolli to behave as an investor on this automobile, which had been designed by Marcelo Gandini. 9 fashions of the automobile had been created alongside the prototype at the moment on the market, which had been displayed on the 1989 Los Angeles and Geneva Motor Exhibits.
In 2018, Canepa Design had carried out a full mechanical restoration of the car. Full with a pink inside and 4 pop-up headlamps, the beautiful design will be sure you go in solely a matter of time.
Drove and Citadelle each joined STMPD RCRDS‘ deep roster inside a month’s time of one another—delivering Nightfall and “Alive,” respectively—and precisely one 12 months later, the trio and duo have now formally come collectively. It might solely be quickly after their label entries that the 2 sides would go on to make contact, deciding to companion up and collectively lengthen their nonetheless blossoming musical timeline with the discharge of “By It All.”
Though Drove and Citadelle haven’t been round for lengthy, their sounds have remained readily pronounced via the ethereal manufacturing taste that they’ve put forth to date. And “By It All” had been predicated on the communal character that the 2 have proven, with Drove and Citadelle exchanging concepts just about earlier than becoming a member of in actual life at STMPD RCRDS’ Amsterdam headquarters to wrap up their collaboration. “By It All” offers a style of melodic home to STMPD RCRDS’ style document because the five-headed cooperative seamlessly meets their sounds within the center to set a excessive bar for label appearances in 2022.
Two DJs, a chart-topping rapper and an iconic supermodel stroll right into a bar…
A brand new DJ duo referred to as WeddingCake is about to make their debut later this week, after they drop a collaborative single referred to as “Chai Tea” with Snoop Dogg and Heidi Klum. The music is about to drop this Friday, January 14th by way of Warner Music.
When reached for remark, a consultant for WeddingCake advised EDM.com the duo consists of multi-Platinum report producers Tom Kaulitz and Devon Culiner. Kaulitz has been married to Klum since 2019.
If a brand new teaser is any indication, WeddingCake’s debut is an digital pop monitor with a disco twist, akin to modern dance music by SG Lewis or Silk Metropolis, the collaborative alias of Mark Ronson and Diplo. “Chai Tea” options an unlikely vocal contribution from Klum, maybe greatest recognized for her work as a decide on America’s Obtained Expertise and as a former top-earning Victoria’s Secret Angel.
“WeddingCake has extra music popping out early this yr,” the duo’s administration advised us. “The music has it’s personal type and never conforming to at least one style. Nevertheless, some style influences could be Dutch home, future home and pop.”
You possibly can try a preview of “Chai Tea” under.
Gifted up-and-comer NAZAAR simply launched his newest entrancing single “WITH U.” A vocal entice and bass gem that tells a deeply private story of discovering your self and your goal. Opening with a haunting dialogue between two lovers, NAZAAR builds the strain with heavy serrating synths and a breath-taking drop. The sultry, distorted vocals serve to distinction the sunshine and darkish parts of this multi-faceted manufacturing. NAZAAR bridges the hole between a hopeful message and an ominous instrumental. Self-reflective and pensive, the music was written whereas at a low level in his life and embodies the sensation of give up to being misplaced and what it appears like to come back out on the opposite facet.
It is nearly that point of 12 months once more, when festival-goers put together to move down the rabbit gap and into the magical world of Past Wonderland SoCal.
The Alice in Wonderland-themed digital music competition returns to the NOS Occasions Middle in San Bernardino Friday, March twenty fifth and Saturday, March twenty sixth. With simply over two-and-a-half months till the occasion, EDM.com is right here that will help you plan for a fun-filled and protected expertise.
Past Wonderland SoCal 2022 Tickets
Tickets to Past Wonderland 2022 are on sale now. Potential attendees 18 years of age and over should purchase two-day GA tickets beginning at $139.99 and two-day GA+ passes beginning at $189.99. Two-day VIP passes begin at $249.99 and are solely obtainable to festival-goers 21 and over. Discover extra details about buying tickets here.
COVID-19 Coverage
Entry into the competition would require a adverse COVID-19 check or proof of vaccination. Proof of a adverse COVID-19 check should be taken inside 24 hours (antigen check) or 48 hours (PCR check) earlier than getting into the occasion.
You need to deliver a duplicate of your adverse check or your vaccination card and be ready to supply it on the occasion’s entrance. A photograph of your adverse check outcomes in your cellphone will likely be accepted. Be taught extra in regards to the occasion’s COVID-19 insurance policies here.
Past Wonderland SoCal 2022 Lineup
Past Wonderland organizers lately dropped a large lineup consisting of over 80 artists. In usually spectacular Insomniac vogue, the varied lineup covers home, dubstep, trance and melodic bass, amongst different digital sub-genres. Take a look at the complete lineup under.
Past Wonderland SoCal 2022 Lineup
Arrival, Parking and Shuttles
With 1000’s of ravers arriving in flocks to the venue, Insomniac does its greatest to accommodate environment friendly parking for everybody. This 12 months, 5 heaps will likely be obtainable for free general parking surrounding NOS Occasions Middle. These heaps could have shuttles operating to and from the venue for comfort. There may even be a drop-off part for these utilizing rideshare apps, taxis, or getting dropped off by a pal.
Moreover, Insomniac has arrange shuttles to run from an area resort space in San Bernardino in addition to from cities like Downtown LA, Fullerton, and Mission Hills. Yow will discover extra data on shuttles here.
Phases
Past Wonderland will characteristic 5 phases hosted by Insomniac Data, Manufacturing facility 93, Misplaced in Desires, Bassrush, Dreamstate, Audiotistic, Basscon, Anjunadeep, and extra. The competition’s beloved phases—equivalent to Queen’s Area, Mad Hatter’s Fortress, Caterpillar’s Backyard, and Cheshire Woods—are designed to immerse attendees into the topsy-turvy world of Alice in Wonderland. Extra data will likely be introduced within the weeks main as much as the competition, equivalent to set instances.
Past Wonderland SoCal.
Jake West/Insomniac Occasions
Past Wonderland SoCal 2022 Artwork and Performers
In the event you get an opportunity to discover and recognize the assorted artwork items across the competition, it is a should. With an abundance of references to the traditional story of Alice in Wonderland, the area actually pulls you into its fantastical and trippy world. As a bonus, performers gallivant across the competition dressed up just like the acquainted characters of the enduring story, so make sure you maintain your eyes out for these whimsical activations.
Well being and Security
Past Wonderland 2022 is ready to occur rain or shine, so test the climate forward of the occasion and costume appropriately. It is also necessary to remain hydrated, which is why the occasion could have ample free water stations, every marked with a water droplet signal.
Medical workers will likely be obtainable at a handful of tents across the competition grounds. These workers members are there that will help you, whether or not you feel lightheaded, nauseous, or just have a imply splinter. It is important to take care of and care for one different at music festivals, so do not hesitate to inform medical, safety, or floor management in case you see any well being considerations.
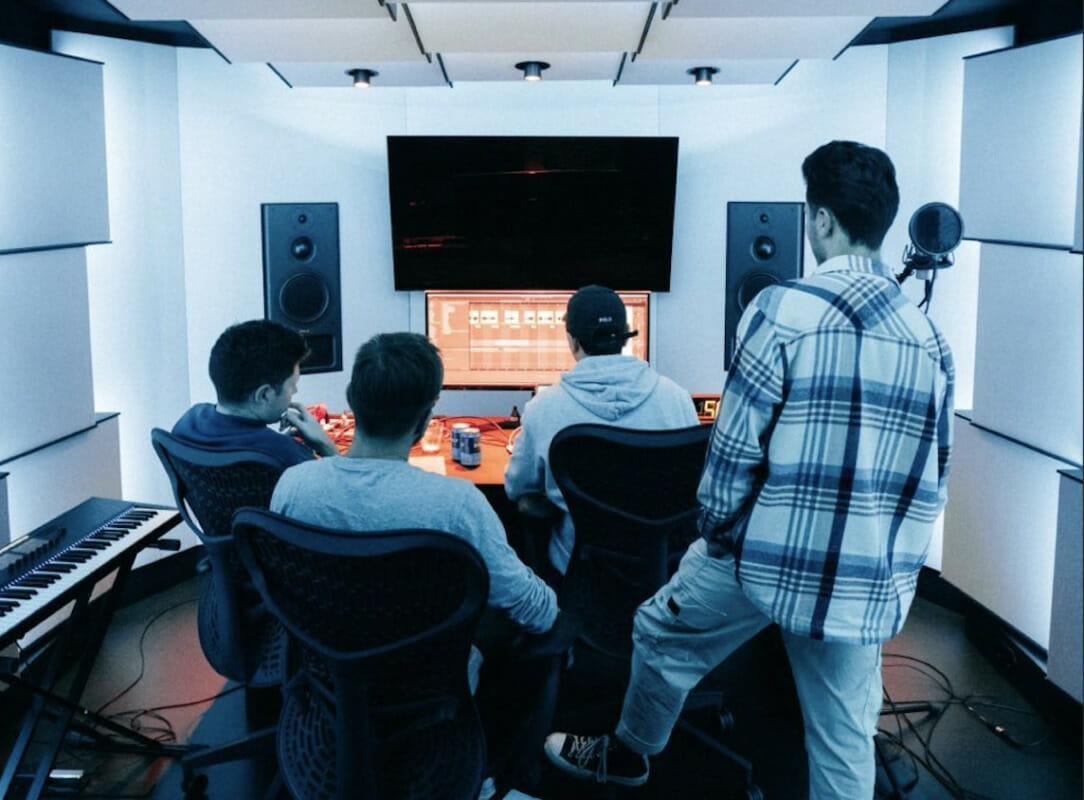
We’ve all been there. You’re listening again to your tune in your DAW, checking the mixdown when abruptly every thing cracks and stutters. Sound acquainted? You then’re most likely having CPU points.
Your laptop specs set the boundaries of what your DAW is ready to course of. Nonetheless, there are a lot of steps you may take to optimize your laptop efficiency.
So on this information we’ll stroll you thru:
The distinction between CPU load and latency
Basic tricks to optimize your CPU efficiency (in any DAW)
5 particular tricks to optimize CPU load in each FL Studio & Ableton Reside
Let’s dive in! ?
CPU, Latency and Buffer Size
As digital music producers, we usually consider ourselves as artists. Nonetheless, working with {hardware} and software program additionally requires a primary understanding of know-how.
And though buffer sizes and pattern charges will not be essentially the most thrilling subjects, they’re essential to making sure a clean workflow.And everyone knows the hyperlink between workflow and creativity.
So earlier than diving any additional, let’s make clear some terminology that can be used all through this information.
Latency
Latency is the time it takes for knowledge to maneuver from one level to a different. In networks, latency refers back to the time it takes for a request to go from the supply to the vacation spot.
Consider an internet site taking too lengthy to load, an e mail not going by, or a recreation freezing after which transferring once more.
Want a extra visible rationalization? Try this video:
In different phrases, it’s the time it takes on your laptop to reply to an motion you took. In our context, this would possibly seek advice from the delay between urgent a be aware on our keyboard and listening to a sound.
Or think about recording vocals, however listening to every thing you say with a half-second delay.
Sometimes, you want your latency to be imperceptible. However this comes at a value of elevated CPU utilization, as we’ll discover later.
CPU
CPU stands for Central Processing Unit, typically merely known as processor. It’s the primary unit of any laptop that executes directions.
Yep, this chip runs your complete laptop!
You possibly can consider the CPU as a ‘mind’ that receives inputs out of your mouse, keyboard, and any software program you might be working. It then performs these duties or instructs different items to do one thing.
To maintain it easy, the extra highly effective your CPU, the extra duties it is going to be capable of full with out working into points.
Different components comparable to RAM and storage dimension are additionally key to your laptop’s efficiency, however we’ll depart these for one more article.
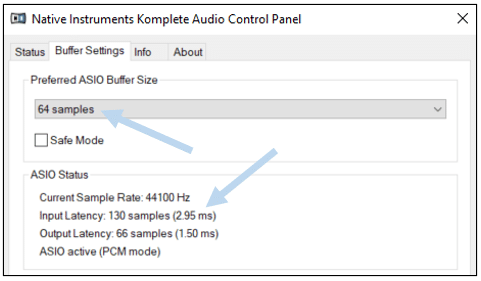
Buffer Size
Buffer size (or buffer dimension) is the period of time allowed on your laptop to course of sound.
A low buffer dimension will scale back latency, however improve the pressure in your CPU. However, rising the buffer dimension will lighten the load in your CPU, however introduce latency.
Small buffer dimension and low latency
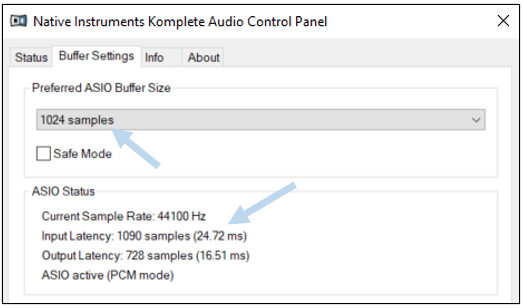
Greater buffer dimension, longer latency
Notice right here the inverse correlation between buffer dimension and latency. This implies there’s a tradeoff to make between CPU load and latency.
Right here’s a easy rationalization:
Decrease Buffer Dimension = Much less Latency = Extra CPU Utilization
Greater Buffer Dimension = Extra Latency = Much less CPU Utilization
So one query to ask your self is: are you optimizing for dwell efficiency or stability?
If you’re recording, you might want to hear what you might be enjoying in real-time (decrease latency). However in case you are listening again to a observe with 50 plugins working on the similar time, you need the sound to return by seamlessly (decrease CPU utilization).
As a result of many producers run into CPU points, we can be specializing in optimizing for CPU utilization moderately than latency in the remainder of this information.
5 Tricks to Save Your CPU (for any DAW)
Though producers like to reward their favourite DAW versus one other, the inside workings of most DAWs are fairly related. For this reason a variety of CPU-saving ideas are relevant to most (if not all) DAWs.
Setting The Proper Buffer Size
As defined above, setting the precise buffer dimension is step one to lighten your CPU load. One of the simplest ways to go about that is trial and error.
You would possibly wish to begin at 1024 samples and see if the latency isn’t too large for you. This can be extremely dependent in your method of writing music.
In the event you work largely with samples, then a excessive latency won’t be a problem. If you’re the sort that can jam out on the keyboard, then you definitely want low latency.
Primarily based by myself workflow and CPU specs, I discover {that a} buffer dimension of 1024 samples works effectively for me. If I would like extra responsiveness (i.e. decrease latency) when dwell recording, I’ll drop the buffer dimension to 512 samples or decrease.
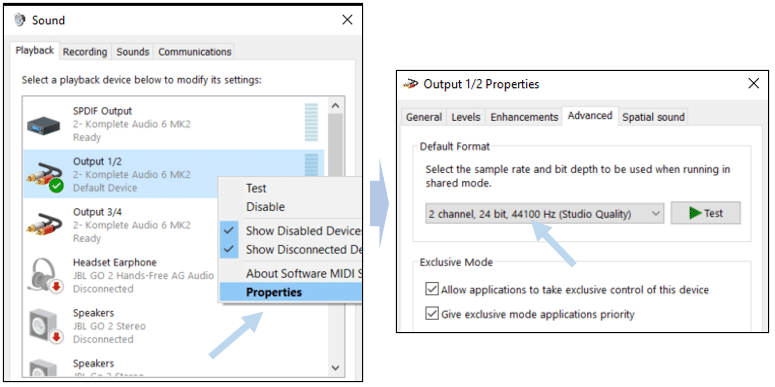
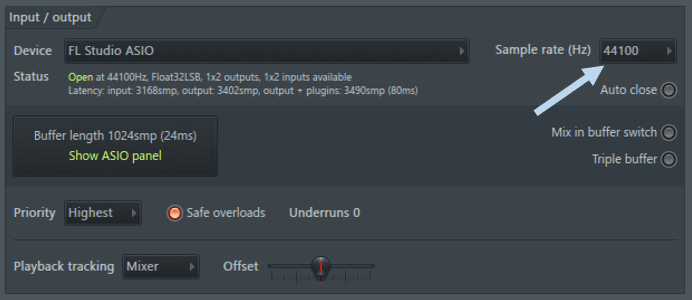
Setting The Proper Pattern Price
The pattern price is the variety of instances that audio is captured each second. It’s the audio equal of FPS, or frames per second within the video world.
Be sure that your laptop pattern price and your audio interface pattern price match:
Laptoppattern price set at 44.1 kHz
FL Studio patternprice set at 44.1 kHz
Though pattern charges can go as much as 192 kHz, the vast majority of digital music (suppose Spotify, YouTube, and so on.) is at 44.1 kHz, in order that needs to be the pattern price you set.
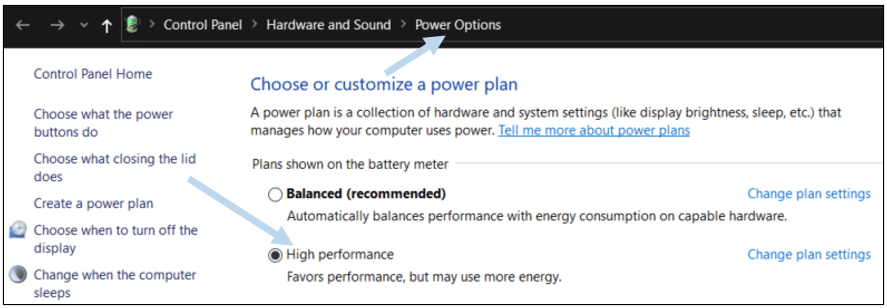
Making Most Use of Your CPU
In an age of energy-saving and optimization, your laptop may need a battery-saving setting enabled by default.
In Home windows, it would be best to select the Excessive-performance mode from the ability choices:
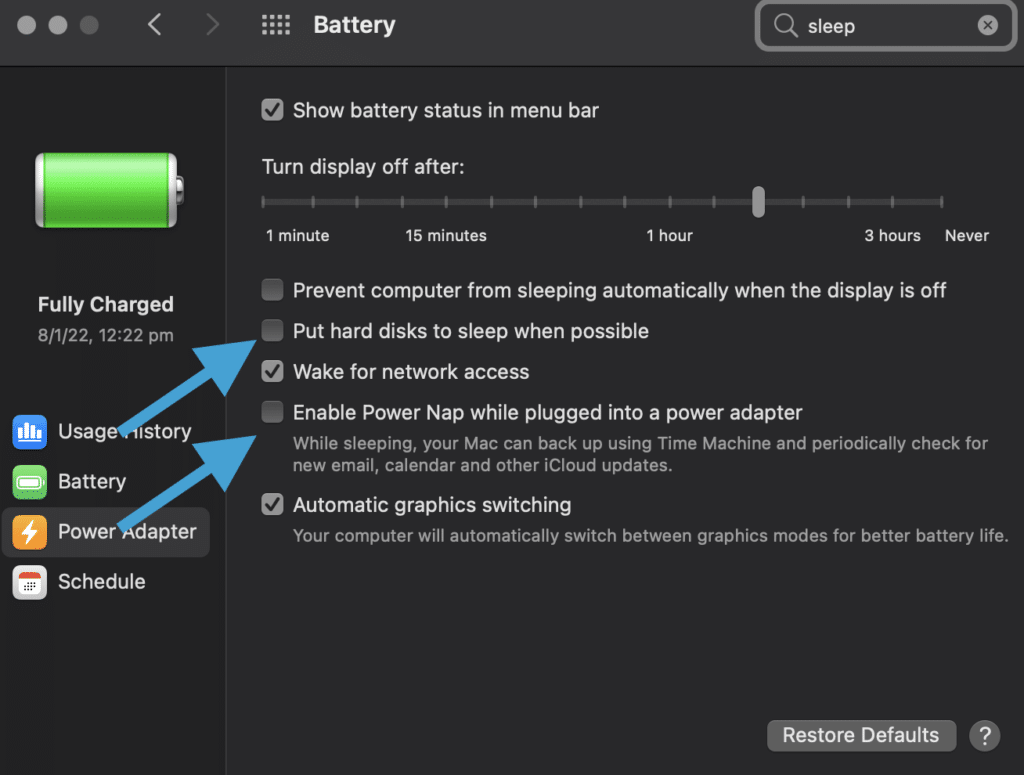
For macOS, ensure that any sleep settings are de-activated. Within the Battery menu, uncheck “Put laborious disks to sleep when potential” and “Allow Energy Nap“.
Basically, it would be best to de-activate any settings that sound just like the goal is to avoid wasting power. Additionally, ensure that your laptop computer is all the time plugged-in, as this can permit it to make use of most assets.
Shut Any Different Packages and Laptop Capabilities
As defined beforehand, the CPU is a bit just like the mind of your laptop. It’s consistently juggling a number of duties on the similar time.
Among the finest issues you are able to do when producing music is to shut all different functions. This may unencumber your CPU, and permit it to focus in your DAW.
Verify your Job Supervisor/Exercise Monitor for any pointless background apps which have launched at start-up, and shut them.
I personally restart my laptop after I’m about to provide music. This ensures that there aren’t any background packages working and taking over the CPU.
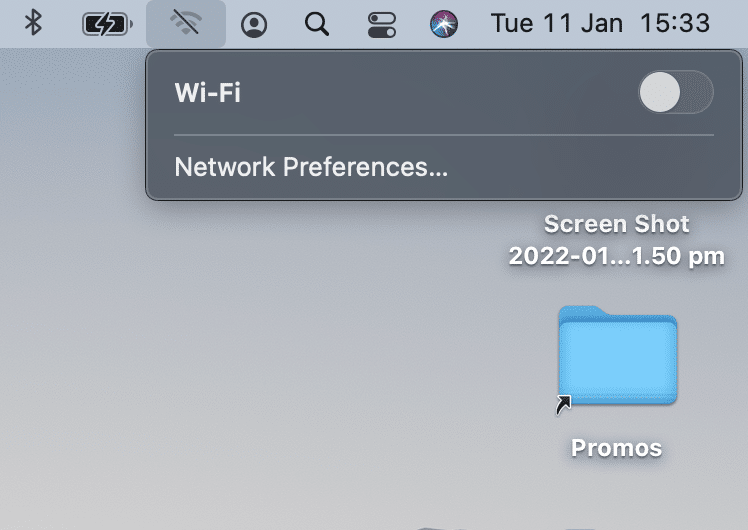
I’ll even typically flip off my Wi-Fi, which has the added bonus of holding me targeted on the duty at hand!
The most effective workflow hack!
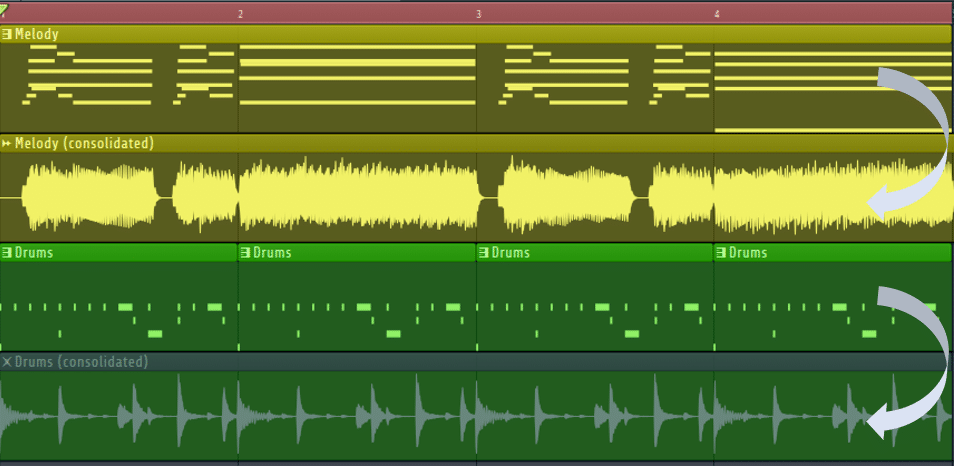
Don’t be Scared to Render to Audio
Rendering to audio has been a revelation for me. Beforehand I was very cautious: what if I wish to change the pre-delay on that reverb afterward? What if I wish to change the ADSR of my lead synth?
However rendering to audio has led me to 2 nice realizations.
Firstly, it frees up a ton of CPU. Having 5 situations of Kontakt and a dozen FabFilter plugins takes its toll. So with the ability to shut all these plugins and work with audio is so much gentler on my laptop computer.
Secondly, it has sped up my workflow dramatically. Committing to audio and never having to skill to consistently return and tweak settings forces you to maneuver ahead with what you’ve bought.
In the event you want extra tips about dashing up your workflow, ensure that to take a look at our 100 Ableton Reside Ideas!
In Fl Studio, you may render to audio by choosing a portion of the playlist and urgent CTRL+ALT+C.
In Ableton Reside, right-click a observe and click on”Freeze Monitor”. Proper-click once more and select “Flatten” to render to audio.
You possibly can all the time save a brand new model of your undertaking earlier than rendering to audio totally different sections.
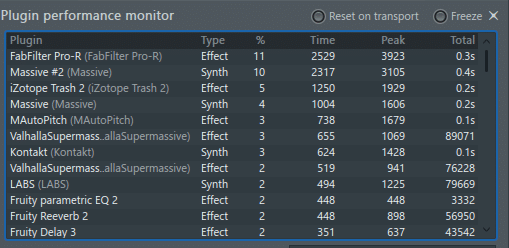
In FL Studio, your CPU load is indicated on the prime of the window:
Double-clicking on the window will open up the Plugin efficiency monitor, exhibiting you the CPU utilization by plugin:
This lets you detect excessive CPU-using plugins proper off the bat, and substitute or render to audio the problematic ones.
5 Tricks to Save Your CPU in FL Studio
Driver and CPU settings
Though we have now already mentioned CPU settings, there are a couple of steps particular to FL Studio that you may take to optimize your CPU efficiency.
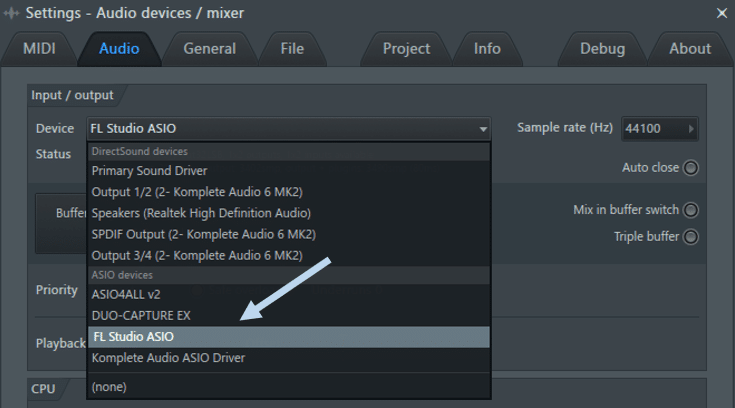
Firstly, ensure that to pick out an ASIO machine on your enter/output. Until you’re on macOS, by which case you may skip this step.
You possibly can select your soundcard’s default ASIO driver if it helps one, or the FL Studio ASIO:
A number of different audio settings to pick out are the next:
Set Precedence to highest and deselect Secure overloads:
Set re-sampling high quality to 24-point sinc or decrease:
Lastly, set your CPU settings as follows:
You can too attempt to activate Triple buffer and Combine in buffer swap if CPU points persist.
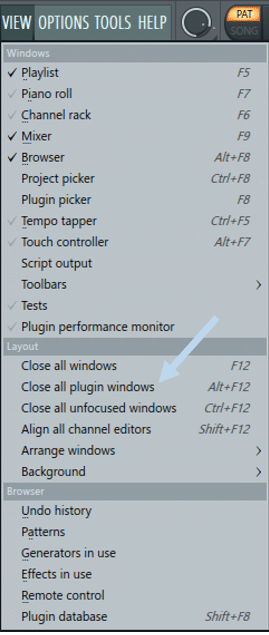
Closing Plugin Home windows
Leaving your plugin home windows open will draw fairly a little bit of CPU. Attempt to shut plugin home windows if you end up not utilizing them, and positively don’t depart 15 home windows open on prime of one another.
You can too shut all plugin home windows directly:
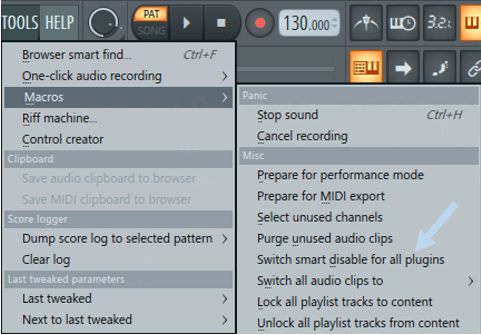
Sensible Disable Plugins
Even when they don’t seem to be actively used, plugins can take up a substantial quantity of CPU. Switching “Sensible Disable” on will disable any plugins which are standing idle:
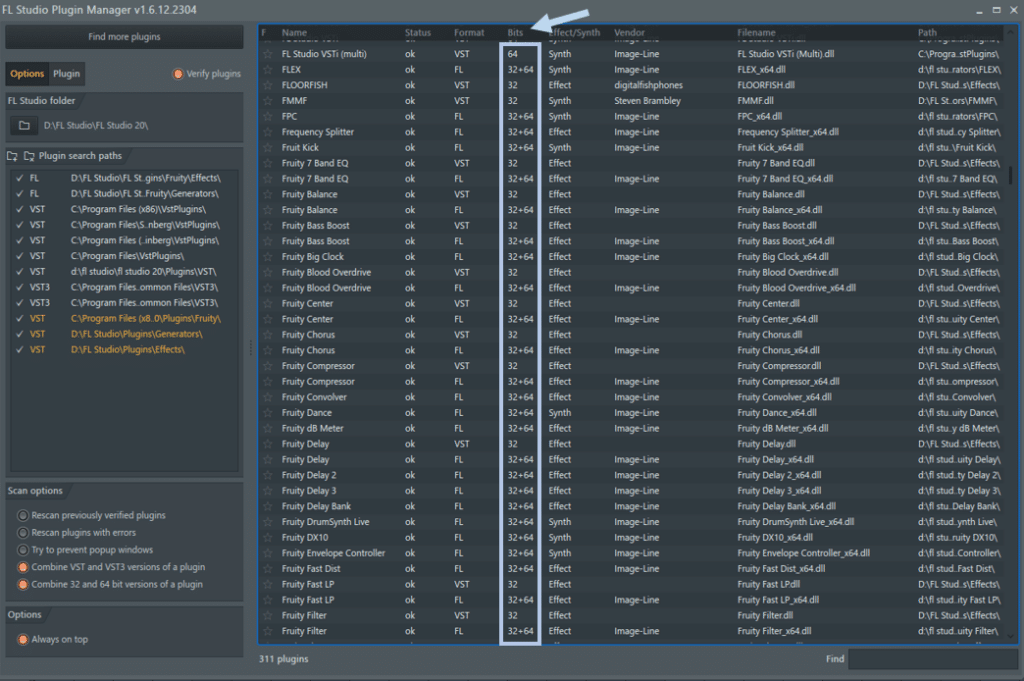
Keep away from Bridged Plugins
Bridged plugins happen when working 32 Bit variations of plugins on a 64 Bit system. If FL Studio doesn’t discover the 64 Bit model of a plugin, it should “bridge” the 32 Bit model. This makes use of extra CPU than merely working the 64 Bit model of a plugin on a 64 Bit system.
You possibly can test which model of every plugin you might be working by opening up the Plugin Supervisor below Choices – Handle plugins:
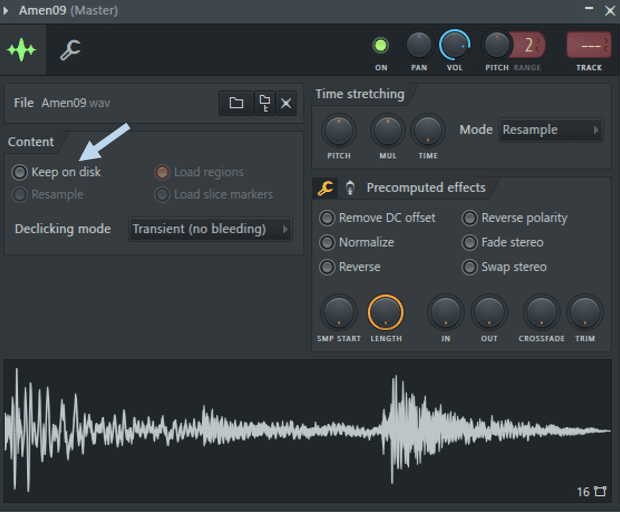
Flip Off “Carry on Disk”
For tasks with a variety of audio samples, deactivate “Carry on Disk” within the Channel Sampler:
This may permit samples to be pre-loaded into reminiscence earlier than being performed.
5 Tricks to Save Your CPU in Ableton Reside
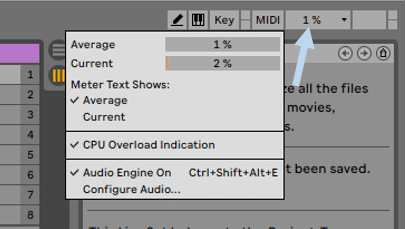
In Ableton Reside, the CPU meter is indicated on the top-right hand nook of the window:
Disable Unused Inputs/Outputs
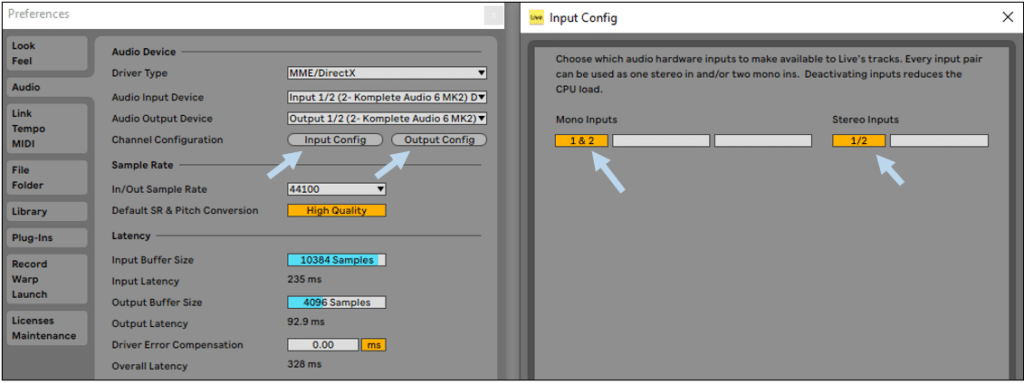
Beneath Preferences – Audio – Channel Configuration, choose Enter Config and Output Config and disable any inputs/outputs that you’re not utilizing. You possibly can depart solely the mono enter activated for instance in case you are not utilizing the stereo enter, and vice versa:
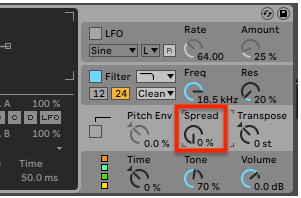
Set Unfold to 0%
The Unfold perform on Ableton’s Operator (and different devices) creates a second voice that’s barely de-tuned from the primary. This implies you want twice the processing energy each time a be aware is performed.
Setting the Unfold to 0 will save up on CPU:
Bonus tip: scale back the polyphony quantity on Ableton’s native devices to a minimal. Every further voice provides extra CPU pressure.
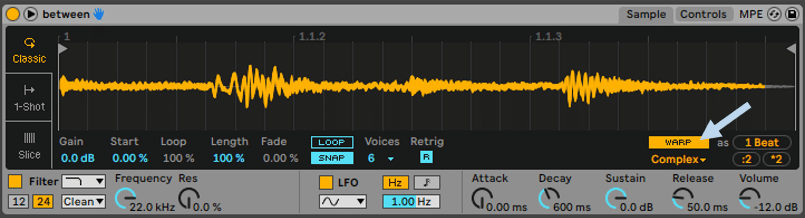
Disable Warping
When utilizing Easier, ensure that warping is deactivated. In the event you do must warp samples, keep away from utilizing the Advanced and Advanced Professional settings as these use extra CPU. You can too render to audio upon getting warped the pattern:
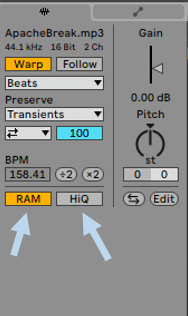
Handle Audio Clips Effectively
When working instantly with audio samples, there are a couple of settings you may tweak to lighten the burden in your CPU.
Open up your pattern settings by double-clicking on it, de-select HiQ, and choose RAM:
Activating RAM will permit the pattern to be pre-loaded in reminiscence, whereas HiQ makes use of a better pattern price for audio file conversion.
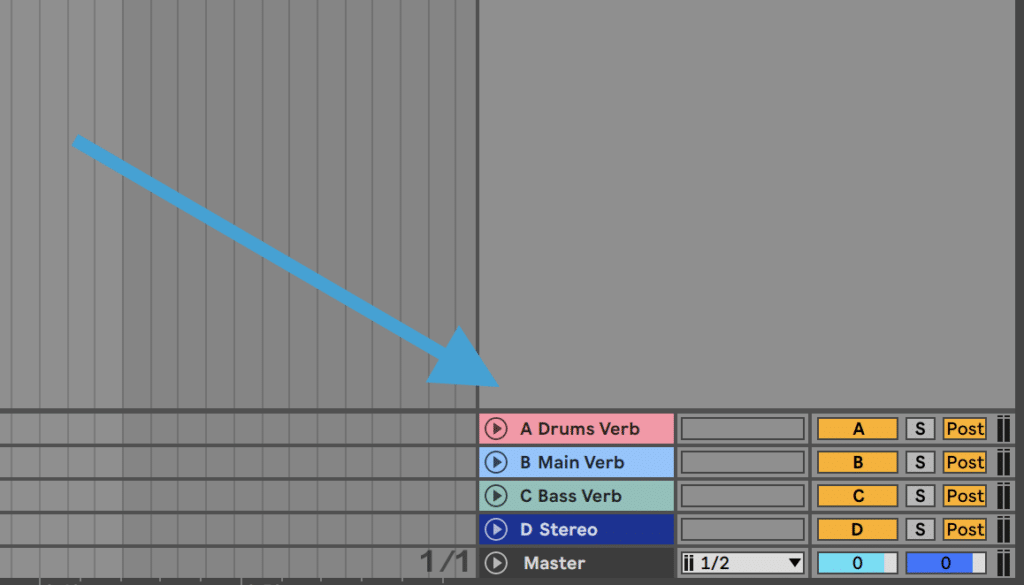
Use Return Tracks
Though this tip isn’t unique to Ableton Reside, it’s good apply to make use of CPU-intensive impact plugins on return tracks.
Firstly, return tracks save on CPU by utilizing just one occasion of the plugin.
Secondly, your observe will achieve cohesiveness. For instance, utilizing the identical reverb settings on a number of devices will add unity and coherence to your association.
In the event you want a refresher on mixing usually, ensure that to take a look at our Full Information to Mixing EDM!
Wrapping Up
Hopefully, you’ll now be capable of run your laptop to its full potential!
Regardless of the following tips and plenty of extra we might have coated, you’ll all the time be restricted by your laptop computer and CPU specs. For this reason choosing the proper laptop computer and audio interface is without doubt one of the most essential choices you’ll make.
Did I miss something right here! Be happy to drop me a line.
Veteran British beatsmiths, Skream and Benga are poised to return as a duo in 2022.
The final time the pair of low-end trailblazers formally collaborated on new music got here almost 20 years in the past with 2003’s “The Judgement,” adopted by a one-off reunion in 2011 for a stellar Important Combine outing. Now, taking to social media to formally substantiate the rumors, Skream has confirmed he and Benga are within the lab collectively as soon as once more, engaged on a batch of recent tunes set to reach this 12 months. In accordance with Skream,
The boys are again on the town…. Skream X @iambenga 2.0….. 2022 we’re having it.
Moreover, on Instagram, the Croydon-native producer added, “No throw again, model new music solely.”
Within the time since Skream and Benga helped push dubstep from UK basements to stateside competition phases, Benga opened up about his psychological well being struggles, largely protecting a low profile because the launch of 2013’s Chapter II LP. In the meantime, Skream has maintained a gentle presence contained in the dance and digital area, although he has notably opted to lean into extra house-inspired productions and away from his bass roots for vital stretches during the last decade.
We use cookies on our website to give you the most relevant experience by remembering your preferences and repeat visits. By clicking “Accept”, you consent to the use of ALL the cookies.
This website uses cookies to improve your experience while you navigate through the website. Out of these cookies, the cookies that are categorized as necessary are stored on your browser as they are essential for the working of basic functionalities of the website. We also use third-party cookies that help us analyze and understand how you use this website. These cookies will be stored in your browser only with your consent. You also have the option to opt-out of these cookies. But opting out of some of these cookies may have an effect on your browsing experience.
Necessary cookies are absolutely essential for the website to function properly. This category only includes cookies that ensures basic functionalities and security features of the website. These cookies do not store any personal information.
Any cookies that may not be particularly necessary for the website to function and is used specifically to collect user personal data via analytics, ads, other embedded contents are termed as non-necessary cookies. It is mandatory to procure user consent prior to running these cookies on your website.