
Some have referred to as Very important the successor to Xfer Serum. Launched in November 2020, it is without doubt one of the most intuitive synth plugins available on the market.
And it’s free.
You learn that proper. So what makes Very important so particular?
On this information, we’ll undergo all the things you should know to create probably the most superb sounds. From ethereal pads to hovering leads, to growly basses, Very important covers all of it.
Collectively we’ll take a look at:
- The fundamental sections of Very important and what they do
- What units it aside from Xfer Serum
- Methods to begin designing your first sounds
- 5 extra suggestions & shortcuts to hurry up your workflow
As talked about, Very important is a free VST synth. Plus it really works in all main DAWs (FL Studio, Ableton Stay, Logic Professional X and so on.)
So there’s completely no excuse to not download it straight away and observe together with this information. Let’s get into it!
Very important’s Pricing Choices
I do know I mentioned that Very important is free, and that’s true.
Nevertheless, there are additionally 2 paid tiers plus a subscription-based tier obtainable. Let’s shortly run via the choices:

Primary
The free model of the Very important synth comes with 25 wavetables and 75 preset sounds.
It’s vital to notice that the free model consists of all of the options attainable in Very important. No restricted or time-limited options: you get the complete deal (except for the text-to-wavetable function, restricted to five per day). So there’s no threat of lacking out on something by getting the free model.
As with most software program synths, presets may be saved and shared with different folks. With a little bit of Googling you will see a wealth of presets (free and paid) obtainable on-line.
Plus
For US$25, you get 250 presets and 70 wavetables. Plus, you get to help an superior mission.
Professional
For US$80, you’ll get much more presets and wavetables to select from, extra skins to vary the look of Very important, Discord perks, and extra.
The presets are what makes Very important shine, so it’s positively value it.
Subscribe
For US$5/month, you get all some great benefits of the Professional tier, in addition to first entry to new options and new plugins.
Now, let’s dive into the meat of the subject.
The Interface
Earlier than we go into all of Very important’s functionalities, let’s get conversant in the interface. For me, that is the place the most important power of Very important lies.
In contrast to loads of different software program synths, Very important’s structure is evident, colourful, and intuitive.
As you open Very important for the primary time, that is the interface you will note:
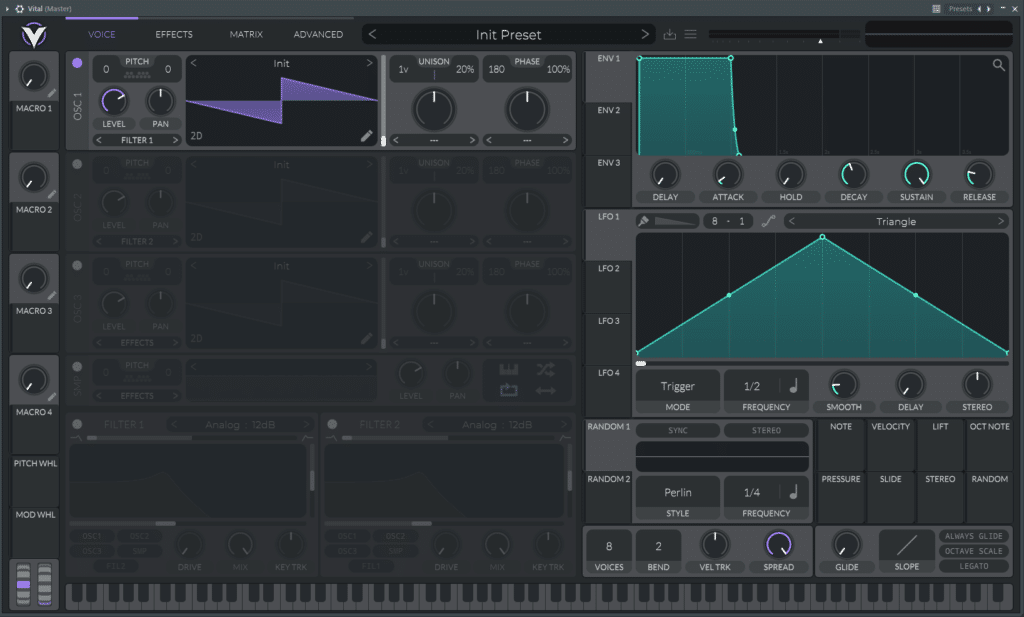
Right away, you may see that an entire part is greyed-out. That’s as a result of these functionalities are disabled for the time being.
As you allow and disable parameters, you will note them disappearing and re-appearing. This offers you a transparent image of what’s taking place along with your sound.
Let’s break down the totally different elements of this structure. We’ll dive into every of them individually afterward on this information, however that is simply to get you conversant in Very important’s GUI.
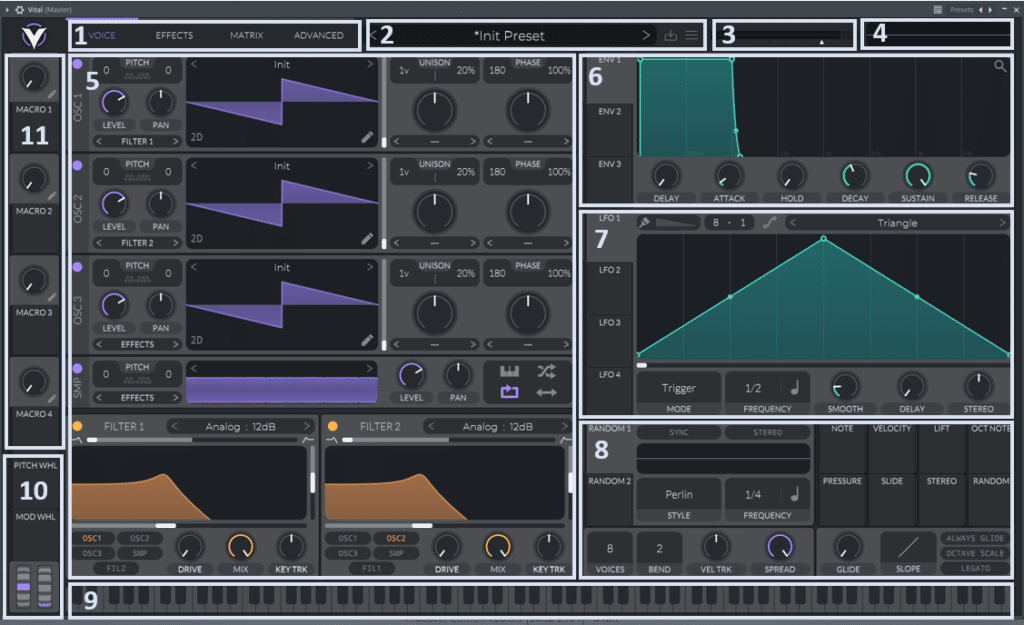
Very important’s Parts
- Very like Serum, Very important has 4 views you may change between. The view you choose will then be displayed in the primary view (quantity 5). With out going into an excessive amount of element but, listed here are these 4 views:
- Voice provides you entry to Very important’s 3 oscillators, the sampler and a couple of voice filters
- Results permits to activate and alter 9 totally different results corresponding to delay, compression and reverb
- Matrix permits you to shortly visualize all of the modulations at the moment energetic
- Superior provides you management over some superior (duh) options corresponding to voicing and oversampling
- The Preset part lets you shortly flick through your saved presets, save and re-initialize the present patch and extra. A lot of the choices listed here are self-explanatory, so we gained’t be diving into them any additional.
- The Grasp quantity setting
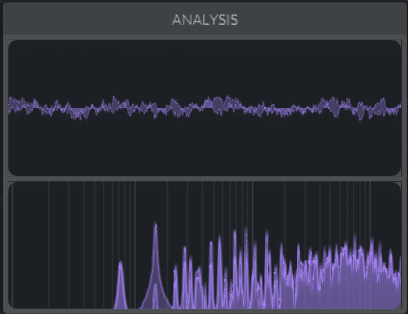
- The part permits to modify between an Oscilloscope and a Frequency Spectrum Analyzer. Merely click on on the analyzer to toggle between the 2.
- The Primary view shows the chosen view as defined in level 1.
- The Envelope part lets you draw customized envelopes and apply them to particular parameters. By default, envelope 1 is assigned to the oscillators and the sampler volumes. It due to this fact acts as your fundamental ADSR envelope.
- Equally, the LFO part permits you to draw customized LFO curves and apply them to particular parameters.
- This sections lets you add some Random Modulation. You may as well management the variety of voices and glide settings.
- The Keyboard is a helpful function should you don’t have a MIDI controller and have to play particular notes.
- The Pitch Wheel and Modulation Wheel allow you to pitch bend the notes. They may also be assigned to any parameters inside very important to modulate them dynamically.
- Lastly, the Macros part lets you management many parameters with only one knob.
As this can be a complete information for Very important, we gained’t go over frequent phrases corresponding to ADSR and LFOs. When you want a refresher on any technical time period, seek the advice of our complete glossary!
Lastly, if you would like a Serum and Very important comparability, take a look at this video from Aden:
As talked about above, the 4 views at your disposal are Voice, Results, Matrix, and Superior. Let’s discover every of those intimately.
The Voice View
The Voice view is the equal to Serum’s OSC tab. That is the place you choose the supply of your sound. For this, you may play with 3 totally different oscillators, a sampler, and a couple of filters:
Let’s discover all of those functionalities.
Very important’s 3 Oscillators
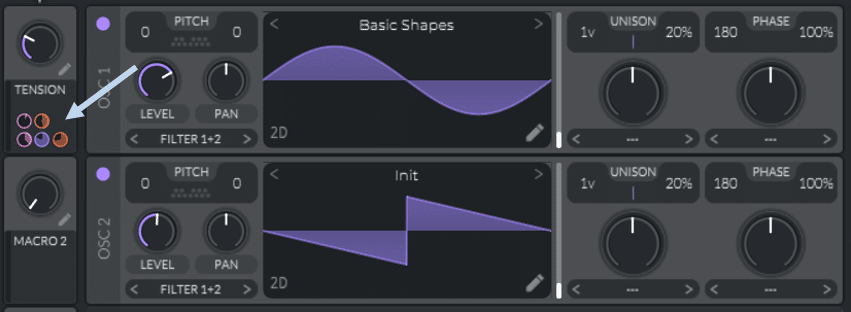
In contrast to Serum’s 2 oscillators, Very important supplies 3 absolutely customizable oscillators.
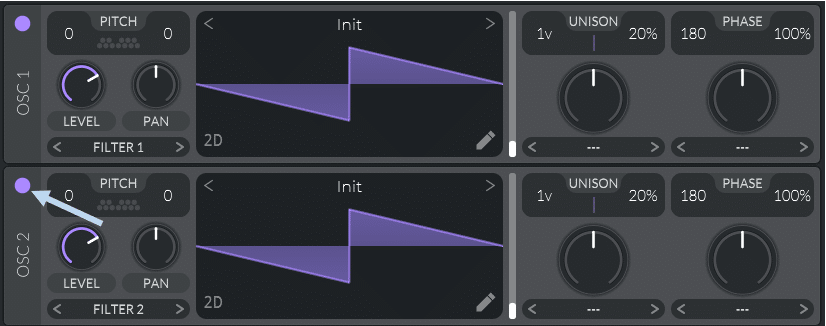
While you initialize Very important, solely OSC1 shall be turned on. Merely click on the spherical activation button to activate any of the opposite oscillators:
Oscillators are the primary supply of your sound. Ensure you spend sufficient choosing the proper wavetables!
To do that, click on on the wavetable identify (on this case “Init”). It will open up all of the obtainable wavetables at your disposal:
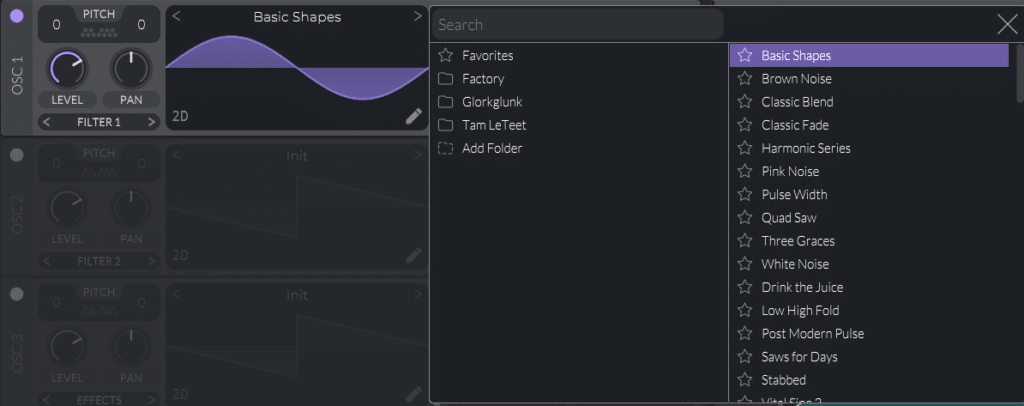
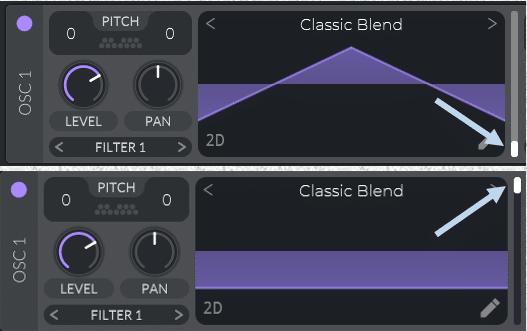
For this instance, I’ll load the Basic Mix wavetable. I can toggle between totally different frames of the wavetable with the vertical slider.
When you really feel such as you want a refresher on wavetable synthesis, make sure that to take a look at our Full Wavetable Synthesis Information!
Let’s see how switching between frames impacts our sound:
Merely toggling between frames (or automating it) can deliver nice outcomes.
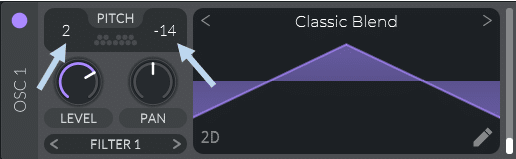
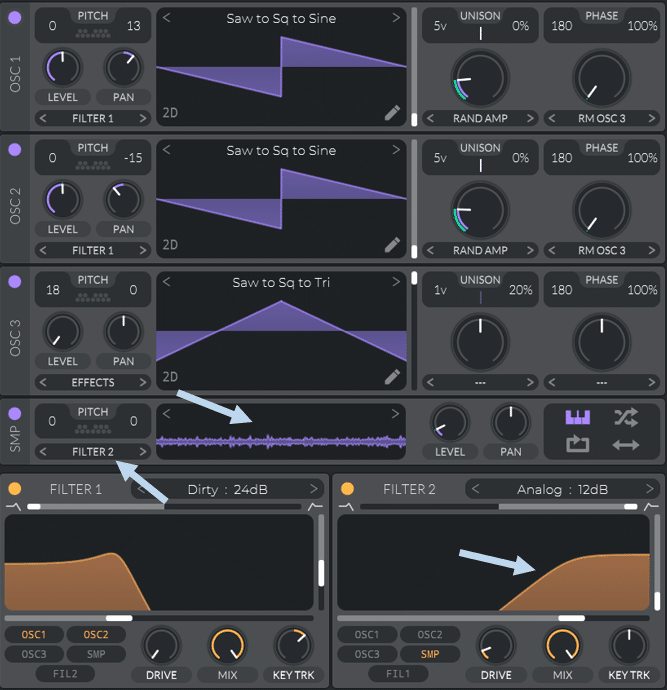
On the left-hand facet of the view, Degree and Pan management the quantity and panning of the oscillator. Pitch permits to transpose the sound by a particular variety of semitones (left), cents (proper), or each:
Routing
Beneath Degree and Pan, you may determine tips on how to route your oscillator. For instance, you would determine to bypass any impact by choosing Direct Out. Or you would choose Filter 1 to ship the oscillator solely to Filter 1 and never Filter 2:
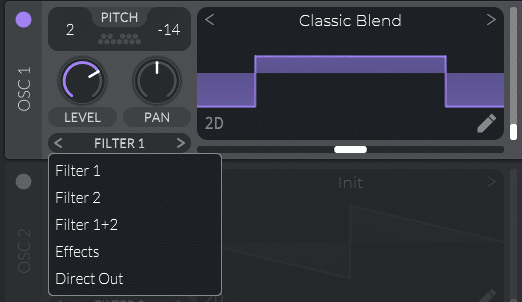
Word that the sign will all the time circulation into the Results chain after the chosen Filters until Direct Out is chosen.
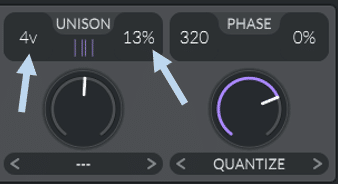
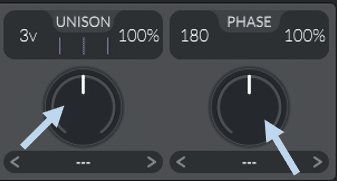
On the right-hand facet of the wavetable visualizer, Unison permits you to add as much as 16 voices. The share determines how detuned these voices are:
Let’s hear how this impacts our sound:
You may hear how including voices and detuning can add loads of depth and width to your sound. A typical software of this method is to create the famous Reese Bass standard in Jungle and Drum and Bass, or the supersaw in Trance and Future Bass.
Section
Section determines at what level of the waveform the sound will begin taking part in.
0 is the beginning of the waveform, 180 the center, and 360 the top.
A helpful tip to create motion is to start out at random factors within the waveform. Which means that each time a notice is performed, the start line on the waveform will change. To do that, merely improve the part share.
Let’s take heed to how this could add motion:
You may hear how the primary model is sort of stale and static. While you improve part randomization, you get extra motion in your sequence.
Nevertheless, in some cases (like a sub-bass), you may want the part randomization set to 0% to get the identical impression on every notice!
Lastly, Very important supplies you with two Morphing modulators for every oscillator. This lets you twist and form your sound for loopy outcomes:
We gained’t go into the small print of every morphing algorithm on this information. One of the simplest ways is to experiment and see what sounds you may provide you with!
The Sampler
Very important’s Sampler lets you layer any sound of your alternative on high of your oscillators. In Xfer Serum, the equal could be the Noise Oscillator.
Let’s dive again into Very important to see tips on how to use the Sampler. Right here’s an arp sequence with the Sampler de-activated:
First, let’s add some noise to make our sound extra fascinating and textured:
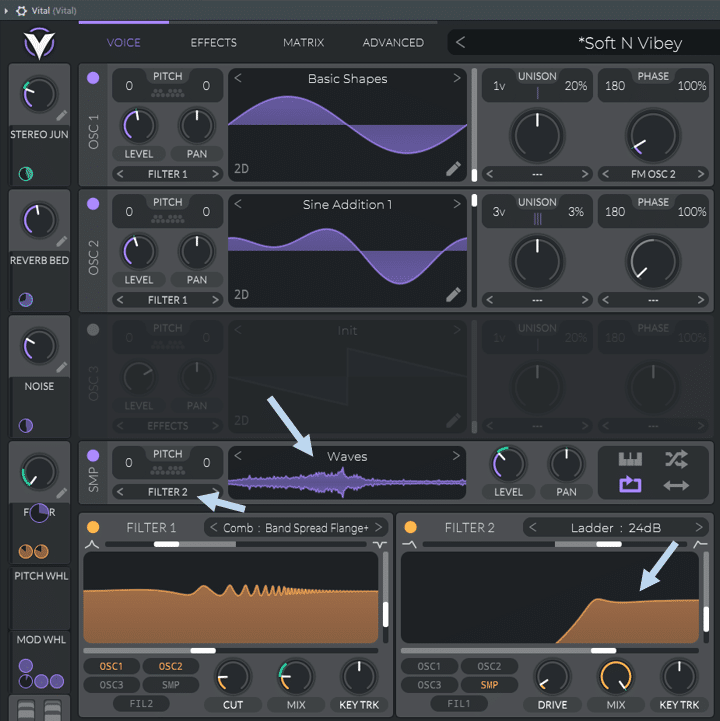
On this instance, I’ve chosen a Waves noise and routed it to Filter 2 so I can high-pass it.
Let’s examine the consequence:
It is a wonderful means so as to add foley and an natural really feel to your sounds.
You may as well load any pattern of your alternative into the sampler. Let’s do this out:
I’ve loaded a rain pattern, routed it to filter 2, and high-passed it. I’ve additionally utilized an envelope to the Degree of the sampler:
This manner, the rain fades out after every notice is performed. Let’s hear it:
You may get actually artistic right here so as to add life to your sounds!
Professional-tip: in case you have an extended noise pattern, activate the pattern random part. This manner, the pattern will begin at totally different factors each time a notice is performed, including extra variation:

The two Voice Filters
We’ve touched on Very important’s filters a bit already on this information. They act as your fundamental EQ filters, so should you want a refresher on Audio Filters, take a look at our complete information right here!
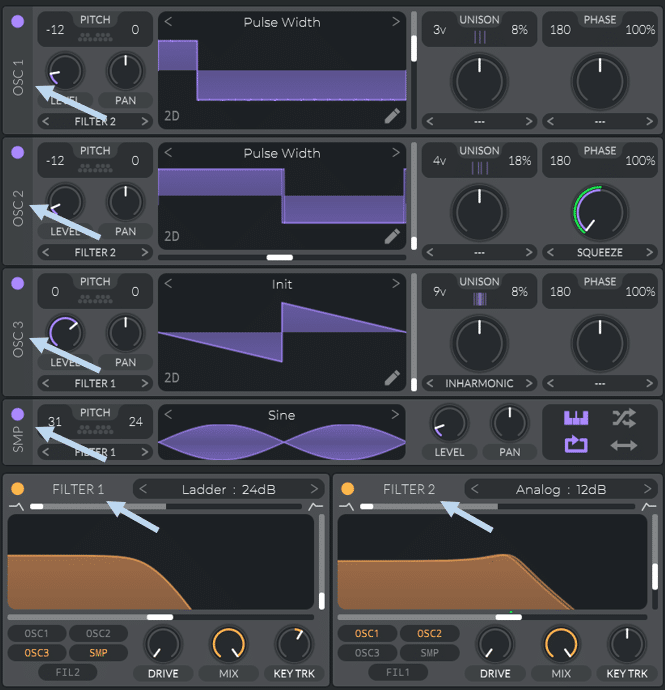
Let’s begin with the structure. Prime, backside, and proper are your three most important sliders. They management respectively the filter kind, the cutoff frequency, and the resonance.
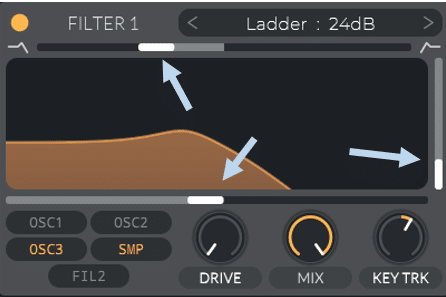
On the backside, left is your routing settings. On this instance, we are able to see that Oscillator 3 and the Sampler are each routed to Filter 1.
Professional-tip: if you would like Filter 1 and Filter 2 to behave in succession, allow FIL2 within the Filter 1 routing choices.
There are a bunch of loopy filters you should utilize to create superb sounds. Certainly one of my favorites is the Formant filter:
As all the time, experimenting is the important thing to fascinating outcomes!
Modulation: Envelopes, LFOs and Macros
When you’ve spent any time in any respect with a synth, you may be conversant in modulations. They allow you to fine-tune how parameters of your sound come into impact over time.
For instance, you may want a low-pass filter to be utilized as quickly as you hit your keyboard. Or it’s your decision that filter to progressively enter over time.
In brief, modulations are a method so as to add motion and variation to your sounds.
Envelopes
Envelopes use the ADSR model to sculpt any parameter that impacts your sound. Each time you play a notice, the envelope you will have designed shall be utilized to your sound.
When you’ve by no means performed with envelopes earlier than, this would possibly sound a bit alien. However it actually isn’t. Let’s discover how all of this works in Very important.
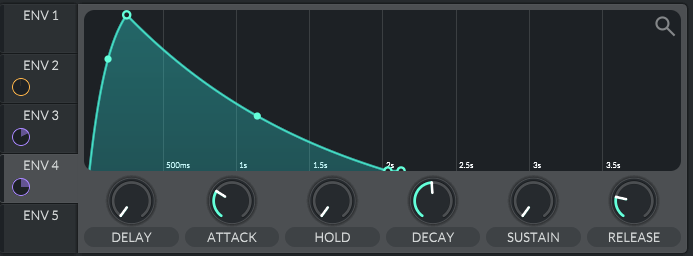
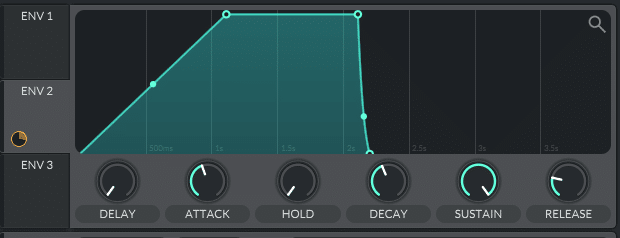
Envelopes in Very important are positioned within the high right-hand nook of the synth. Three envelopes are at your disposal to start out with, with a possible 6 envelopes in whole to make use of.
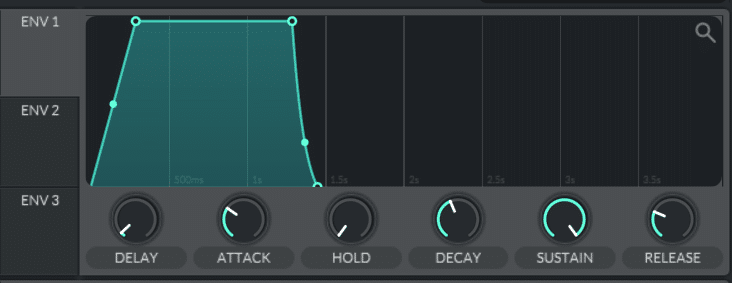
You get your customary Assault-Decay-Maintain-Launch settings, in addition to Delay and Maintain. Delay permits you to set as much as 4 seconds earlier than the envelope is triggered. Whereas Maintain will set the period of time the sound stays at most quantity whereas the notice remains to be being performed.
Now let’s take a look at some frequent purposes.
Creating Envelopes
Envelope 1 is mechanically assigned to the extent of the oscillators. Let’s change the Assault from 0 to 0.3 seconds:
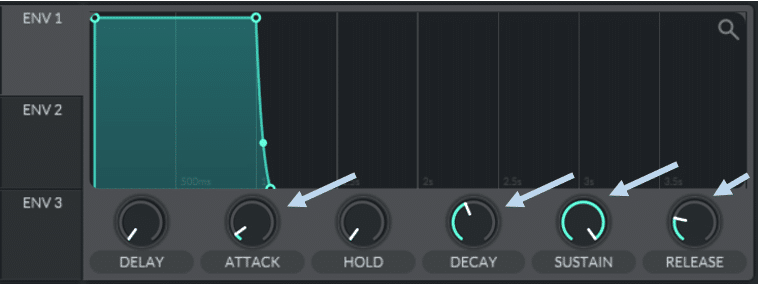
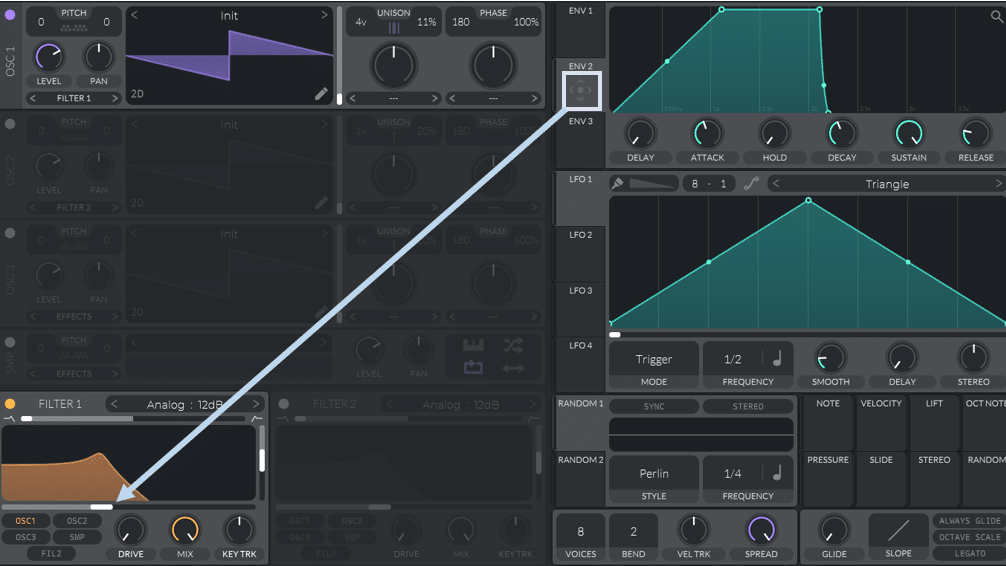
Let’s draw a second envelope, and apply it to the cutoff of Filter 1:
To use an envelope to a parameter, click on on the wheel and drag it on to the parameter you need to modulate:
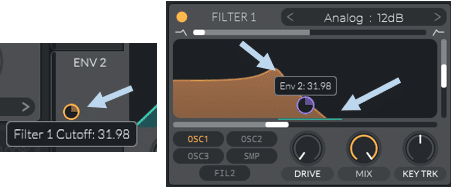
When you do that, somewhat wheel will seem, reminding you the place your envelope is utilized. It is going to additionally allow you to management the quantity of modulation utilized.
In our case, we’re controlling how a lot Filter 1 is opening up each time we play a notice:
Let’s take heed to what this implies:
If we needed, we might set a a lot faster assault time in order that the filter opens up instantly. The probabilities are limitless!
Professional-tip: when making an attempt to design a particular sound, attempt to get as shut as attainable inside your synth. Use envelopes and LFOs to keep away from utilizing too many impact plugins. It will simplify your workflow and loosen up your CPU load.
LFOs
LFO stands for Low-Frequency Oscillator and has turn into a cornerstone of music manufacturing. Very like envelopes, they assist you to modulate parameters over time. Nevertheless, LFOs play in a repeating sample, modulating your sound endlessly.
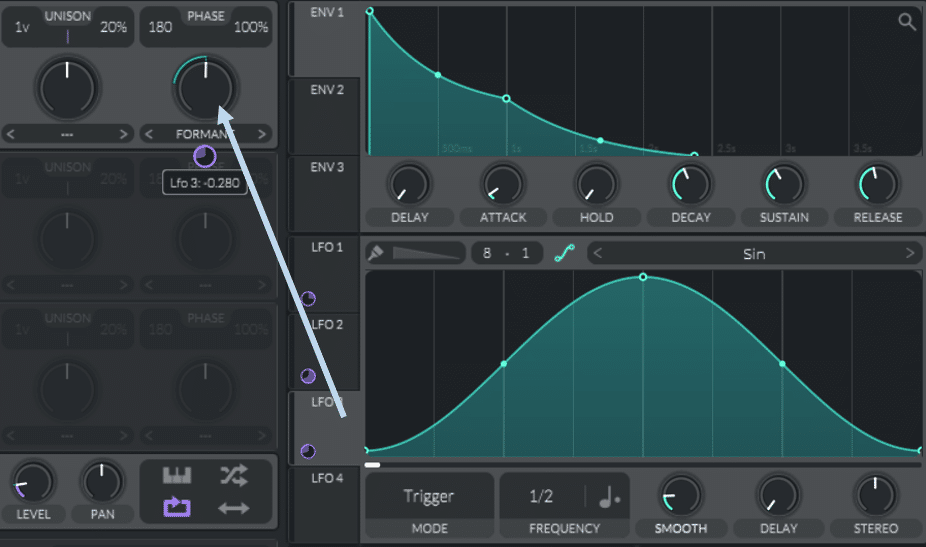
Very important supplies you with a complete of 8 LFOs to play with. Let’s discover the two most important options you have to: Mode and Frequency:

Mode units how your LFO will begin and finish. Setting to Set off for instance will begin the LFO from the purpose set by the horizontal slider.
Frequency determines how briskly the modulation repeats itself based on the curve you drew. Normally, you will have your frequency set to Tempo in order that the LFO is utilized in time along with your mission’s BPM.
Professional-tip: re-using the identical LFO for a number of parameters may help obtain cohesion in your sound!
As all the time, actions converse louder than phrases, so let’s hear some examples!

On this instance, I’ve assigned the LFO to the cutoff of Filter 1. Setting the frequency to 1/4 notes ensures that the modulation stays in time with my mission.
Let’s hear one other instance:
Professional-tip: each for Envelopes and LFOs, drawing straight into the visualizer is usually a faster technique to obtain outcomes!
Random Modulation
Very important’s Random Modulation Generator is a good way to introduce fascinating and surprising twists to your sounds:

It is a nice choice if:
- you need to modulate a parameter however don’t know during which method;
- you need some form of evolving sample that by no means repeats.
This may be helpful for arp sequences and lengthy atmospheres for instance.
You may select from totally different kinds of randomness. Pattern and Maintain will bounce in step from one random worth to a different. Sine Interpolate will introduce randomness round a sine curve.
Macros
Macros assist you to management a number of parameters without delay.
In Very important, 4 macros can be found, and any variety of parameters may be assigned to a single macro.
Let’s take a look at an instance:
I’ve assigned 5 totally different parameters to Macro 1 – and renamed it “Rigidity” for simple reference. Hover over any of the 5 circles to see which parameter is being managed:

To assign a parameter to a macro, merely slide the macro tile to the parameter you need to management.
For this instance, I needed to have the ability to create rigidity with a single knob. I’ve assigned issues like Reverb degree, Delay degree, and Distortion to the macro. This manner, I can improve all of them by simply turning up one knob!
Let’s take a hear:
Fairly cool proper?
The Results View
Very like Serum, Very important gives so many results and parameters to regulate that you simply in all probability gained’t want to make use of extra impact plugins.
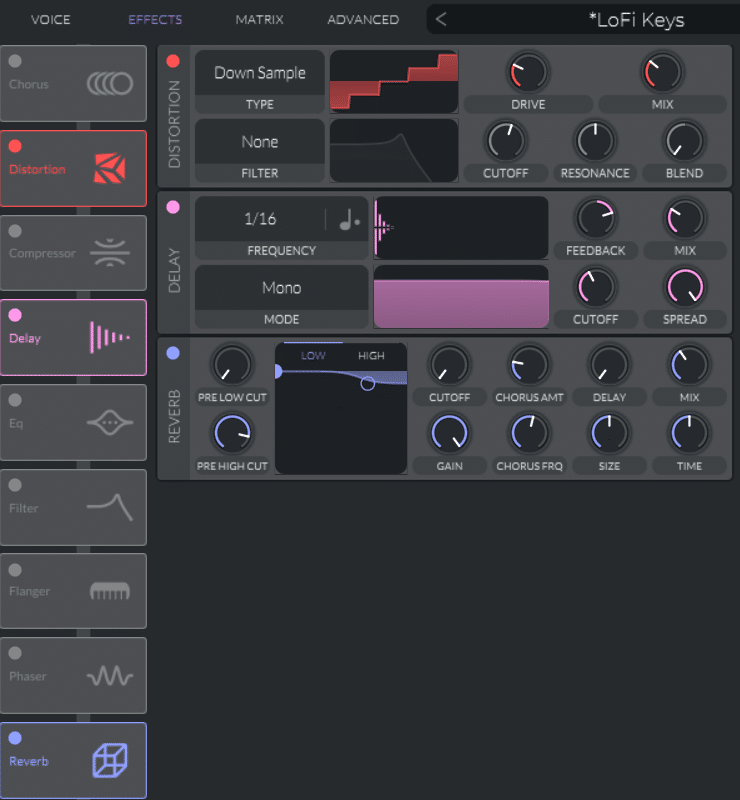
Activated results will mild up with a particular colour, whereas de-activated results are greyed out. You may simply re-arrange the order of results by merely dragging the tiles up or down.
For me, that is the part that really makes Very important stand out.
Every impact has its personal visualizer, making it lifeless simple to know how the impact is affecting your sound. Let’s dive into every of the consequences and the way they’ll rework your sound.
Professional-tip: understand that every impact flows as an enter into the subsequent impact – so select your order correctly!
Refrain
Refrain duplicates your sound into a number of voices, delaying and detuning them barely. It will create the impression of a number of devices taking part in collectively:
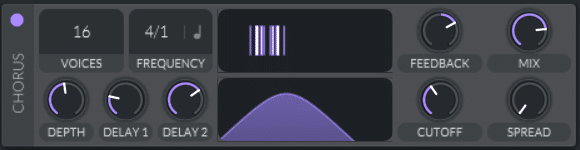
You may select 4, 8, 12, or 16 voices. Enjoying with the Depth, Delay 1, and Delay 2 will intensify the sound of the refrain. You may tone down the sound of the refrain by reducing the Combine quantity.
Lastly, a pleasant Filter permits you to lower out low/excessive frequencies from the refrain output. This gained’t impact any of the dry sign.
Compressor
Very important’s compressor comes with a number of modes: from single one-band compression to 3-band compression.
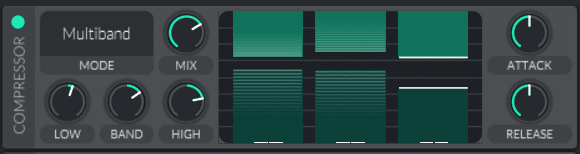
Once more, you’ve acquired a pleasant OTT-like visualizer that permits you to see precisely what’s taking place. You should use a mixture of upward and downward compression to make your sounds thick and dense.
Want a refresher on all issues compression? Try our Final Compression Information!
Sadly, you can’t alter the frequency cutoffs for every band (which can be the case within the OTT plugin it’s modeled after).
However once more, Very important is free – so who am I to complain.
Delay
Very important’s delay has some of the aesthetically pleasing layouts in my view:
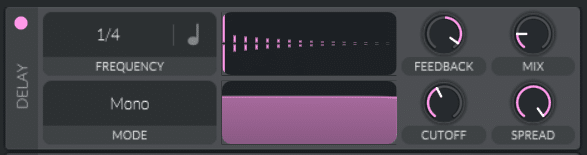
Every little thing from the frequency to the suggestions degree and the dry/moist combine is represented on the visualizer.
You’ve got your customary delay modes to select from corresponding to Mono, Stereo, and Ping-pong.
Identical to with the refrain, a filter permits you to high-pass, low-pass, or band-pass the delay output.
Professional-tip: automating the Suggestions and Combine quantities throughout a build-up may be a good way to construct up anticipation!
Distortion
Distortion is the place you will get actually loopy and utterly rework your sounds:
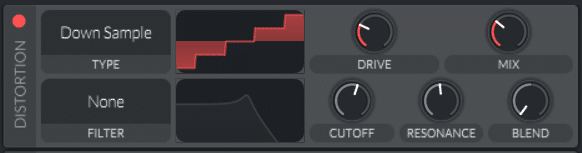
From mild saturation to intense bit-crushing, you’ve acquired a wealth of distortion varieties to select from.
Personally, I like to automate the Drive and Combine quantities with an LFO to create variation and to construct rigidity. Let’s take heed to an instance:
Right here I’m utilizing the Down Pattern kind, and automating the Drive quantity with a sin wave LFO. Discover how having the delay positioned after the distortion provides dimension and a cosmic really feel.
On this subsequent instance, I’m utilizing the Bit Crush kind, and slowly growing the Drive to create rigidity:
Distortion can deliver out some harsh frequencies, so use a filter or an EQ if something pokes out.
EQ
An environment friendly 3-point EQ with no bells or whistles:

The high and low cutoff factors may be set to both shelf or low/high-cut mode. That is one other case the place drawing straight into the visualizer is helpful.
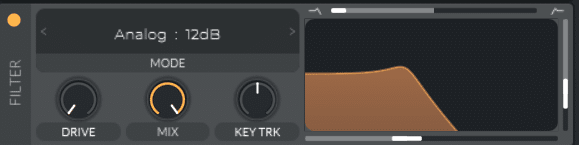
Filter
The Filter within the Results rack is a carbon copy of the two filters obtainable within the Voice view, so we gained’t go over them once more:
Flanger
The Flanger is sort of self-explanatory. Basically, a flanger is a type of low-time delay mixed with filtering:

When used an excessive amount of, it will possibly sound fairly tacky. Like with many different results, I like to easily automate the quantity over time to create some good motion:
Phaser
Pretty much like a normal phaser, that is one other impact that may add motion to your sounds:
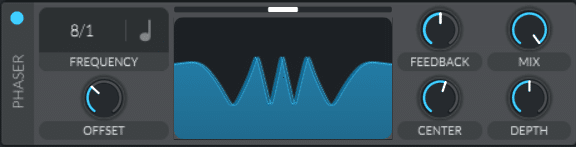
Professional-tip: attempt automating the Heart quantity to create a cool retro really feel!
Reverb
Lastly, a normal Reverb unit is at your disposal:
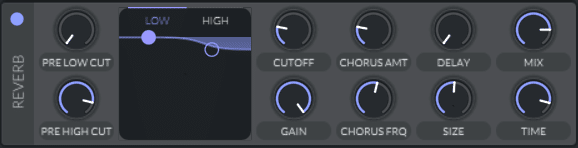
That is one which I choose to make use of to easily experiment. For instance, I would chuck it within the results chain when designing new sounds to see if something fascinating occurs.
But when I want a lush and spacious reverb, I’ll have a tendency to achieve for an exterior plugin.
I might say that is one space the place Very important lacks in comparison with Serum. Just a few totally different reverb modes or presets could be good; however hey once more, Very important is free.
The Matrix View
The Matrix is a good way to immediately visualize the totally different modulations (i.e. envelopes, LFOs, and so on.) in your present patch:
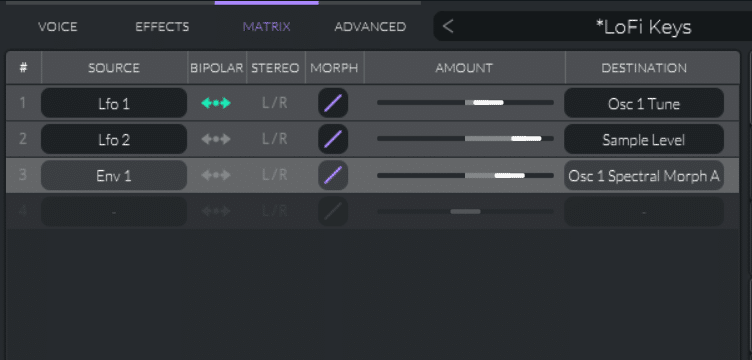
On this instance, we are able to see that LFO 1 is modulating the tuning of Osc 1, LFO 2 is modulating the extent of the sampler, and so on.
The Matrix permits you to shortly bypass any modulation by merely clicking on the quantity within the first column. You may as well shortly change the quantity of modulation with the horizontal slider.
When loading a preset sound, I discover the Matrix is a superb place to begin to perceive what is going on. I can then tweak particular person modulations one after the other to get nearer to the sound I take into account.
You may as well simply re-route any modulation supply to any parameter inside Very important, all inside the Matrix. All you should do is click on on the identify of the modulation supply or the parameter being modulated:
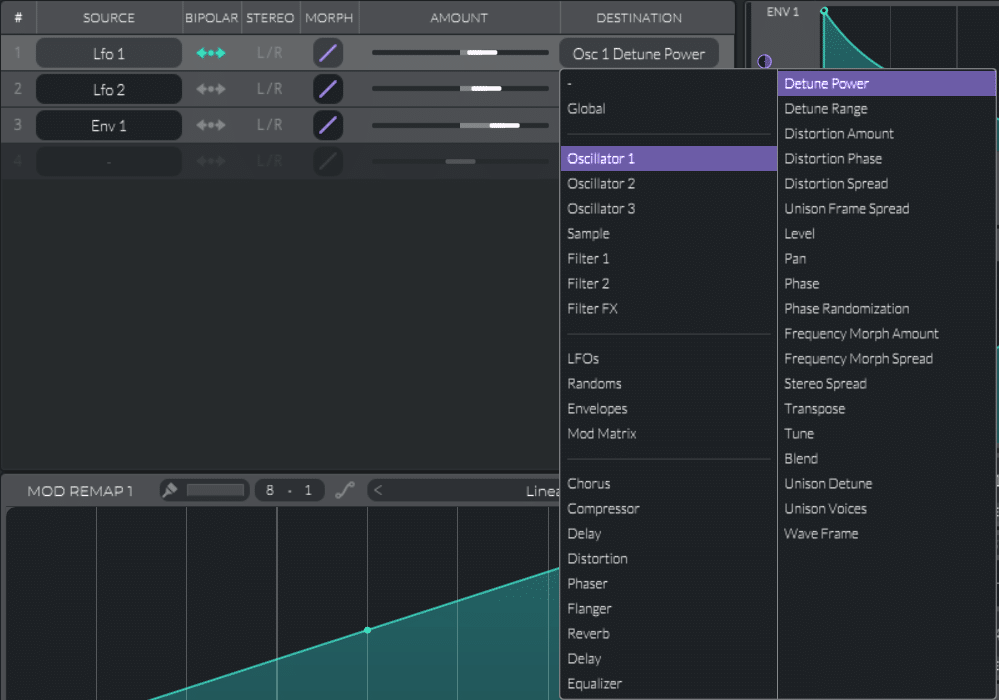
Lastly, for the extra adventurous amongst you, the Modulation Remap Curve permits you to set how shortly a modulation takes place:
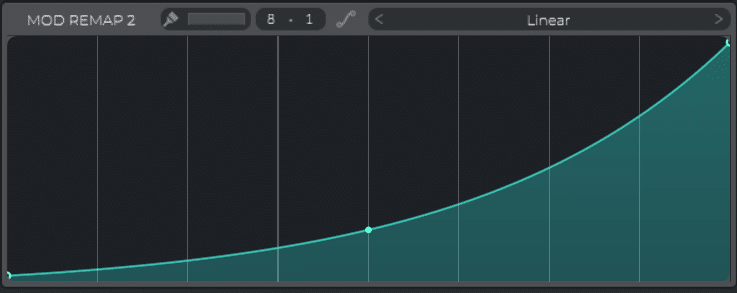
We gained’t go into extra particulars right here, however merely drawing new curves will make it apparent how the sound is affected.
The Superior View
I’ll admit that I don’t use the Superior settings that a lot, though there are a number of helpful options.
To mild up and Oscillator Choices part, merely activate mentioned oscillator. Solely the oscillators with greater than 1 voice may have the Oscillator Unison part enabled:
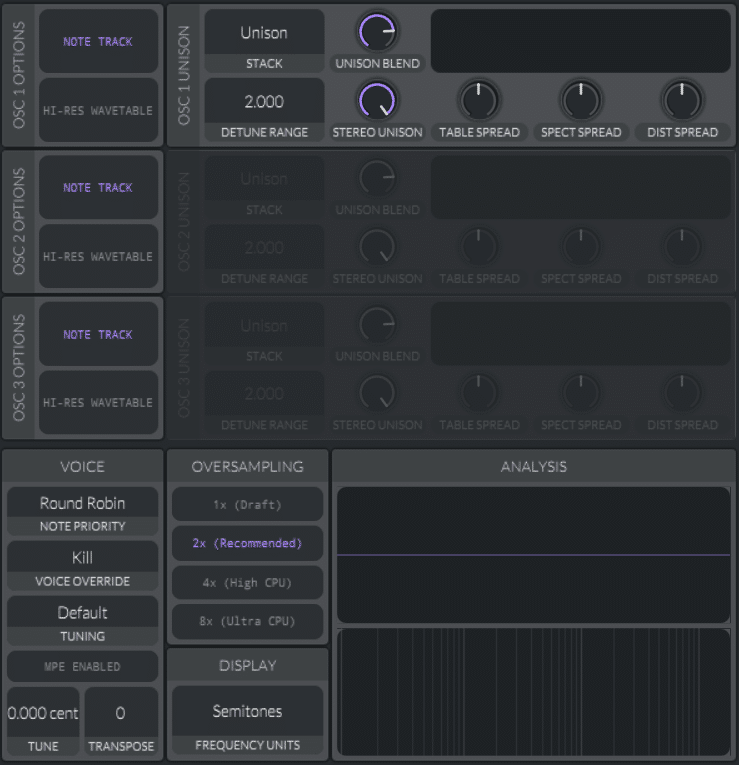
Stack permits you to determine how the totally different voices relate to one another when it comes to pitch.
Detune vary units the utmost quantity by which your voices shall be detuned.
Lastly, the Evaluation view provides you a visible illustration of your sound. First is an Oscilloscope, and the second is a Spectrum Analyzer:
Usually, you’ll alter these settings a couple of times to make Very important be just right for you. And then you definitely’ll in all probability by no means take a look at it once more ?
5 Ideas To Get The Most Out Of Very important
Earlier than I allow you to go, let’s go over some fast suggestions and hidden secrets and techniques in Very important.
Urgent CTRL to superb tune
When adjusting any parameter, maintain down CTRL to fine-tune the quantity. You may as well press ALT and click on on the parameter to enter a price straight.
Octave shifts
If you wish to shortly change the octave of an oscillator, merely maintain SHIFT when adjusting the pitch. It will transpose the pitch by increments of 12 semitones.
Utilizing LFOs as Macros
When you run out of macros, you should utilize an empty LFO as a macro. Merely set the LFO Frequency to Freeze, and use the LFO Section (the horizontal slider) because the macro knob.
Create Customized Reverb Tones with Refrain
You may really create customized reverb tones with simply the refrain impact. Give this a hear:
To attain this, set the refrain frequency to Freeze, and assign a distinct Random modulation to Depth, Delay 1, and Delay 2. By modulating the three parameters by very small quantities, you get a fantastic reverb tone!
Create Randomized Sequences that Keep in Key
You may mix the Random modulation and the Transpose Snap perform to create superb melodies. Let’s take a look.
First, set every oscillator’s pitch to transpose into the important thing of your mission:
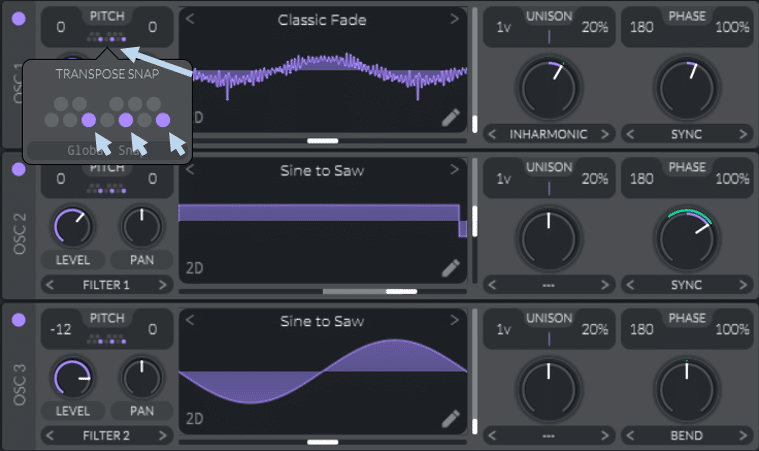
Subsequent, set a random modulation to Pattern and Maintain, and drag the modulation onto the Transpose parameter of every oscillator:
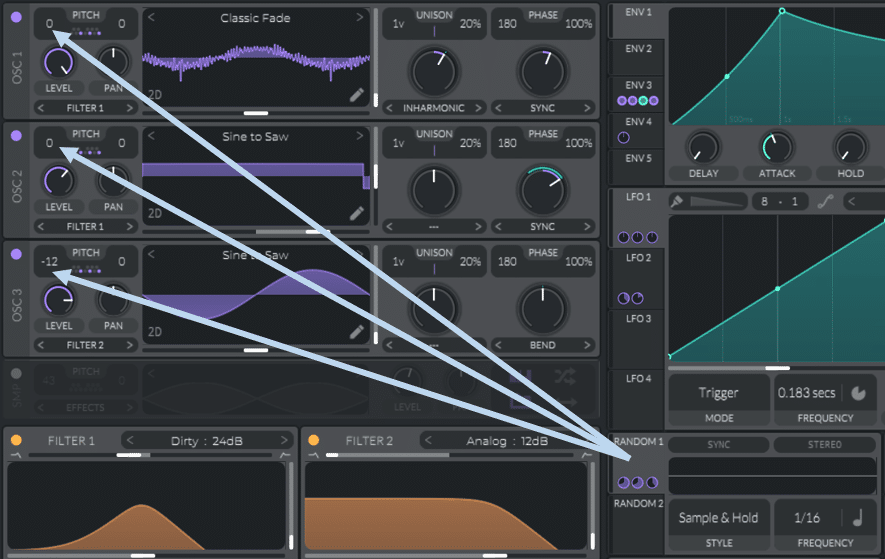
Now, all you should do is draw one lengthy C notice into your piano roll, and that is the consequence:
How cool is that? You may play with the modulation quantity of every oscillator, in addition to the frequency of the modulation to get superb outcomes.
That is good for re-sampling into an 8 bar-loop for instance.
Final Phrases
Hopefully, this may encourage you to start out designing your personal loopy sounds!
Did I miss out on something? Be at liberty to get in contact with me at [email protected]