In case you’re right here, it’s since you wish to learn to use FL Studio, proper? Wherein case, you’re in all probability a newbie to FL Studio, or to music manufacturing typically, proper?
Perhaps you’ve loaded up the FL Studio interface for the primary time, and have thought to your self: “How am I going to be taught all this…?”
I do know as a result of I additionally began on FL Studio a few years in the past – and have felt the very same method. However don’t fear, this is the reason we’ve put this information collectively! Collectively, we’re going to break down the principle options of FL Studio to get you making music within the least time potential.
However first, in case you’re a brand new producer, studying your DAW is barely step one. You want a complete information for studying digital music.
That’s why we created our FREE eBook – How To Make Digital Music. You’ll be able to obtain it beneath.
Observe: We will likely be utilizing the FL Studio 21 Producer Version for this information.
How you can Use FL Studio: Introduction 👋
For many of you, FL Studio will look one thing like this whenever you first load it up:
The very first thing to find out about FL Studio is that each one the home windows could be moved round.
That’s the great thing about this DAW – it’s infinitely customizable, particularly compared to its arch-nemesis, Ableton Dwell. Nothing is mounted, moreover the toolbar throughout the highest of the display.
Once I clarify the interface and how one can use FL Studio for freshmen, I like to interrupt it down into 5 completely different sections:
- The Playlist
- The Piano Roll
- The Channel Rack
- The Mixer
- The Browser
These 5 completely different views could be accessed from the highest of the window:

In case you’re not sure what you’re in regards to the click on, test the Assist window on the high left! Altogether, these 5 sections cowl 99% of the capabilities you’ll use in FL Studio. Let’s shortly go over what every of them does earlier than diving deeper.
Exploring FL Studio’s 5 Essential Sections
The Playlist (or Association view) is the place you prepare your whole monitor. That is the place you’ll drag your varied musical and beat patterns, audio samples and automation:

The Piano Roll is the place you write your melodies and chord progressions. Each time you load up a synth (like Serum or Important), a devoted Piano Roll will likely be obtainable:

Subsequent, the Channel Rack is the place your completely different devices and automation are held. That is the place you create patterns (like an epic chord development or a drum beat) earlier than dragging them into the playlist:

The Mixer is the place you course of your sounds with results like reverb, delay and saturation. You’ll be able to hyperlink a number of devices and sounds to the identical mixer monitor if you want:

Lastly, the Browser is the place you’ll seek for samples and MIDI scores:

Nice! We now know how one can entry the 5 most necessary sections of FL Studio. However earlier than diving deeper into every of them, let’s shortly cowl some primary controls included within the Device Bar (the highest part of FL Studio).
The Device Bar is high part of FL Studio. Though there’s a little bit of customization potential, this a part of FL Studio is generally mounted:

I gained’t cowl each single button right here, however let’s go over those you’ll use essentially the most typically.
Transport Controls
Within the centre, you’ll discover your transport part: play, cease, report and tempo. These needs to be fairly self-explanatory:

On this part, you’ll see two choices: Pat and Track. This lets you change between enjoying what’s within the Channel Rack and what’s within the Playlist. Switching between them lets you transfer between sketching out concepts to creating a full monitor.
Proper-clicking the Document button allows you to change between recording modes.
The 2 most typical recording modes you’ll use are :
- Notes: play your MIDI keyboard, and the notes will likely be recorded into the Piano Roll.
- Audio: something you play (MIDI or an instrument you plug into your audio interface like a microphone) will likely be recorded as an audio clip.
Further World Controls
Subsequent to the tempo are some extra world controls. I’ve highlighted those you’ll use essentially the most:

On the high proper, you’ll be able to allow or disable the metronome.
Subsequent is the “typing keyboard to piano keyboard” mode. This allows you to use your keyboard as a piano in case you don’t have any MIDI controller. Lastly, the “Multilink to controllers” allows you to hyperlink parameters to your MIDI keyboard and create automations simply.
Essential Snap
Beneath, you’ve a common snap management. This determines the snapping of the grids throughout the piano roll and playlist:

Snapping mainly retains every little thing quantized in time (to a particular interval) throughout your music. For instance, in order for you your audio clips to snap to the closest beat, choose “Beat” within the Essential Snap.
Visualizers
Lastly, a bunch of various visualizers allow you to perceive what’s going on in your tune:

Particularly, we’ve got:
- Track place. This tells you the place you’re in your tune (could be set in seconds or bars).
- Spectogram. Provides you a tough indication of the frequency spectrum of what’s enjoying.
- Peak Meter. Provides you a sign of the general stage (in dB) of your monitor.
- CPU load. A brilliant useful gizmo in case you don’t have a really highly effective pc. The nearer you attain 100%, the extra the sound will begin to glitch. Double-click on the window to see the plugins which might be consuming essentially the most sources.
How you can Use FL Studio: The Browser 🔍
FL Studio’s Browser is the place all of your materials comes from, whether or not its samples, presets or devices:

Think about you’re a craftsman: you’ve uncooked supplies like leather-based, steel and wooden to work with. You’ve additionally acquired your toolbox, all of the instruments you utilize to make issues.
That is what the browser is for music producers in FL Studio. By default, there are fairly a couple of completely different folders. Let’s not fear about all of them, let’s as an alternative take a look at the principle ones.
In FL Studio 21, the browser has been re-organized with a couple of tabs on the high. If you wish to add a browser menu that you simply use rather a lot to the tabs, simply right-click on it and choose “Open in new tab”.
Present Venture
Both by navigating to this folder, or clicking on the paper icon on the high, you’ll arrive on the Present Venture folder:

This can present you all sounds, automation clips, actions, something finished within the present mission.
That is helpful for locating materials you’ve acquired with out having to sift by completely different home windows.
Plugin Database
Much like how Present Venture works, you’ll be able to open the Plugin Database window in the principle view, or by clicking on the ‘plug’ icon on the high proper of the Browser window.
This can present you all impact and generator (a elaborate method of claiming instrument) plugins. Any third-party VSTs or plugins you add will present up right here too. Nonetheless, more often than not you’ll be loading results immediately by way of the Mixer, and devices immediately within the Channel Rack. So that you gained’t be utilizing this menu typically.
Wish to Add Your Personal Pattern Packs to the Browser?
Let’s be sincere, most individuals are going to wish to add their very own samples to the browser.
So to do this, the very best factor to do is to go to Choices > File Settings > Browse Additional search folders.
There, choose the folder the place your samples are situated:

Now your samples folder will seem within the ‘Browser’ window.
Trying to find Samples
On the backside of the browser is a brilliant useful gizmo known as the “search bar”:

This lets you immediately scan your whole samples library for a particular time period. FL Studio will then filter any pattern or folder with that key phrase in it.
How you can Use FL Studio: The Channel Rack 🔊
If the Browser is your toolbox and supplies, then the Channel Rack is your workbench. Right here is the place you can also make patterns and convey concepts to life:

Arguably, that is crucial a part of FL Studio, and it’s a big a part of what units it aside from different DAWs available on the market.
Channel Rack Fundamentals
By default, FL Studio’s Channel Rack masses up with 4 inventory sounds: Kick, Clap, Hat and Snare. To create a beat, merely fill within the steps by clicking on them:

Superior! You’ve simply created your first beat! That is what it feels like:
To add a step, left click on on the field. You may also drag throughout so as to add a number of. To delete a step, proper click on on a field (additionally with the choice of additionally dragging).
You’ll be able to right-click on any channel to open up a context menu. Inside this menu, essentially the most helpful choices are:
- Rename. By default, a channel will take the identify of the pattern or plugin you load. Rename a channel to one thing that’s clearer for you.
- Clone. Duplicate a channel if you wish to create layers.
- Delete. Self-explanatory 😅
To switch a pattern by one other down, merely drag it over:

You may also drag a pattern into a brand new slot beneath, which is able to routinely create a brand new channel. Or you’ll be able to add a brand new channel by clicking the “+” icon on the backside.
Step Sequencer vs. Piano Roll
The important thing a part of the channel rack is the step sequencer, and this lets you shortly sketch out concepts. That is what we coated within the earlier part: filling out steps to create a beat.
Nonetheless, how does the channel rack work for melodic concepts? That is the place the Piano Roll is available in.
Let’s say you’ve loaded up FL Keys by urgent the “+” icon:

Proper-click on the channel and choose “Piano Roll”. This can open up the Piano Roll, the place you’ll be able to then write out your chords and melodies. No matter you write will then present up within the channel rack:

Further Channel Rack Controls
In case you deliver your consideration to the left facet, you’ll discover a couple of further knobs and buttons:

So as, we’ve got:
- Mute / solo button. The inexperienced LED determines whether or not the channel is on or not. Left-click to show them on and off. Or right-click and choose “Solo” to solo a channel.
- Panning and quantity. Two knobs controls the panning and quantity of every channel.
- Mixer Routing. Signifies to which mixer monitor the channel is shipped (extra on the mixer later).
The quantity on the high proper determines the size of the sample (in 1/sixteenth notes), which is 16 by default. The knob subsequent to that determines the swing quantity, which is a form of timing impact that alters the notes to sound extra human and groovy-sounding.
How you can Use FL Studio: The Piano Roll 🎹
We’ve touched on the Piano Roll briefly when speaking in regards to the Channel Rack. However let’s dive a bit deeper now.
In essence, the Piano Roll will allow you to write melodies, chords and extra advanced rhythms and patterns.
FL Studio is famed for its unbelievable piano roll, and the sleek performance it has to supply. Significantly, simply strive placing in a few notes and also you’ll be in love.
FL Studio Piano Roll Fundamentals
The identical method you draw steps on the step sequencer is similar within the piano roll, however you’ve the choice of clicking and dragging up, down, left and proper to alter timing and pitch:

The fundamental controls you have to listed here are:
- Left-click: add a notice. The notice will routinely snap to the grid.
- Proper-click: take away a notice.
- Click on-and-drag to maneuver a notice left-right or up-down.
- Click on-and-drag the tip of a notice to alter its period.
- Maintain CTRL + left-click to pick a number of notes and alter them.
Down the underside, you’ve the speed for every notice. You’ll be able to left-click and drag to regulate these values, in addition to choose an possibility from the Management dropdown menu to alter what’s being altered.
FL Studio Piano Roll Instruments
Past that, the Piano Roll practically has sufficient performance to be its personal program.
We gained’t go into heaps of depth right here, however we are going to unpack a couple of of the important thing options to get you

- Draw: attract notes and transfer them round
- Paint: paint in notes and repeat them (by dragging)
- Paint (Sequencer): paint in steps and repeat them (by dragging)
- Delete: take away notes by clicking on them
- Mute: deactivate sure notes by clicking on them
- Slice: break notes into a number of components by clicking and dragging a line
- Choose: click on and maintain to pick a bunch of notes
- Zoom: click on to zoom in on all notes, click on and drag to zoom into a particular space
- Playback: one in all my favorite options, lets you hear what notes are enjoying at a given time by clicking
There’s much more to the Piano Roll then this, however this needs to be sufficient to get you began. If you wish to go one step additional, you’ll be able to discover our devoted information right here.
For now, let’s transfer on the the Playlist
How you can Use FL Studio: The Playlist ⏯️
So that you’ve made some patterns within the Channel Rack and wish to make them right into a full monitor? The Playlist view is designed to do exactly that:

On the left within the Picker. That is the place you’ll be able to choose patterns, audio clips or automations and drag them into the Playlist.
You’ll be able to place these in any monitor, which is the great thing about FL Studio. There isn’t a selected method you need to construction patterns.
You may also drag in audio samples immediately into the Playlist and construction them nonetheless you need, with out having to load them right into a sampler and play them with notes first. Moreover, any automation clips you create will seem right here, which is one thing we are going to get into within the final part.
Much like the channel rack, there are a selection of tracks you’ll be able to drag clips onto. The peak of those tracks could be resized, and you’ll flip them on and off by left-clicking on them and soloing sure tracks by right-clicking. Every monitor will also be renamed and coloured for readability:

Playlist Instruments
A lot of the instruments and controls from the Piano Roll are relevant right here too (right-click so as to add, left-clicking to take away and so on.).
Some further instruments which you would possibly discover helpful:
- Slice: allows you to minimize up any sample or audio clip.
- Slip: allows you to transfer the content material of every clip with out affecting the beginning and finish instances (actually helpful for including fascinating rhythms and timing)
- Time Markers: press CTRL + T so as to add a time marker, serving to you construction your monitor.
How you can Use FL Studio: The Mixer 🎚️🎚️🎚️
After getting your sounds organized the way you need, the mixer is the place all of the magic occurs with processing:

Personally, the mixer is one in all my favorite instruments for artistic sound design, due to the processing and routing capabilities. So, let’s begin with the principle options.
Every channel will likely be assigned to a mixer monitor from the Channel Rack, as per the quantity we mentioned earlier. If not, you’ll be able to choose a quantity to route it to.
On the principle interface, you’ll be able to see all of the mixer channels, and the grasp channel on the far left.
The meter on the far left signifies the extent of your whole monitor, whereas the small meters alongside the monitor point out the extent of every monitor:
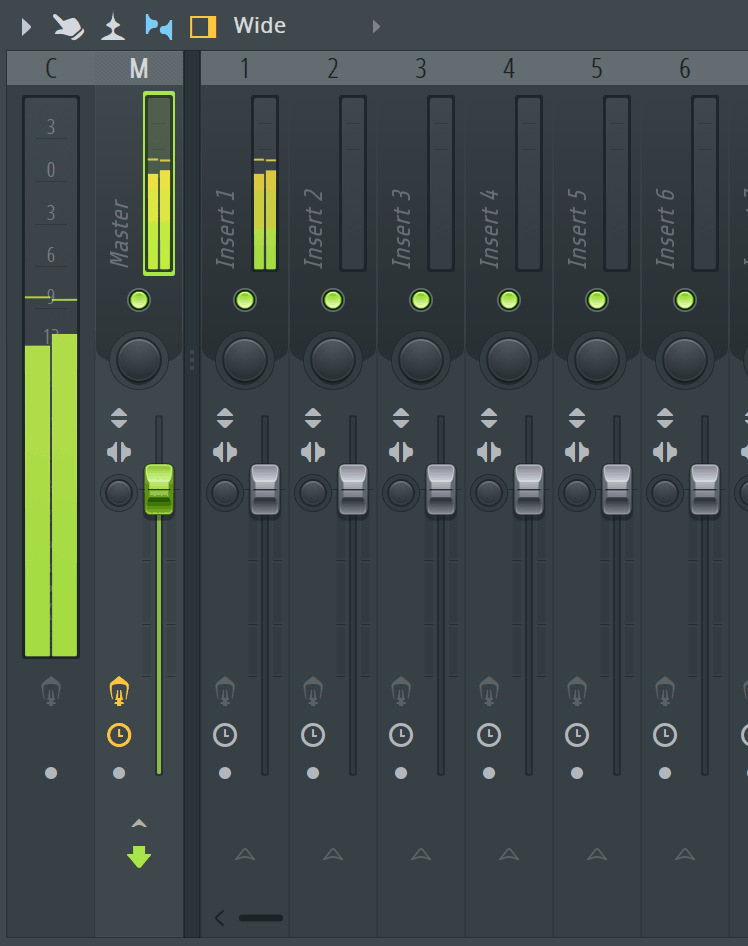
For every monitor, you’ve:
- a mute change
- a quantity fader
- pan controls (for shifting a sound left or proper)
- stereo imager (for making issues sound extra stereo or mono).
These are your 4 important instruments for mixing. A lot of the combine work will likely be on the quantity faders, balancing the person ranges of sounds to make them mix properly collectively.
Including Results
That is the place the actual enjoyable begins 😍

The inserts on the precise are the place all of your results are added to course of every mixer monitor. Down the underside, you’ve a primary EQ to fiddle with, however the slots above are the place you’ll be able to add a few of FL’s built-in impact plugins, or third-party ones.
Merely left-click on the slot to open up a menu to pick from the number of plugins. There are various right here to make use of, however a number of the important and extra sensible ones are:
Every of those requires a lesson on how the assorted FX sorts works, so click on the above hyperlinks to see some nice sources on these.
How you can Use FL Studio: Settings and Different Options ⚙️
Now these are the 5 important sections of FL Studio, however there are some key options past this that can allow you to to start out creating music.
Plugins
If you wish to add plugins (and be cautious of this in case you are a brand new producer), then comply with the following steps to start including them.
Firstly, you’ll wish to head to the Choices > File Settings once more and click on on Handle plugins. This can deliver up a brand new window with quite a lot of choices.
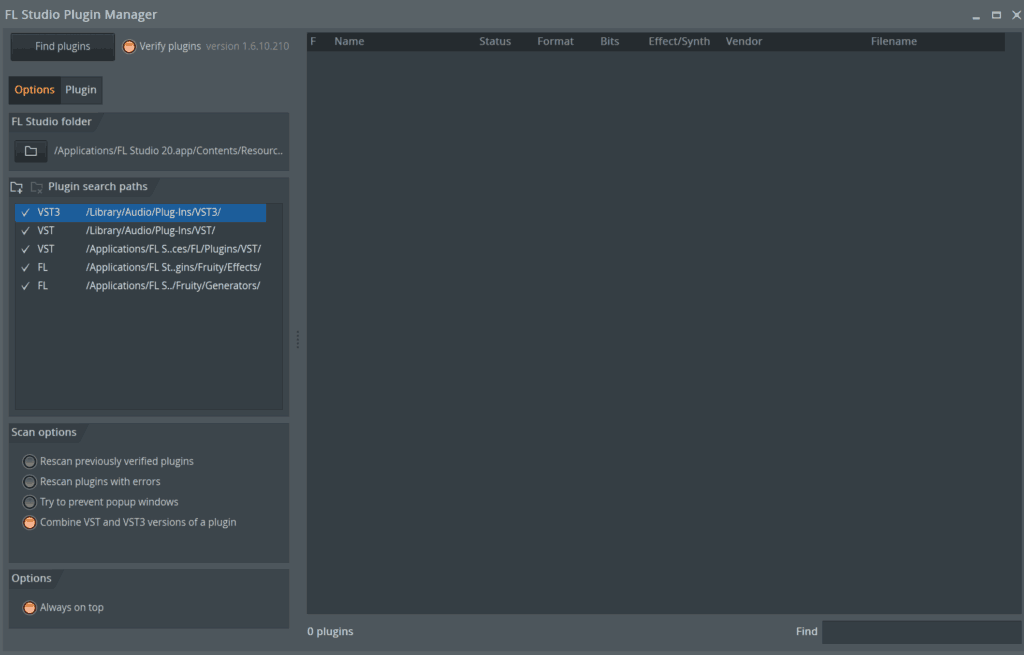
FL Studio is aware of how one can discover plugins fairly nicely, so click on on the Discover plugins button within the high left.
Wait a bit whereas it scans by your pc (you would possibly wish to make your self a espresso in case you have loads of plugins). When you’re finished, it would checklist out all plugins you’ve acquired put in. In case you’re tremendous indie and wish so as to add a customized folder to scan, click on on the plus folder icon within the high proper of the Plugin search paths space. Merely navigate and select a folder.
When you’re finished, depart the Plugin Supervisor and go to the Browser > Plugin database and they’ll all be there. If you load it up, in order for you it to look alongside the checklist of FL Studio plugins, merely click on on the menu within the high left and choose Add to plugin database.
If you go so as to add results within the mixer or turbines within the Channel Rack, they’ll all be there!
Automation
One of the vital highly effective instruments within the arsenal of the fashionable digital music producer – automation.
An automation mainly lets you automate any parameter you need over time. For instance, you would automate the quantity of a Piano, or improve the reverb of a percussion. The one limitation is your creativeness!
We’ve acquired a full information on automation right here, however right here’s the TL;DR.
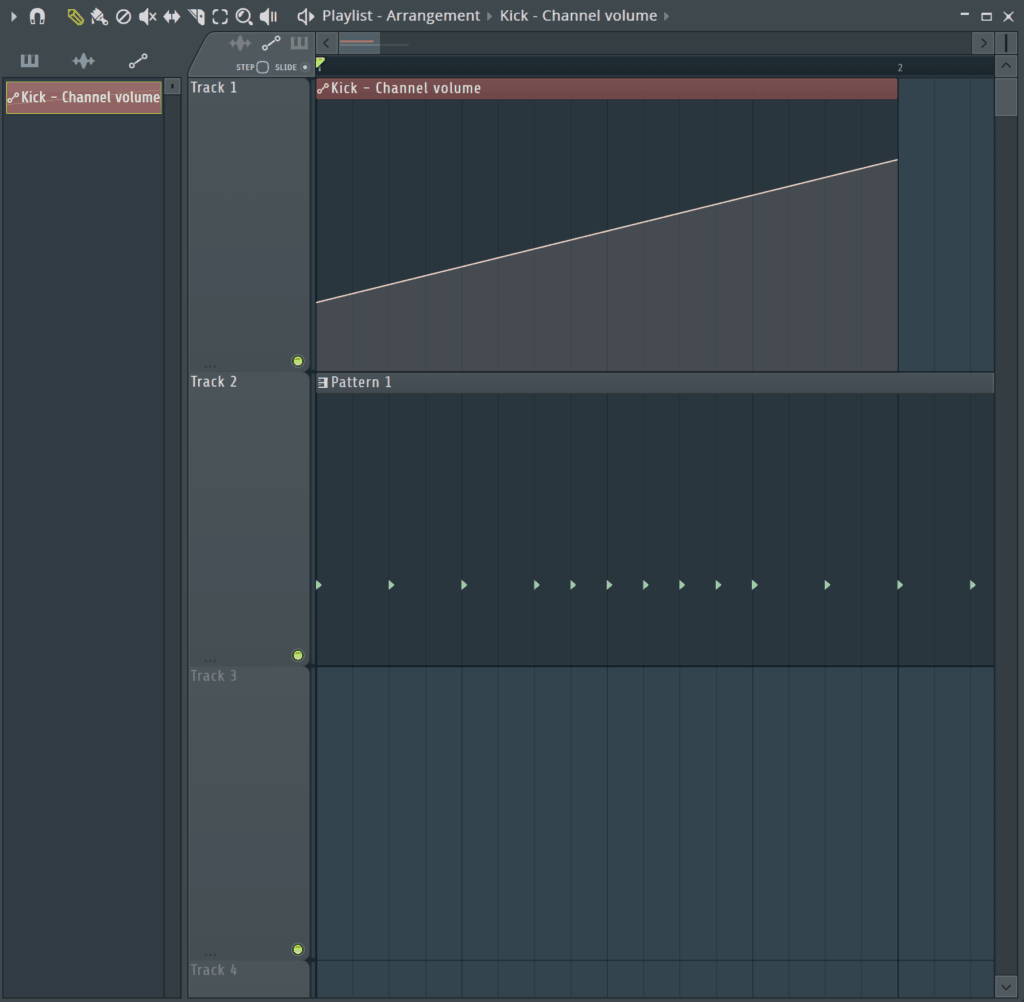
If you end up enjoying round with any management in FL Studio and/or any of the native plugins, merely proper click on on it and choose ‘Create Automation Clip’. Within the Playlist, a brand new clip will seem with a line, describing the management that you simply simply automated.
Then, right-click on the road anyplace so as to add an automation level, and left click on to maneuver it round. Discover it would snap to the present grid, which is neat.
In case you right-click on a particular automation level, you’ll be able to change the curve kind, which is tremendous enjoyable to mess around with.
Edison
Now in case you are used to utilizing one other DAW, you then is perhaps asking the place the bouncing and audio processing performance is at.
In case you’re not, that final sentence made you very confused. Both method, let’s check out Edison and what it does:
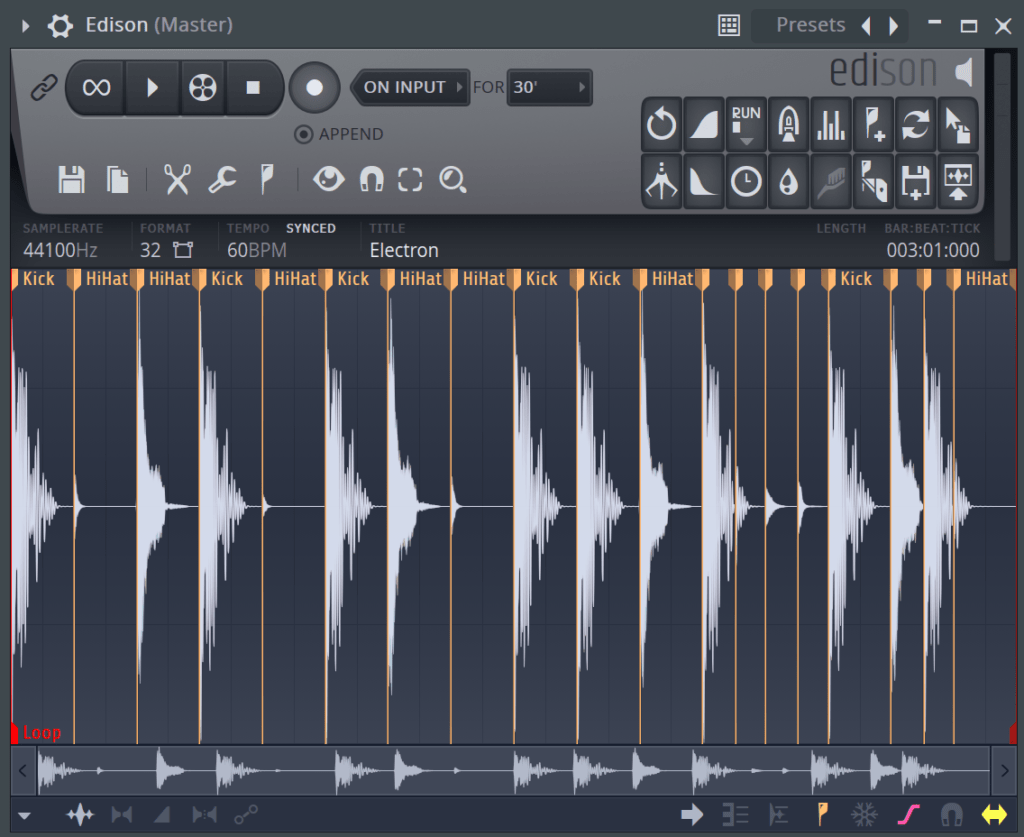
Edison is FL Studio’s audio recorder, processor, manipulator, no matter you wish to name it. You’ll be able to load it up on a slot within the insert FX space of the mixer.
Observe: Usually it’s finest to place it on the grasp channel so it doesn’t get misplaced, as by itself it’s not a typical ‘impact’ and capabilities extra as a approach to report audio for the aim of resampling it again into your monitor. That being mentioned, if you wish to put it on a person monitor, go forward.
Strive dragging in a pattern from the browser into the big pattern space on the backside, or clicking report and recording one thing from the monitor.
There’s a myriad of processing capabilities in Edison. We gained’t get into them on this information, and we in all probability will get round to doing a full Edison tutorial at one level, however simply realize it’s there and be at liberty to experiment.
Export
Now the very last thing you’re in all probability desirous to know – how one can really export your monitor when you’re finished. As a result of ending music is the purpose, proper?
Effectively, let’s have a look. Navigate to the highest toolbar and click on the save icon with the wave beneath it, or just press CTRL + R.
After selecting the place to export, the next window will come up.
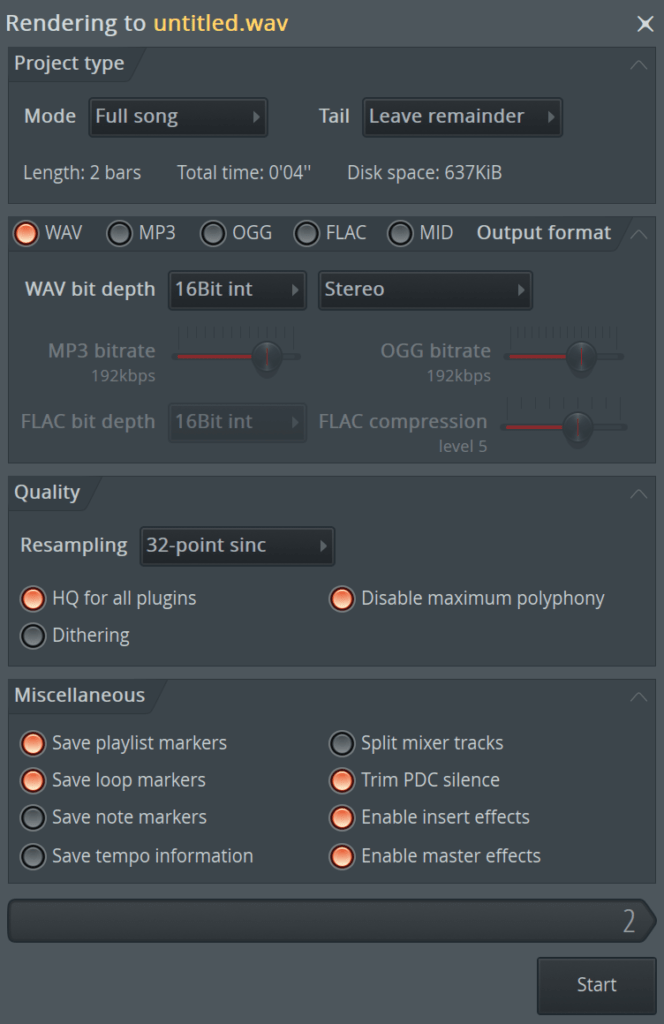
There’s rather a lot to soak up right here, however let’s discuss over the important thing issues to recollect.
- Be sure Mode is ready to Full tune to export all the association
- Choose the specified format within the second part. MP3 exporting will provide you with further choices like bitrate and so on.
- Be sure all the opposite settings are set like above for the standard export
- Additionally, saving tempo data will write the BPM to the file tags
After that, hit begin and watch your masterpiece export.
How About Really Making Music? 🤗
You is perhaps questioning how one can use all these methods to really begin making music.
In reality, once I began producing, I didn’t have the faintest concept of how one can make good music, whilst I discovered how the instruments labored.
In that case, you’re in all probability going to wish somebody to information you thru the method of singing, possibly even a number of songs.
That’s the place EDM Foundations is available in. Now despite the fact that we’ve had 2000+ college students do that course up to now, we’ve by no means launched an FL Studio model.
Till now. You’ll be taught the basics by creating 4 tracks in several types, all inside FL Studio. Test it out.
Find Out More
That’s It for This Information on How you can Use FL Studio
So, that’s various data. Hopefully we have been ready that can assist you get off that floor and begin utilizing FL Studio. Do you’ve any questions? Something on this information that was unclear? Be happy to achieve out to make use of at [email protected]